supermerger-web-ui
Science Score: 54.0%
This score indicates how likely this project is to be science-related based on various indicators:
-
✓CITATION.cff file
Found CITATION.cff file -
✓codemeta.json file
Found codemeta.json file -
✓.zenodo.json file
Found .zenodo.json file -
○DOI references
-
✓Academic publication links
Links to: arxiv.org -
○Academic email domains
-
○Institutional organization owner
-
○JOSS paper metadata
-
○Scientific vocabulary similarity
Low similarity (10.3%) to scientific vocabulary
Repository
Basic Info
- Host: GitHub
- Owner: BenevolenceMessiah
- License: agpl-3.0
- Language: Python
- Default Branch: master
- Size: 34.2 MB
Statistics
- Stars: 0
- Watchers: 1
- Forks: 0
- Open Issues: 0
- Releases: 0
Metadata Files
README.md
Supermerger Web UI
A web interface for Supermerger, implemented using Gradio library and powered locally on the backend via Stable Diffusion.
Overview
This implementation is for a comprehensice and all-encompassing workflow concerning AI models, LoRAs, and even the manipulation of their weights. Notably, this application allows merged models to be loaded as models for image generation without saving them.This in turn significantly improves the efficiency of model merging by eliminating the need for saving and loading the model and by generating continuously while changing ratios.
Index/Features
How to Use
Merge Models
The model merged here is loaded as a generation model for the Web-UI. The model display on the top left does not change, but the merged model is indeed loaded. The merged model will remain loaded until a different model is selected from the model selection on the top left.
Basic Usage
Select models A/B/(C), the merge mode, and alpha (beta), then press Merge/Merge and Gen to start the merging process. In the case of Merge and Gen, generation is carried out using the prompt and other settings specified in txt2img.The Gen button only generates images, and the Stop button interrupts the merging process.
Load Settings From:
Read settings from merge log. The log is updated each time a merge is performed, and a sequential ID starting from 1 is assigned. "-1" corresponds to the settings from the last merge, and "-2" is for the one before last. The merge log is saved in extension/sd-webui-supermerger/mergehistory.csv. You can browse and search in the History tab. You can search and/or by separating with a half-width space.
Clear Cache
If the model cache function of the Web-UI is enabled, SuperMerger will create a model cache to speed up continuous merging. During this process, the model is cached separately from the Web-UI's cache function. Please use this button to delete the cache after use. The cache is created in RAM, not VRAM.
Merge mode
Weight sum $(1-\alpha) A + \alpha B$
Normal merge. Alpha is used. If MBW is enabled, MBW base is used as alpha.
Add difference $A + \alpha (B-C)$
Add difference, if MBW is enabled, MBW base is used as alpha
Triple sum $(1-\alpha - \beta) A + \alpha B + \beta C$
Merge 3 models at the same time. alpha and beta are used. I added this function because there were three model selection windows, but I am not sure if it works effectively.
sum Twice $(1-\beta)((1-\alpha)A+\alpha B)+\beta C$
Weight sum twice, alpha and beta are used.
calcmode
You can set the calculation method. Please refer to here for details on each calculation method. Refer to the table below for the correspondence between the calculation method and Merge Mode. | Calcmode | Description | Merge Mode | |----|----|----| |normal | Normal calculation method | ALL | |cosineA | Calculate to minimize loss during merging, using ModelA as the reference. | Weight sum | |cosineB | Calculate to minimize loss during merging, using ModelB as the reference. | Weight sum | |trainDifference |'Trains' that difference as if it was finetuning it relative to model A | Add difference | |smoothAdd | Add difference that mixes the benefits of Median and Gaussian filters | Add difference | |smoothAdd MT| Calculate using multi-threading to speed up. | Add difference | |extract | Merge the common and uncommon parts between models B and C. | Add difference | |tensor| Instead of sum, exchange the tensors themselves at a certain ratio. | Weight sum | |tensor2 |When the tensor has a large number of dimensions, exchanges are performed based on the second dimension. | Weight sum | |self | The weight is multiplied by alpha. | Weight sum |
use MBW
Block-by-blockc merging is enabled. Please set the weights in the Merge Block Weight. Enabling this will disable alpha and beta.
Options
| Options | Description | |-----------------|---------------------------------------------------| | save model | Saves the model after merging. | | overwrite | Enables overwriting of the model. | | safetensors | Saves in safetensors format. | | fp16 | Saves in half-precision. | | save metadata | Saves merge information in metadata upon saving.(safetensors only) | | prune | Removes unnecessary data from the model when saving. | | Reset CLIP ids | Resets the CLIP ids. | | use old calc method | Use old calculation method | | debug | Outputs debug information to CMD. |
save merged model ID to
You can choose whether to save the Merge Id to the generated image or PNG info.
Additional Value
Currently, it is only effective when 'extract' is selected in calcmode.
Custom Name (Optional)
You can set the model name. If not set, it will be determined automatically.
Bake in VAE
When saving the model, the selected VAE is incorporated into the model.
Save current Merge
Saves the currently loaded model. This is effective when merging takes time due to PC specifications or other issues.
Merge Block Weight
This is a merging technique where you can set the ratio block-by-block. Since each block may correspond to background depiction, characters, art style, etc., you can create a variety of merged models by changing the ratio for each block. The blocks vary depending on the version of SD, and there are blocks such as the following. BASE refers to the text encoder, which affects things like responses to prompts. IN-OUT refers to the U-Net, which is responsible for image generation.
Stable diffusion 1.X, 2.X
|1|2|3|4|5|6|7|8|9|10|11|12|13|14|15|16|17|18|19|20|21|22|23|24|25|26|
|-|-|-|-|-|-|-|-|-|-|-|-|-|-|-|-|-|-|-|-|-|-|-|-|-|-|
|BASE|IN00|IN01|IN02|IN03|IN04|IN05|IN06|IN07|IN08|IN09|IN10|IN11|MID|OUT00|OUT01|OUT02|OUT03|OUT04|OUT05|OUT06|OUT07|OUT08|OUT09|OUT10|OUT11|
Stable diffusion XL |1|2|3|4|5|6|7|8|9|10|11|12|13|14|15|16|17|18|19|20| |-|-|-|-|-|-|-|-|-|-|-|-|-|-|-|-|-|-|-|-| |BASE|IN00|IN01|IN02|IN03|IN04|IN05|IN06|IN07|IN08|MID|OUT00|OUT01|OUT02|OUT03|OUT04|OUT05|OUT06|OUT07|OUT08|
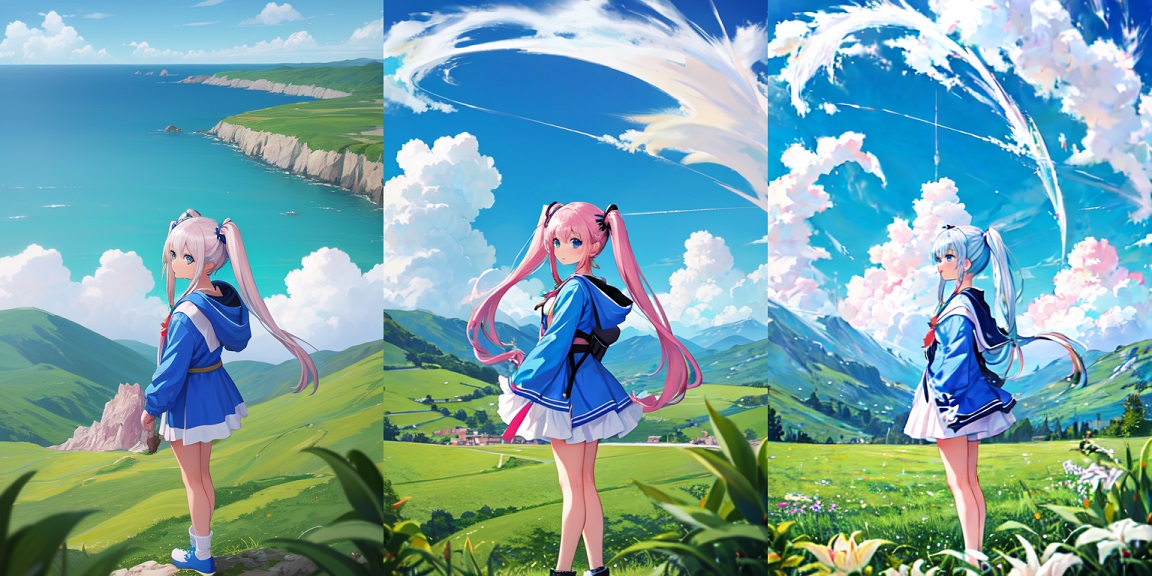
XYZ Plot
Performs sequential merge image generation. Effective in all merge modes.
alpha, beta
Change alpha and beta.
alpha and beta
Change alpha and beta at the same time. Separate alpha and beta with a single space, and separate each element with a comma. If only one number is entered, the same value is entered for both alpha and beta.
Example: 0, 0.5 0.1, 0.3 0.4, 0.5
MBW
Performs a block-byblock merge. Enter ratios separated by newlines. Presets can be used, but be careful to separate on a new line.For Triple and Twice, enter two lines as a set. An odd number of lines will result in an error.
seed
Changes the seed. Entering -1 will result in a fixed seed in the opposite axis direction.
model_A, B, C
Changes the model. The model selected in the model selection window is ignored.
pinpoint blocks
Changes only specific blocks in MBW. Choose alpha or beta for the opposite axis. If you enter a block ID, the alpha (beta) will change only for that block. As with the other types, use commas to separate them. Multiple blocks can be changed at the same time by separating them with a space or hyphen. NOT must be entered first to have any effect.
Input example
IN01, OUT10 OUT11, OUT03-OUT06, OUT07-OUT11, NOT M00 OUT03-OUT06
In this case: - 1:Only IN01 changes - 2:OUT10 and OUT11 change - 3:OUT03 to OUT06 change - 4:OUT07 to OUT11 change - 5:All except for M00 and OUT03 to OUT06 are changed.
Please be careful not to forget to input "0".
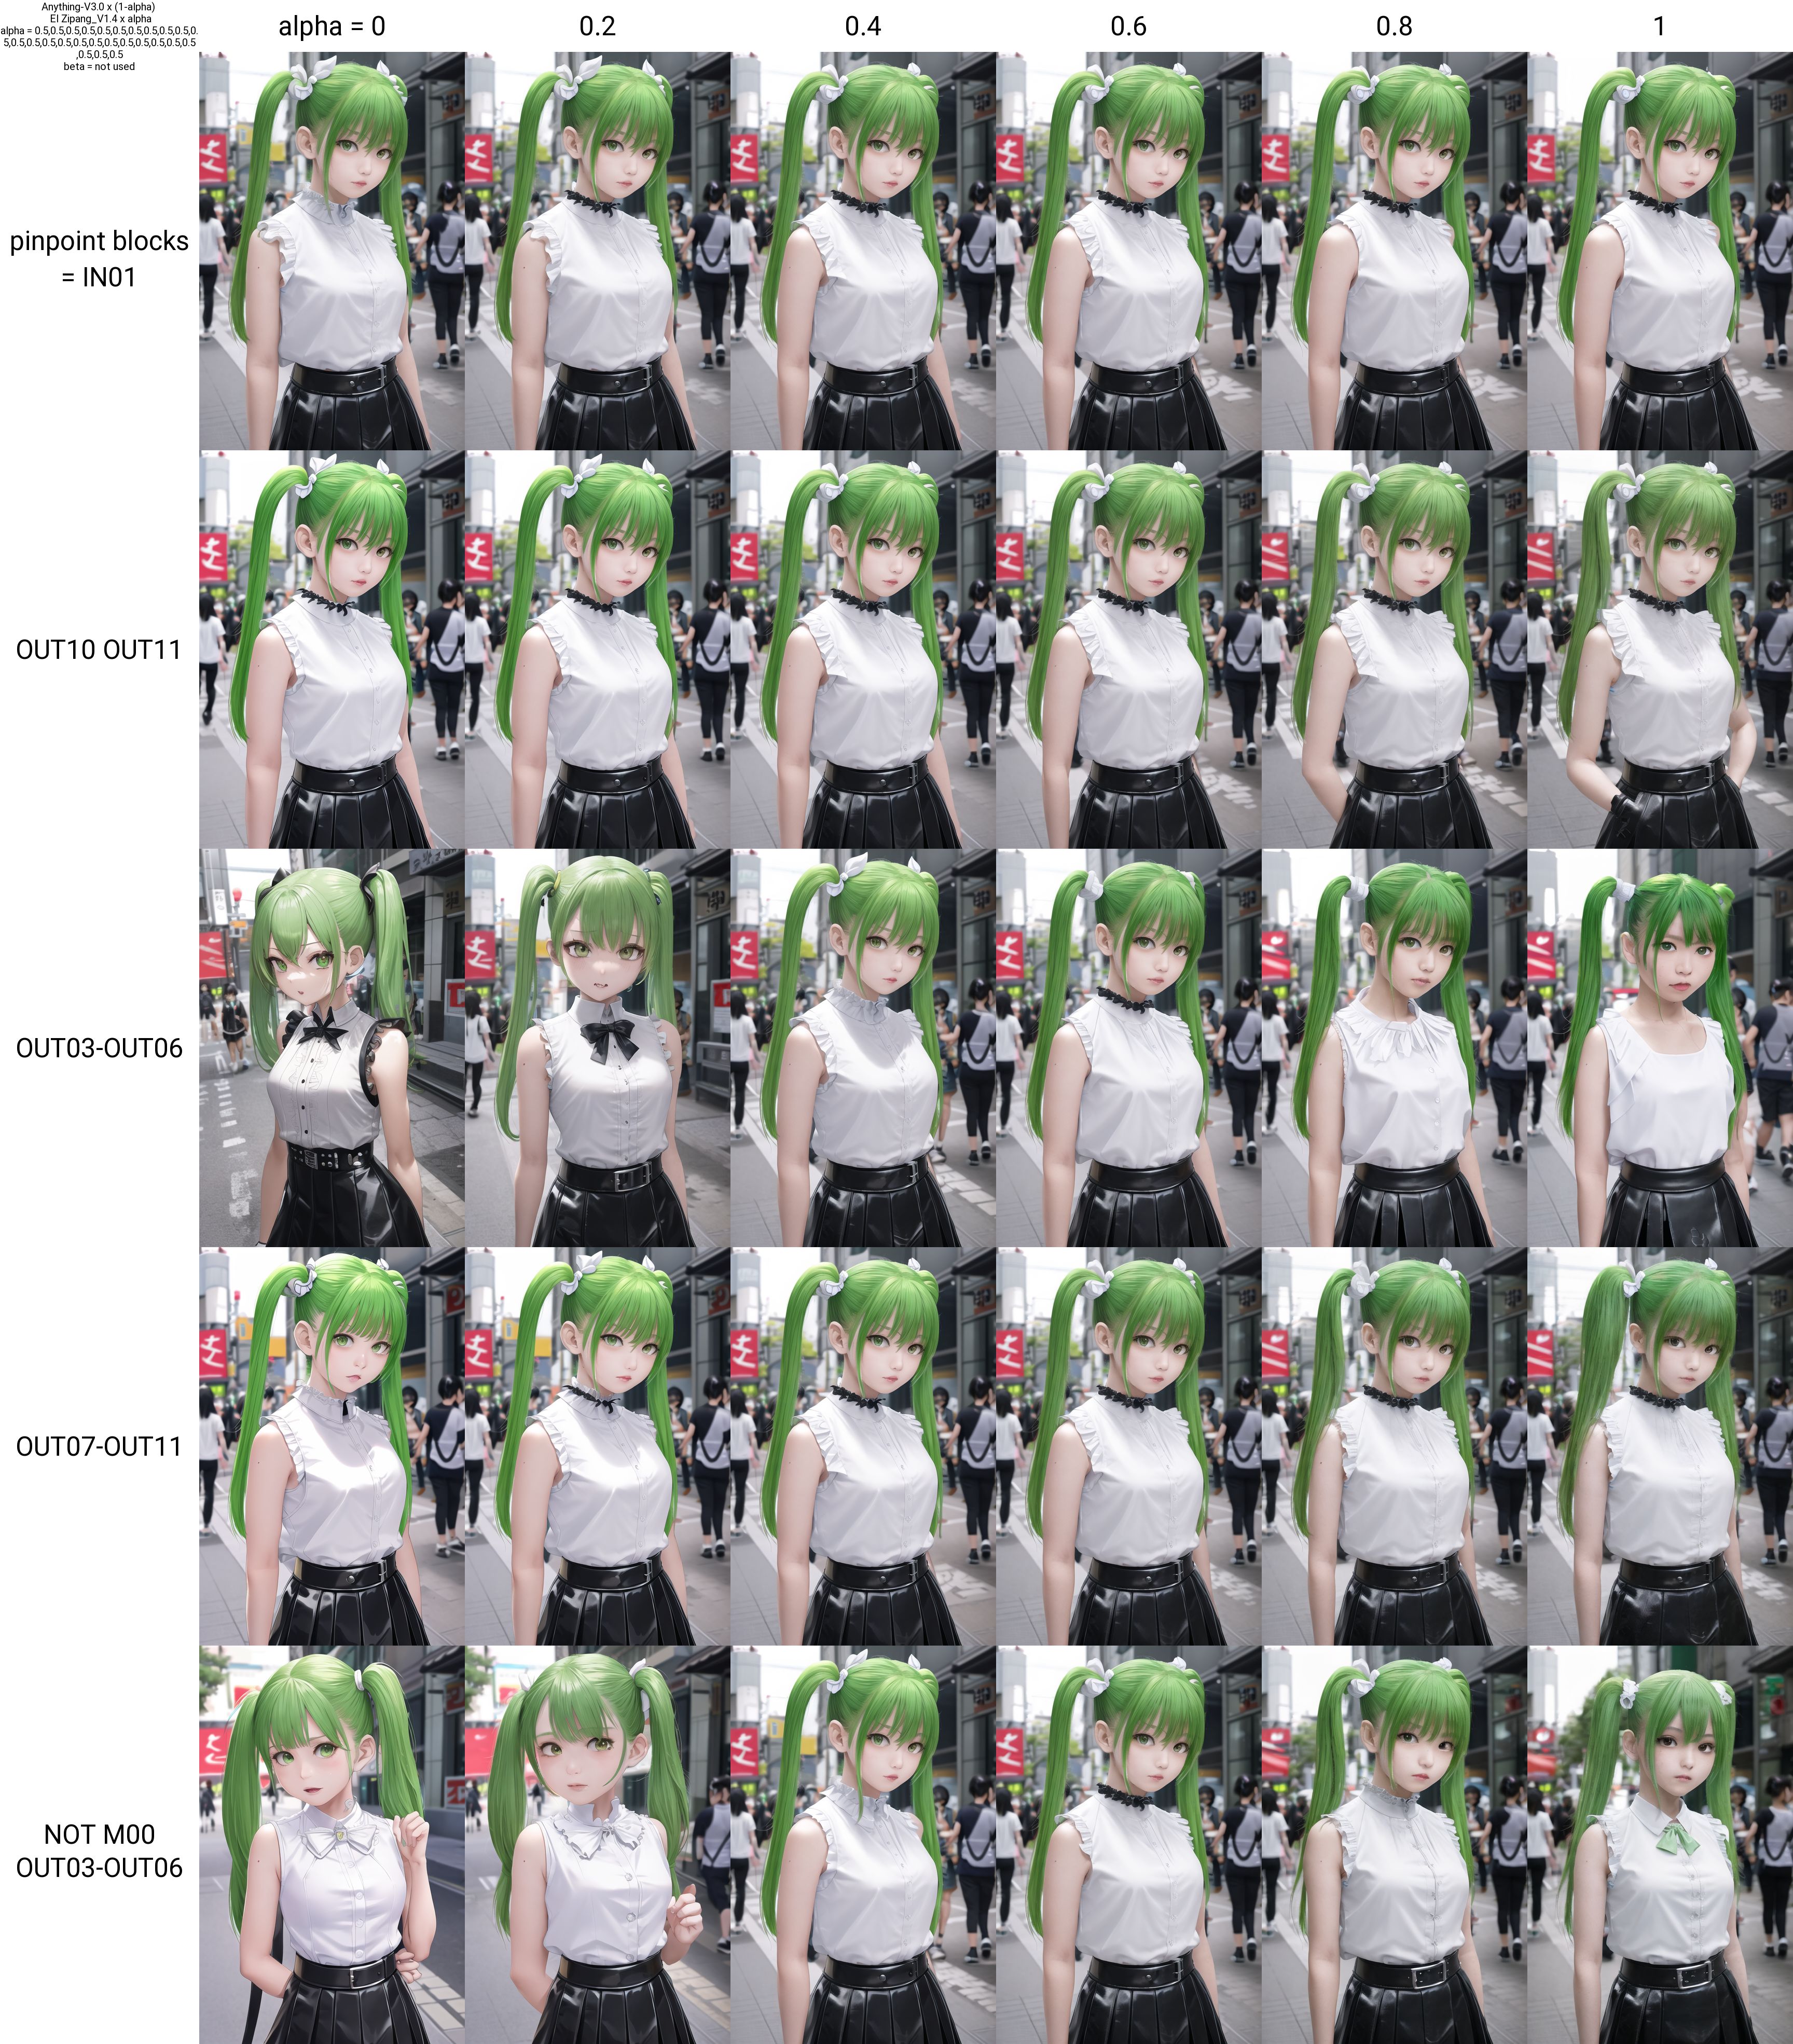
Block ID (only upper case letters are valid) BASE,IN00,IN01,IN02,IN03,IN04,IN05,IN06,IN07,IN08,IN09,IN10,IN11,M00,OUT00,OUT01,OUT02,OUT03,OUT04,OUT05,OUT06,OUT07,OUT08,OUT09,OUT10,OUT11
for XL model BASE,IN00,IN01,IN02,IN03,IN04,IN05,IN06,IN07,IN08,M00,OUT00,OUT01,OUT02,OUT03,OUT04,OUT05,OUT06,OUT07,OUT08
calcmode
change calclation mode.
Note the correspondence between calculation mode and merge mode.
prompt
You can change the prompt. The negative prompt does not change. Separate with a new line.
Reserve XY plot
The Reserve XY plot button reserves the execution of an XY plot for the setting at the time the button is pressed, instead of immediately executing the plot. The reserved XY plot will be executed after the normal XY plot is completed or by pressing the Start XY plot button on the Reservation tab. Reservations can be made at any time during the execution or non-execution of an XY plot. The reservation list is not automatically updated, so use the Reload button. If an error occurs, the plot is discarded and the next reservation is executed. Images will not be displayed until all reservations are finished, but those that have been marked "Finished" have finished generating the grid and can be viewed in the Image Browser or other applications.
It is also possible to move to an appointment at any location by using "|".
Inputing "0.1,0.2,0.3,0.4,0.5|0.6,0.7,0.8,0.9,1.0"
0.1,0.2,0.3,0.4,0.5
0.6,0.7,0.8,0.9,1.0
The grid is divided into two reservations, "0.1,0.2,0.3,0.4,0.5" and "0.6,0.7,0.8,0.9,1.0" executed. This may be useful when there are too many elements and the grid becomes too large.
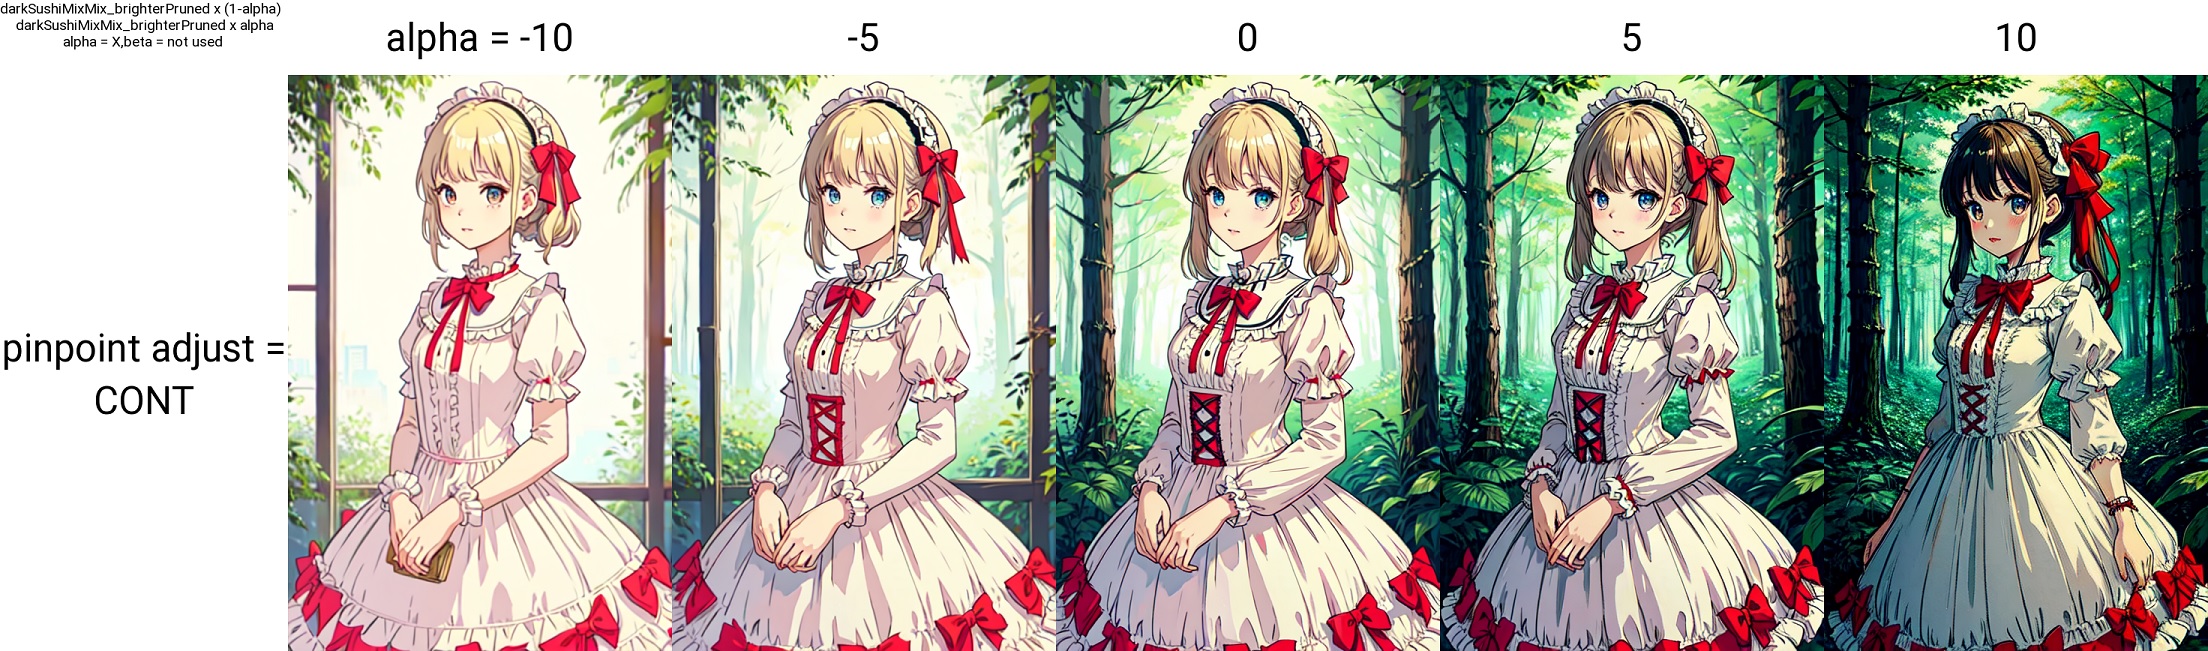
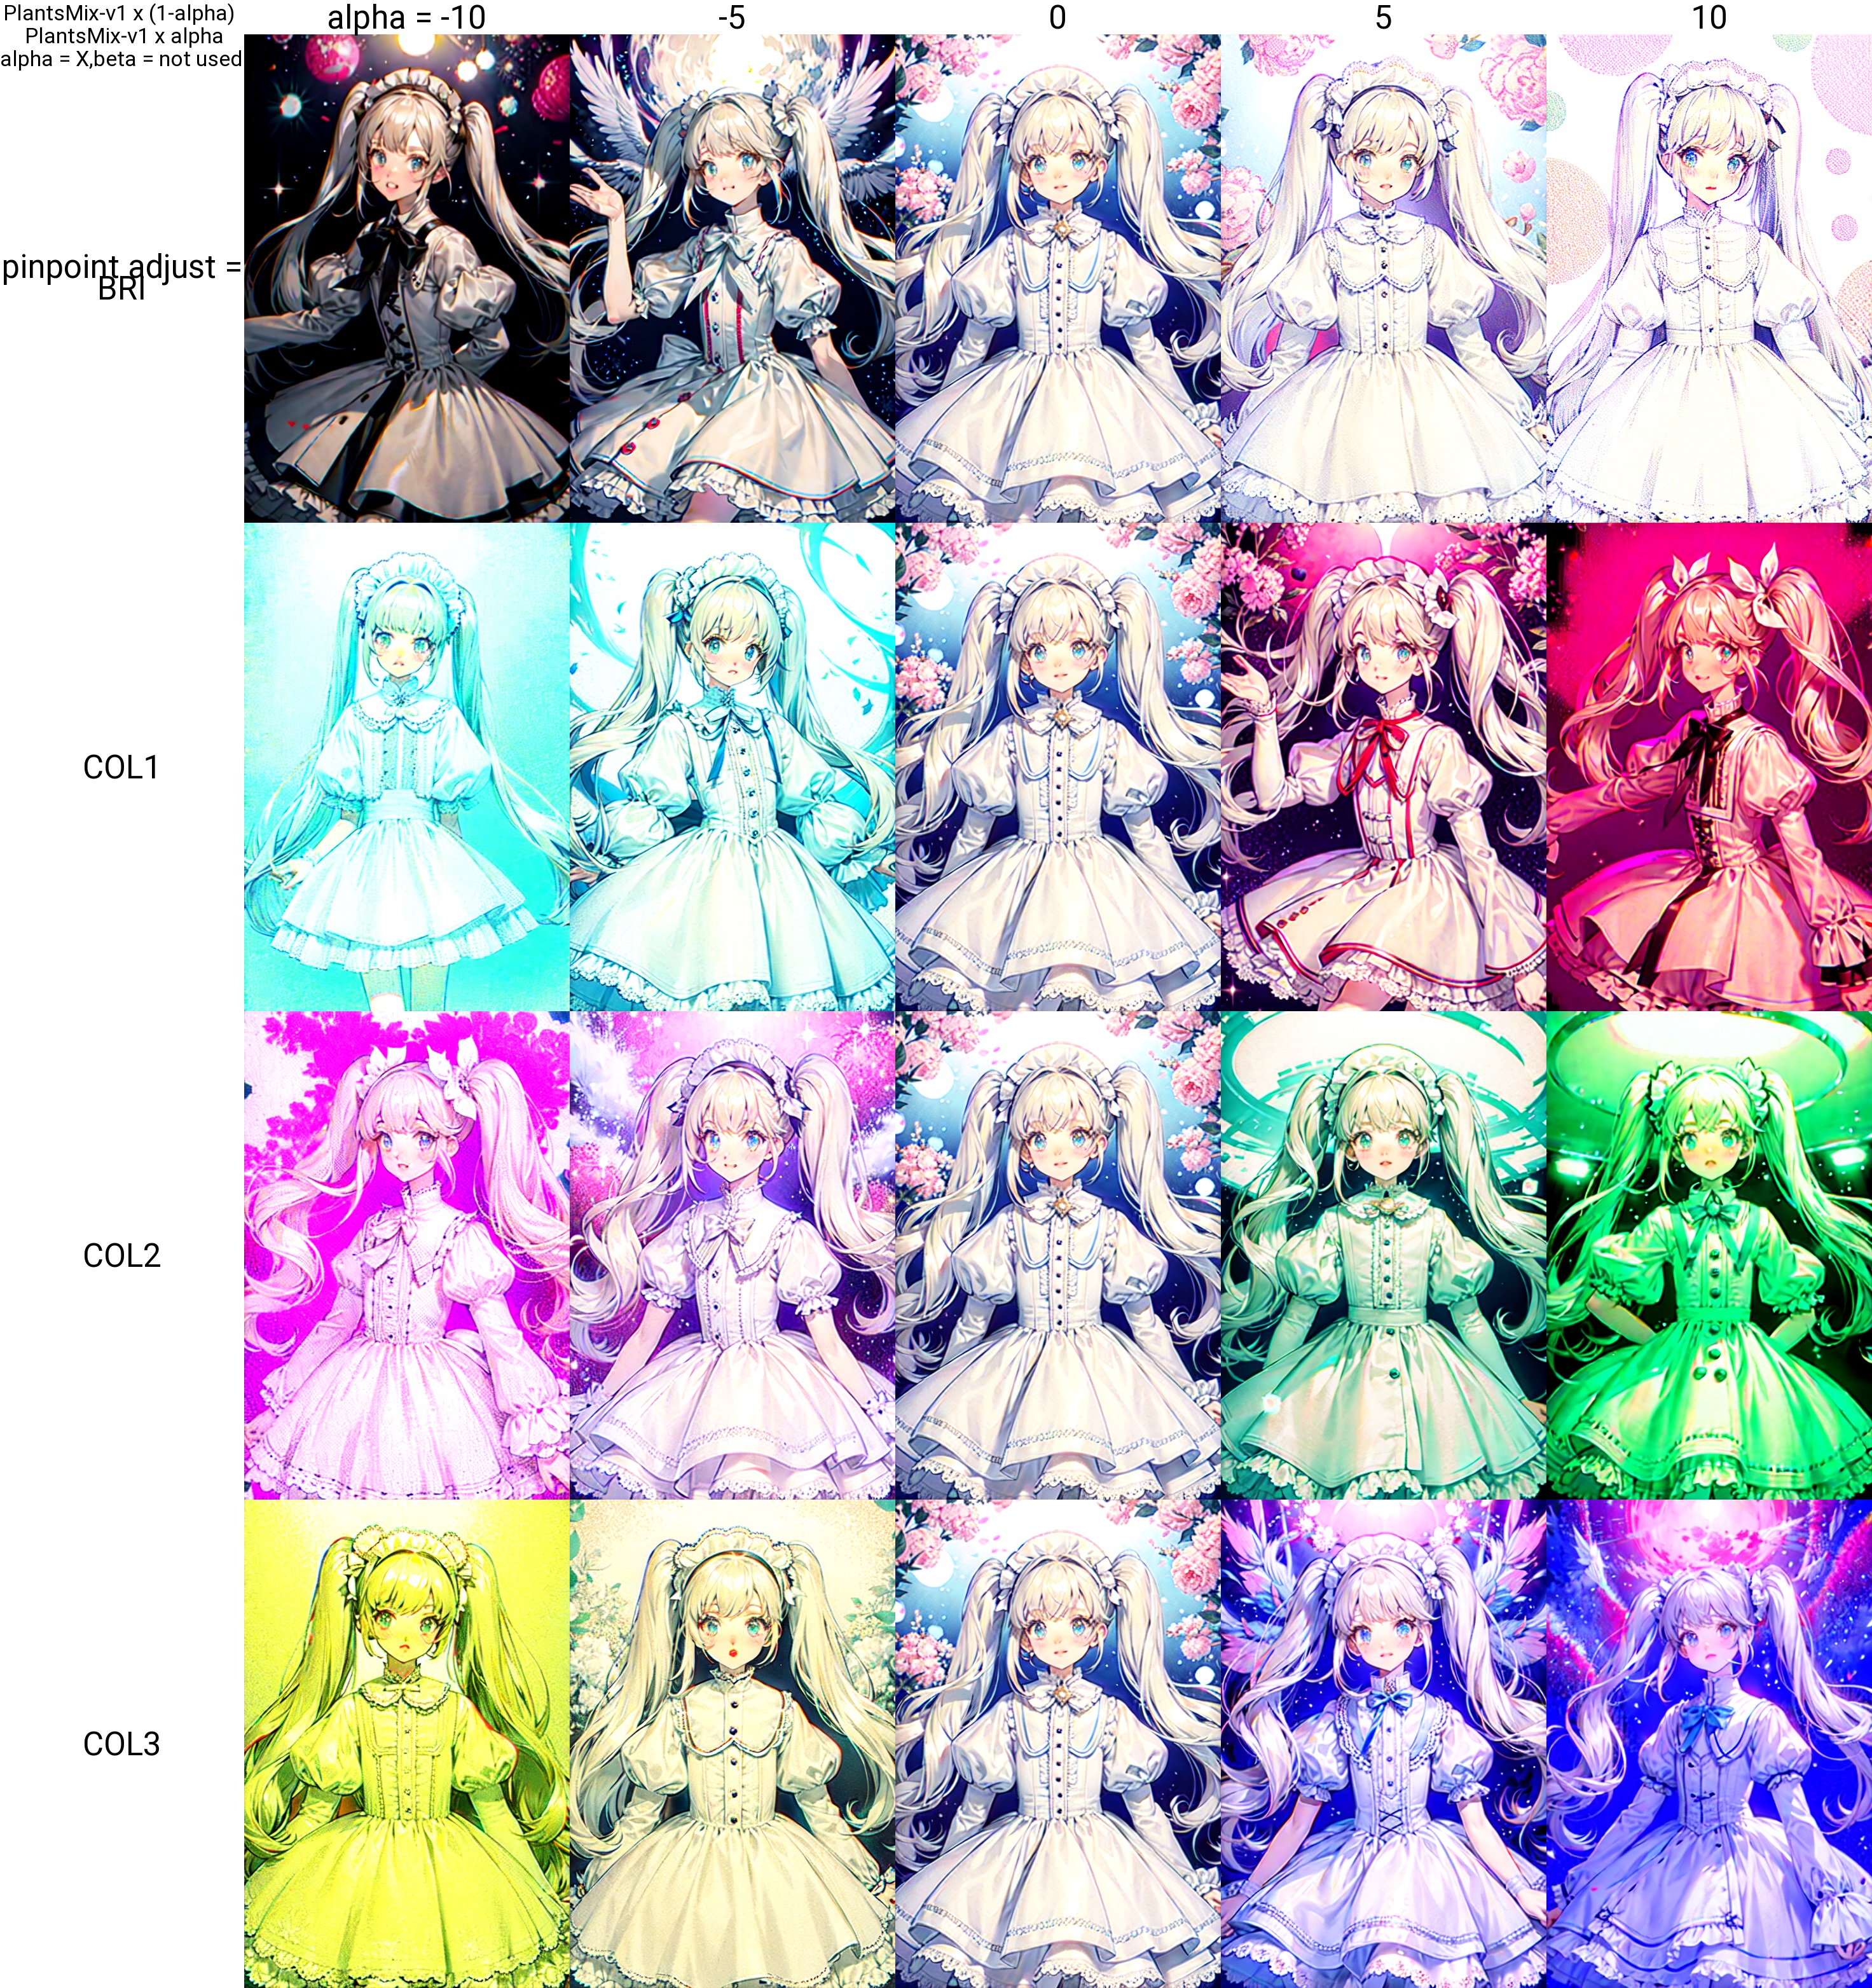
Adjust
This corrects the amount of detail and color tone in your model. It employs a different mechanism from LoRA. By adjusting the input and output points of U-Net, the details and color tones of the image can be adjusted.
How to use
You can either enter directly into the textbox or decide the value with the slider and then reflect it in the textbox by pressing the up button. It will be ignored if left blank.
Input seven numbers separated by commas.
0,0,0,0,0,0,0,0
This is the default, and effects appear as you shift these values.
Each setting value
The seven numbers correspond to 1. Detail/Noise 2. Detail/Noise 3. Detail/Noise 4. Contrast/Detail 5. Brightness 6. Color Tone 1 (Cyan-Red) 7. Color Tone 2 (Magenta-Green) 8. Color Tone 3 (Yellow-Blue)
Please be aware that as the level of detail increases, so inevitably does the noise. Also, when using Hires.fix, the output may look different, so I recommend testing it with the expected settings. The values should be good up to about 5/-5, but it depends on the model. Entering a positive value will increase the level of detail. There are three types of color tones, which seem to correspond roughly to color balance.
1,2,3 Detail/Noise
1 corresponds to the input of the U-Net. Adjusting this allows you to control the level of detail in the image. The composition changes more easily here than in OUT. Making it negative will make it flatter and slightly blurred. Making it positive will increase the detail and make it noisier. Be aware that even if it's noisy in the regular generation, it may become cleaner with hires.fix. 2 and 3 correspond to the OUT part.

4. Contrast/Detail
Adjusting this will change the contrast and brightness, as well as the level of detail. It's faster to see the sample.
5,6,7,8 Brightness, Color Tone
You can correct the color tone. It seems to correspond roughly to the color balance.
Let the Dice roll
Determines the merge ratio randomly.
Usage
Select the Random Mode and press Run Rand to generate images with randomly set weights for the number of challenges specified by Num of challenge. The generation operates in XYZ mode, so the STOP button is effective. At that time, please set Seed for Random Ratio to -1. Using the same seed ensures reproducibility. If the number of generations exceeds 10, the grid will automatically become two-dimensional. Checking the alpha and beta in Settings will randomize them. For Elemental, beta will be disabled.
Modes
R, U, X
Random weights are set for all 26 blocks. The difference between R, U, and X is the range of random values. For X, specify lower limit to upper limit for each layer.
R: 0 ~ 1
U: -0.5 ~ 1.5
X: lower limit ~ upper limit
ER, EU, EX
Random weights are set for all Elementals. The difference between ER, EU, and EX is the range of random values. For X, specify lower limit to upper limit for each layer.
Custom
Specifies the hierarchical level to be randomized. Specify it as custom.
You can use R, U, X, ER, EU, and EX.
Example:
U,0,0,0,0,0,0,0,0,0,0,0,0,R,R,R,R,R,R,R,R,R,R,R,R,R
U,0,0,0,0,0,0,0,0,0,0,0,0,ER,0,0,0,0,0,0,X,0,0,0,0,0
Settings
roundsets the decimal places for rounding. With the initial value of 3, it becomes 0.123.save E-listsaves the key and ratio of Elemental in csv format toscript/data/.
XYZ Plot
You can use the XYZ Plot by setting the type to random. Enter the number of times you want to randomize, and the parameters will be set accordingly.
For example:
X type: seed, -1, -1, -1
Y type: random, 5
With this configuration, a 3x5 grid will be created, and the model will generate images using weights randomly set for 5 iterations. Please make sure to set the randomization option on the random panel. It will not function properly if it is set to off.
Elemental Merge
see here
Generation Parameters
You can also set the conditions for image generation here. If values are set here, they will take priority.
Include/Exclude
When merging, you can set blocks that you want to include/exclude. Only the selected blocks will be merged / will not be merged. If you check 'print', you can confirm whether a block has been include/excluded on the Command Prompt screen. If you check 'Adjust', the elements used in Adjust will be included/excluded. You can also specify things like attn, and in this case, elements containing attn will be included/excluded. Separate the strings with commas.
unload button
Deletes the currently loaded model. This is used to free up GPU memory when using kohya-ss GUI. Once the model is deleted, you will not be able to generate images. If you want to generate images, please re-select models.
LoRA
LoRA related functions. It is basically the same as kohya-ss scripts, but it supports block-by-block merging.
Note: LyCORIS supports only single merge due to its special structure. Only ratios of 1,0 can be used for single merges. If any other value is used, the result will not match the Block weight LoRA result, even if the value is "SAME TO STRENGTH". LoCon will match reasonably well even with non-integers.
LoCon/LyCORIS merge to model is enable in web-ui 1.5 | 1.X,2.X | LoRA | LoCon | LyCORIS | |----------|-------|-------|---------| | Merge to Model | Yes | Yes | Yes | | Merge LoRAs | Yes | Yes | No | | Apply Block Weight(single)|Yes|Yes|Yes| | Extract From Models | Yes | No | No |
| XL | LoRA | LoCon | LyCORIS | |----------|-------|-------|---------| | Merge to Model | Yes | Yes | Yes | | Merge LoRAs | Yes | Yes | No | | Extract From Models | Yes | No | No |
Merge LoRAs
Merges one or more LoRAs. kohya-ss's latest script is used, so LoRAs with different dimensions can be merged, but note that the generated images may differ significantly because LoRAs are recalculated when dimensions are converted.
The calculate dimention button calculates the dimensions of each LoRA and activates the display and sorting functions. The calculation is rather time-consuming and takes several tens of seconds for a LoRA of about 50. Newly merged LoRAs will not appear in the list, so please press the reload button. Dimension recalculation only calculates the added LoRAs.
Merge to Checkpoint
Merge LoRAs into a model. Multiple LoRAs can be merged at the same time.
Enter LoRA name1:ratio1:block1,LoRA name2:ratio2:block2,...
LoRA can also be used alone. The ":block" part can be omitted. The ratio can be any value, including negative values. There is no restriction that the total must sum to 1 (of course, if it greatly exceeds 1, it will break down).
To use ":block", use a block preset name from the bottom list of presets, or create your own. Ex:
LoRAname1:ratio1
LoRAname1:ratio1:ALL
LoRAname1:ratio1:1,0,0,0,1,1,1,1,1,1,1,1,0,0,0,0,0
Extract from checkpoints
Generates a LoRA from the difference of two models. If you specify a demension, it will be created with the specified dimension. If no demension is specified, LoRAs are created with dim 128. The blend ratio can be adjusted by alpha and beta. $(\alpha A - \beta B)$ alpha, beta = 1 is the normal LoRA creation.
Extract from two LoRAs
see here
Metadata
create new
Create new minimal Metadata. Only dim, alpha, basemodel version, filename, and networktype will be generated.
merge
Information of each LoRA is saved, and tags are merged. (The information of each LoRA is not visible with the simple Metadata reading function in the Web-UI)
save all
Information of each LoRA is saved. (The information of each LoRA is not visible with the simple Metadata reading function in the Web-UI)
use first LoRA
Copy the information of the first LoRA as is.
Get Ratios from Prompt
The prompt field is used to load the LoRA ratio settings. This includes the settings for LoRA Block Weight, allowing for direct merging.
Difference between Normal Merge and SAME TO STRENGTH
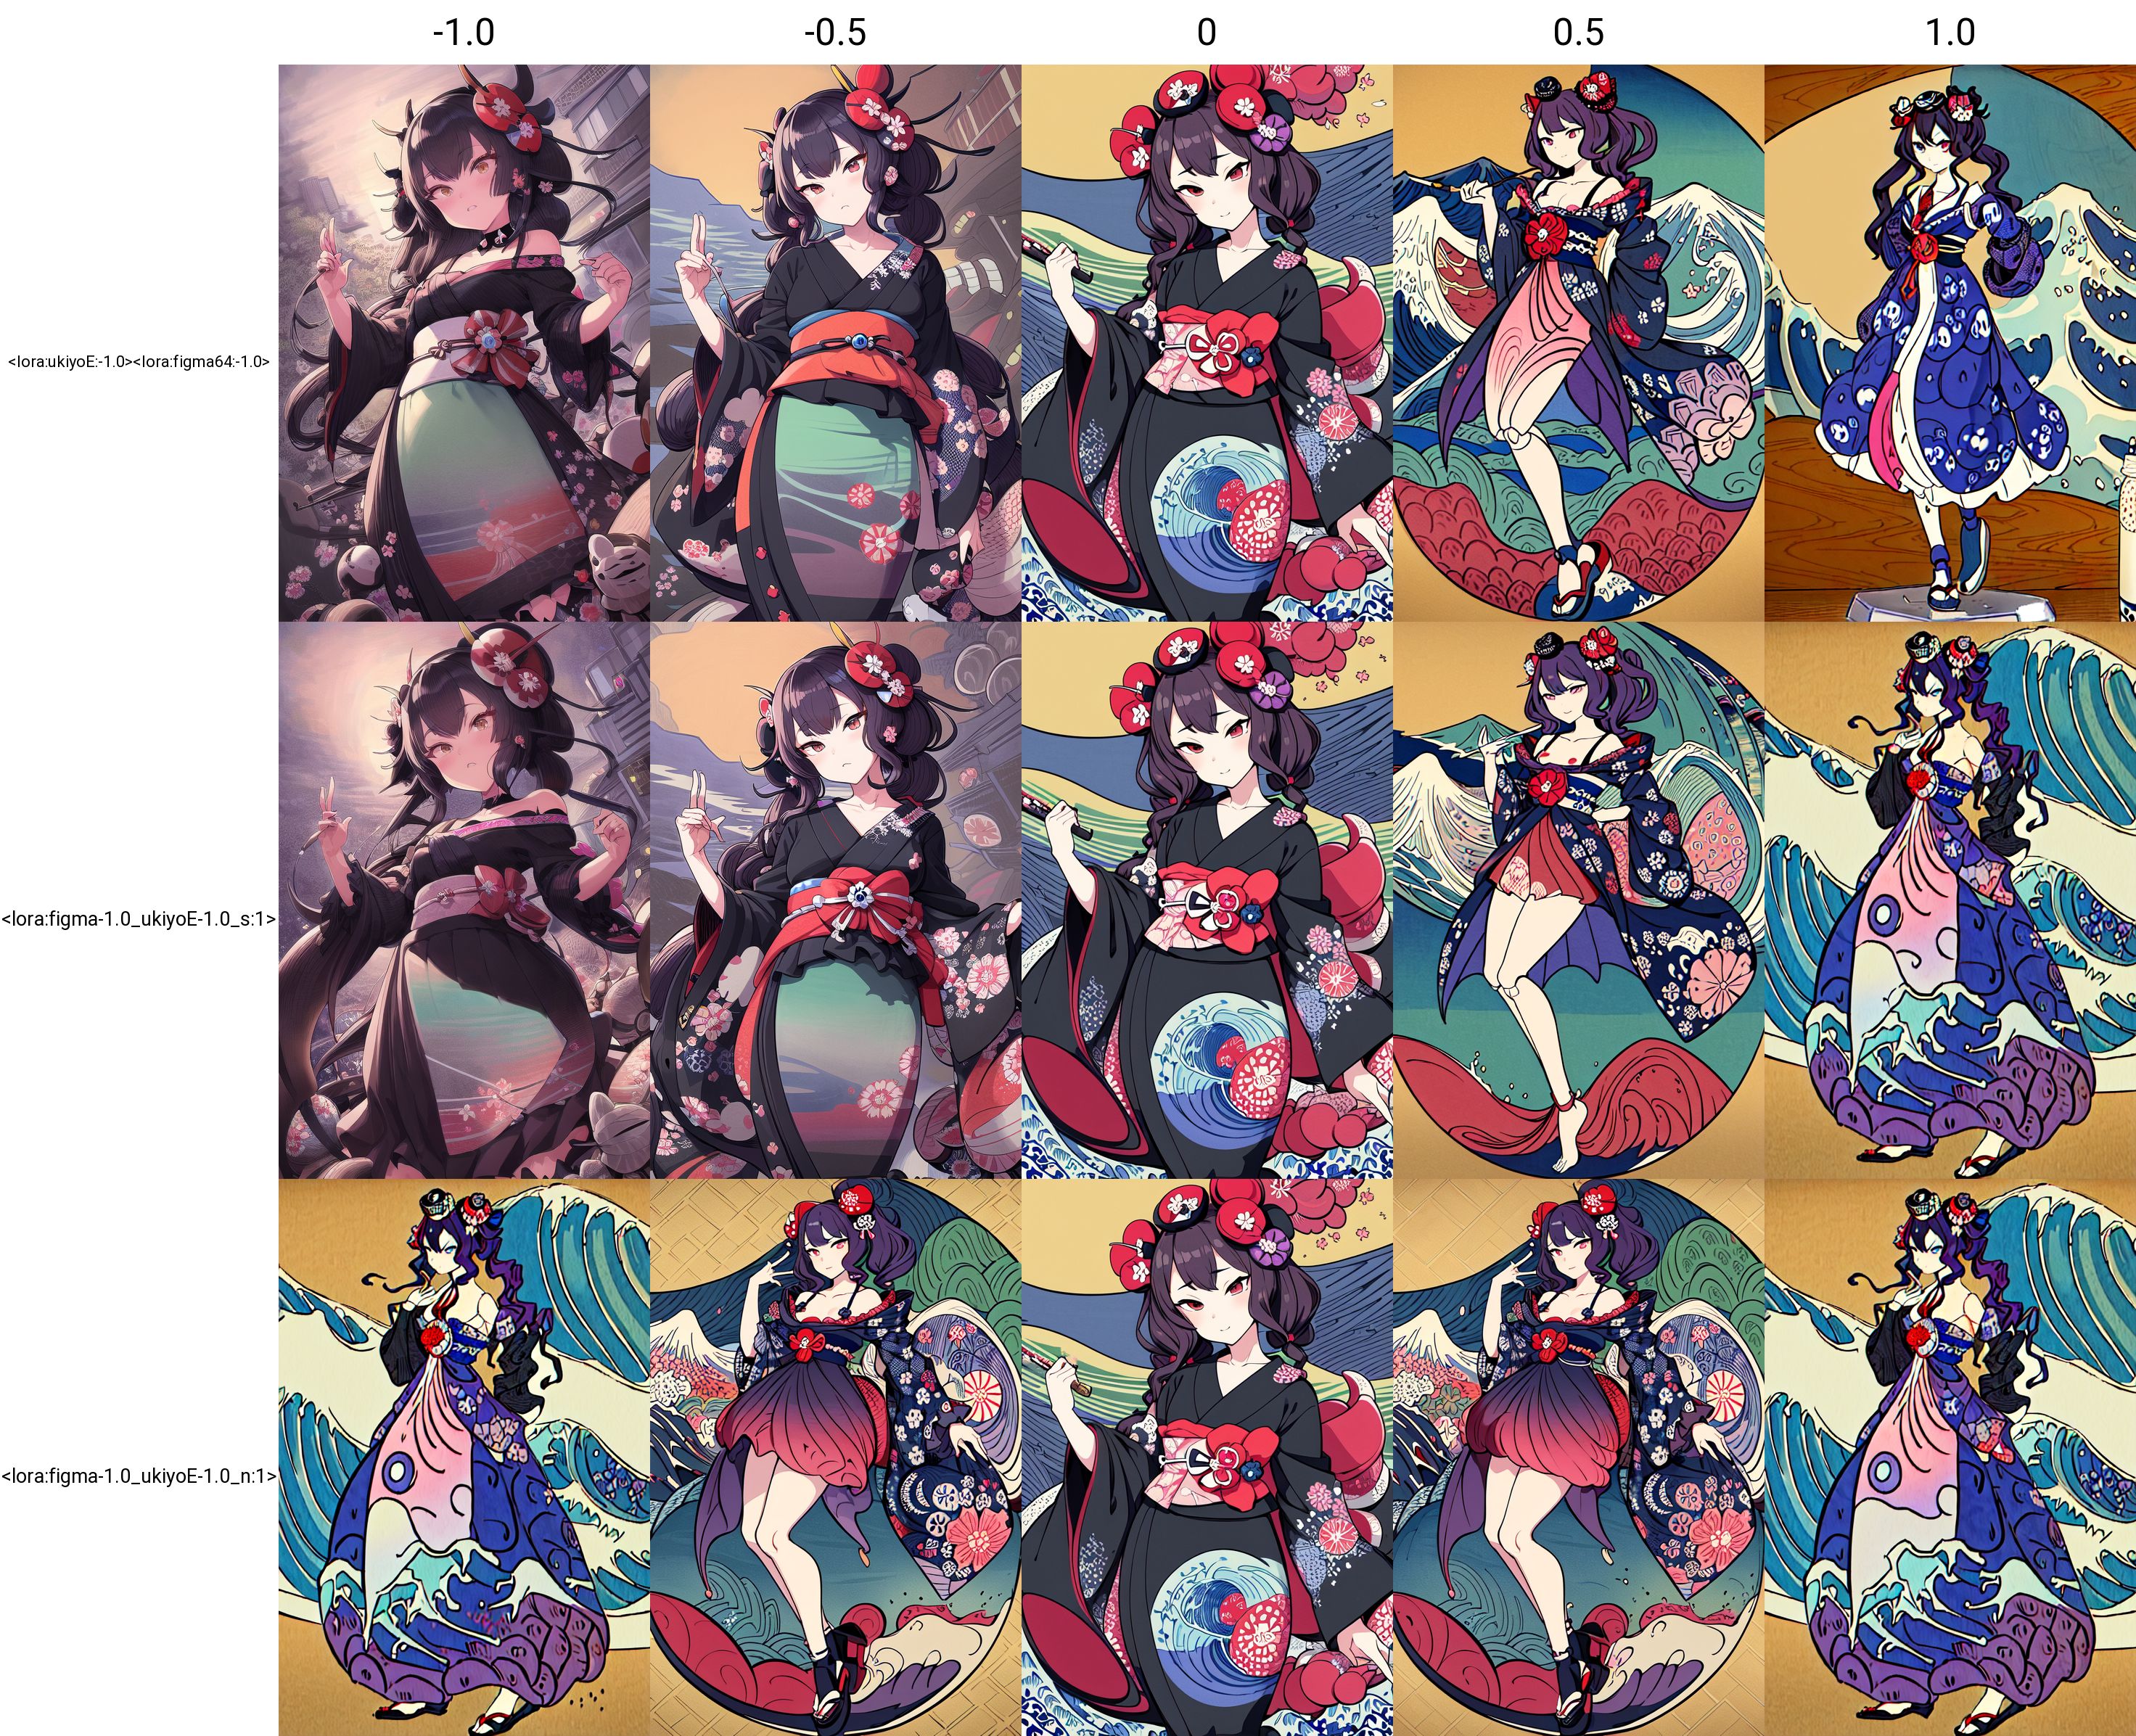
If the same to Strength option is not used, the result is the same as the merge in the script created by kohya-ss. In this case, the result is different from the case where LoRA is applied on Web-ui as shown in the figure below. The reason for this is related to the mathematical formula used to adopt LoRA into U-net. kohya-ss's script multiplies the ratio as it is, but the formula used to apply LoRA squares the ratio, so if the ratio is set to a number other than 1, or to a negative value, the result will differ from Strength (strength when applied). Using the SAME TO STRENGTH option, the square root of the ratio is driven at merge time, so that Strength and the ratio are calculated to have the same meaning at apply time. It is also calculated so that a negative value will have the same effect. If you are not doing additional learning, for example, you may be fine using the SAME TO STRENGTH option, but if you are doing additional learning on the merged LoRA, you may not want to use anyone else's option.
The following figures show the generated images for each case of normal image generation/same to Strength option/normal merge, using merged LoRAs of figmization and ukiyoE. You can see that in the case of normal merge, even in the negative direction, the image is squared and positive.
Other tabs
Analysis
Analyze the differences between two models. Select the models you wish to compare, model A and model B.
Mode
The ASimilality mode compares tensors computed from qkv. Other modes calculates from the cosine similarity of each element. It seems that the calculated difference becomes smaller in modes other than ASimilality mode. Since the ASimilality mode gives a result that is closer to the difference in output images, you should generally use this one. This Asimilality analysis was created by extending the Asimilality script.
Block Method
This is a method to calculate the ratio for each hierarchy in modes other than the ASimilality mode. Mean represents the average, min represents the minimum value, and attn2 outputs the value of attn2 as the calculation result of the block.
History
You can search the merge history. The search function allows for both 'and' and 'or' searches.
Elements
You can obtain a list of the Elements contained in the model, the assignment of blocks, and the size of the tensors.
Acknowledgements
This script uses several scripts by kohya and bbc-mc. I would also like to thank everyone who contributed to the development of the extensions.
Stable Diffusion web UI
A web interface for Stable Diffusion, implemented using Gradio library.

Features
Detailed feature showcase with images:
- Original txt2img and img2img modes
- One click install and run script (but you still must install python and git)
- Outpainting
- Inpainting
- Color Sketch
- Prompt Matrix
- Stable Diffusion Upscale
- Attention, specify parts of text that the model should pay more attention to
- a man in a ((tuxedo)) - will pay more attention to tuxedo
- a man in a (tuxedo:1.21) - alternative syntax
- select text and press Ctrl+Up or Ctrl+Down (or Command+Up or Command+Down if you're on a MacOS) to automatically adjust attention to selected text (code contributed by anonymous user)
- Loopback, run img2img processing multiple times
- X/Y/Z plot, a way to draw a 3 dimensional plot of images with different parameters
- Textual Inversion
- have as many embeddings as you want and use any names you like for them
- use multiple embeddings with different numbers of vectors per token
- works with half precision floating point numbers
- train embeddings on 8GB (also reports of 6GB working)
- Extras tab with:
- GFPGAN, neural network that fixes faces
- CodeFormer, face restoration tool as an alternative to GFPGAN
- RealESRGAN, neural network upscaler
- ESRGAN, neural network upscaler with a lot of third party models
- SwinIR and Swin2SR (see here), neural network upscalers
- LDSR, Latent diffusion super resolution upscaling
- Resizing aspect ratio options
- Sampling method selection
- Adjust sampler eta values (noise multiplier)
- More advanced noise setting options
- Interrupt processing at any time
- 4GB video card support (also reports of 2GB working)
- Correct seeds for batches
- Live prompt token length validation
- Generation parameters
- parameters you used to generate images are saved with that image
- in PNG chunks for PNG, in EXIF for JPEG
- can drag the image to PNG info tab to restore generation parameters and automatically copy them into UI
- can be disabled in settings
- drag and drop an image/text-parameters to promptbox
- Read Generation Parameters Button, loads parameters in promptbox to UI
- Settings page
- Running arbitrary python code from UI (must run with --allow-code to enable)
- Mouseover hints for most UI elements
- Possible to change defaults/mix/max/step values for UI elements via text config
- Tiling support, a checkbox to create images that can be tiled like textures
- Progress bar and live image generation preview
- Can use a separate neural network to produce previews with almost none VRAM or compute requirement
- Negative prompt, an extra text field that allows you to list what you don't want to see in generated image
- Styles, a way to save part of prompt and easily apply them via dropdown later
- Variations, a way to generate same image but with tiny differences
- Seed resizing, a way to generate same image but at slightly different resolution
- CLIP interrogator, a button that tries to guess prompt from an image
- Prompt Editing, a way to change prompt mid-generation, say to start making a watermelon and switch to anime girl midway
- Batch Processing, process a group of files using img2img
- Img2img Alternative, reverse Euler method of cross attention control
- Highres Fix, a convenience option to produce high resolution pictures in one click without usual distortions
- Reloading checkpoints on the fly
- Checkpoint Merger, a tab that allows you to merge up to 3 checkpoints into one
- Custom scripts with many extensions from community
- Composable-Diffusion, a way to use multiple prompts at once
- separate prompts using uppercase AND
- also supports weights for prompts: a cat :1.2 AND a dog AND a penguin :2.2
- No token limit for prompts (original stable diffusion lets you use up to 75 tokens)
- DeepDanbooru integration, creates danbooru style tags for anime prompts
- xformers, major speed increase for select cards: (add --xformers to commandline args)
- via extension: History tab: view, direct and delete images conveniently within the UI
- Generate forever option
- Training tab
- hypernetworks and embeddings options
- Preprocessing images: cropping, mirroring, autotagging using BLIP or deepdanbooru (for anime)
- Clip skip
- Hypernetworks
- Loras (same as Hypernetworks but more pretty)
- A separate UI where you can choose, with preview, which embeddings, hypernetworks or Loras to add to your prompt
- Can select to load a different VAE from settings screen
- Estimated completion time in progress bar
- API
- Support for dedicated inpainting model by RunwayML
- via extension: Aesthetic Gradients, a way to generate images with a specific aesthetic by using clip images embeds (implementation of https://github.com/vicgalle/stable-diffusion-aesthetic-gradients)
- Stable Diffusion 2.0 support - see wiki for instructions
- Alt-Diffusion support - see wiki for instructions
- Now without any bad letters!
- Load checkpoints in safetensors format
- Eased resolution restriction: generated image's dimensions must be a multiple of 8 rather than 64
- Now with a license!
- Reorder elements in the UI from settings screen
- Segmind Stable Diffusion support
Installation and Running
Make sure the required dependencies are met and follow the instructions available for: - NVidia (recommended) - AMD GPUs. - Intel CPUs, Intel GPUs (both integrated and discrete) (external wiki page) - Ascend NPUs (external wiki page)
Alternatively, use online services (like Google Colab):
Installation on Windows 10/11 with NVidia-GPUs using release package
- Download
sd.webui.zipfrom v1.0.0-pre and extract its contents. - Run
update.bat. - Run
run.bat. > For more details see Install-and-Run-on-NVidia-GPUs
Automatic Installation on Windows
- Install Python 3.10.6 (Newer version of Python does not support torch), checking "Add Python to PATH".
- Install git.
- Download the stable-diffusion-webui repository, for example by running
git clone https://github.com/AUTOMATIC1111/stable-diffusion-webui.git. - Run
webui-user.batfrom Windows Explorer as normal, non-administrator, user.
Automatic Installation on Linux
- Install the dependencies:
bash
# Debian-based:
sudo apt install wget git python3 python3-venv libgl1 libglib2.0-0
# Red Hat-based:
sudo dnf install wget git python3 gperftools-libs libglvnd-glx
# openSUSE-based:
sudo zypper install wget git python3 libtcmalloc4 libglvnd
# Arch-based:
sudo pacman -S wget git python3
If your system is very new, you need to install python3.11 or python3.10: ```bash # Ubuntu 24.04 sudo add-apt-repository ppa:deadsnakes/ppa sudo apt update sudo apt install python3.11
Manjaro/Arch
sudo pacman -S yay yay -S python311 # do not confuse with python3.11 package
Only for 3.11
Then set up env variable in launch script
export python_cmd="python3.11"
or in webui-user.sh
python_cmd="python3.11"
2. Navigate to the directory you would like the webui to be installed and execute the following command:
bash
wget -q https://raw.githubusercontent.com/AUTOMATIC1111/stable-diffusion-webui/master/webui.sh
Or just clone the repo wherever you want:
bash
git clone https://github.com/AUTOMATIC1111/stable-diffusion-webui
```
- Run
webui.sh. - Check
webui-user.shfor options. ### Installation on Apple Silicon
Find the instructions here.
Contributing
Here's how to add code to this repo: Contributing
Documentation
The documentation was moved from this README over to the project's wiki.
For the purposes of getting Google and other search engines to crawl the wiki, here's a link to the (not for humans) crawlable wiki.
Credits
Licenses for borrowed code can be found in Settings -> Licenses screen, and also in html/licenses.html file.
- Stable Diffusion - https://github.com/Stability-AI/stablediffusion, https://github.com/CompVis/taming-transformers, https://github.com/mcmonkey4eva/sd3-ref
- k-diffusion - https://github.com/crowsonkb/k-diffusion.git
- Spandrel - https://github.com/chaiNNer-org/spandrel implementing
- GFPGAN - https://github.com/TencentARC/GFPGAN.git
- CodeFormer - https://github.com/sczhou/CodeFormer
- ESRGAN - https://github.com/xinntao/ESRGAN
- SwinIR - https://github.com/JingyunLiang/SwinIR
- Swin2SR - https://github.com/mv-lab/swin2sr
- LDSR - https://github.com/Hafiidz/latent-diffusion
- MiDaS - https://github.com/isl-org/MiDaS
- Ideas for optimizations - https://github.com/basujindal/stable-diffusion
- Cross Attention layer optimization - Doggettx - https://github.com/Doggettx/stable-diffusion, original idea for prompt editing.
- Cross Attention layer optimization - InvokeAI, lstein - https://github.com/invoke-ai/InvokeAI (originally http://github.com/lstein/stable-diffusion)
- Sub-quadratic Cross Attention layer optimization - Alex Birch (https://github.com/Birch-san/diffusers/pull/1), Amin Rezaei (https://github.com/AminRezaei0x443/memory-efficient-attention)
- Textual Inversion - Rinon Gal - https://github.com/rinongal/textual_inversion (we're not using his code, but we are using his ideas).
- Idea for SD upscale - https://github.com/jquesnelle/txt2imghd
- Noise generation for outpainting mk2 - https://github.com/parlance-zz/g-diffuser-bot
- CLIP interrogator idea and borrowing some code - https://github.com/pharmapsychotic/clip-interrogator
- Idea for Composable Diffusion - https://github.com/energy-based-model/Compositional-Visual-Generation-with-Composable-Diffusion-Models-PyTorch
- xformers - https://github.com/facebookresearch/xformers
- DeepDanbooru - interrogator for anime diffusers https://github.com/KichangKim/DeepDanbooru
- Sampling in float32 precision from a float16 UNet - marunine for the idea, Birch-san for the example Diffusers implementation (https://github.com/Birch-san/diffusers-play/tree/92feee6)
- Instruct pix2pix - Tim Brooks (star), Aleksander Holynski (star), Alexei A. Efros (no star) - https://github.com/timothybrooks/instruct-pix2pix
- Security advice - RyotaK
- UniPC sampler - Wenliang Zhao - https://github.com/wl-zhao/UniPC
- TAESD - Ollin Boer Bohan - https://github.com/madebyollin/taesd
- LyCORIS - KohakuBlueleaf
- Restart sampling - lambertae - https://github.com/Newbeeer/diffusionrestartsampling
- Hypertile - tfernd - https://github.com/tfernd/HyperTile
- Initial Gradio script - posted on 4chan by an Anonymous user. Thank you Anonymous user.
- (You)
Owner
- Login: BenevolenceMessiah
- Kind: user
- Repositories: 1
- Profile: https://github.com/BenevolenceMessiah
Citation (CITATION.cff)
cff-version: 1.2.0
message: "If you use this software, please cite it as below."
authors:
  - given-names: AUTOMATIC1111
title: "Stable Diffusion Web UI"
date-released: 2022-08-22
url: "https://github.com/AUTOMATIC1111/stable-diffusion-webui"
GitHub Events
Total
Last Year
Dependencies
- actions/checkout v4 composite
- actions/setup-node v4 composite
- actions/setup-python v5 composite
- actions/cache v4 composite
- actions/checkout v4 composite
- actions/setup-python v5 composite
- actions/upload-artifact v4 composite
- eslint ^8.40.0 development
- pytest * test
- pytest-base-url * test
- pytest-cov * test
- GitPython *
- Pillow *
- accelerate *
- blendmodes *
- clean-fid *
- diskcache *
- einops *
- facexlib *
- fastapi >=0.90.1
- gradio ==3.41.2
- inflection *
- jsonmerge *
- kornia *
- lark *
- numpy *
- omegaconf *
- open-clip-torch *
- piexif *
- pillow-avif-plugin ==1.4.3
- protobuf ==3.20.0
- psutil *
- pytorch_lightning *
- requests *
- resize-right *
- safetensors *
- scikit-image >=0.19
- tomesd *
- torch *
- torchdiffeq *
- torchsde *
- transformers ==4.30.2
- cloudpickle *
- decorator *
- synr ==0.5.0
- tornado *
- GitPython ==3.1.32
- Pillow ==9.5.0
- accelerate ==0.21.0
- blendmodes ==2022
- clean-fid ==0.1.35
- diskcache ==5.6.3
- einops ==0.4.1
- facexlib ==0.3.0
- fastapi ==0.94.0
- gradio ==3.41.2
- httpcore ==0.15
- httpx ==0.24.1
- inflection ==0.5.1
- jsonmerge ==1.8.0
- kornia ==0.6.7
- lark ==1.1.2
- numpy ==1.26.2
- omegaconf ==2.2.3
- open-clip-torch ==2.20.0
- piexif ==1.1.3
- pillow-avif-plugin ==1.4.3
- protobuf ==3.20.0
- psutil ==5.9.5
- pytorch_lightning ==1.9.4
- resize-right ==0.0.2
- safetensors ==0.4.2
- scikit-image ==0.21.0
- setuptools ==69.5.1
- spandrel ==0.3.4
- spandrel-extra-arches ==0.1.1
- tomesd ==0.1.3
- torch *
- torchdiffeq ==0.2.3
- torchsde ==0.2.6
- transformers ==4.30.2