Science Score: 44.0%
This score indicates how likely this project is to be science-related based on various indicators:
-
✓CITATION.cff file
Found CITATION.cff file -
✓codemeta.json file
Found codemeta.json file -
✓.zenodo.json file
Found .zenodo.json file -
○DOI references
-
○Academic publication links
-
○Academic email domains
-
○Institutional organization owner
-
○JOSS paper metadata
-
○Scientific vocabulary similarity
Low similarity (5.6%) to scientific vocabulary
Repository
基于YOLOv5的井盖隐患智能识别系统
Basic Info
Statistics
- Stars: 11
- Watchers: 1
- Forks: 0
- Open Issues: 0
- Releases: 0
Metadata Files
README.md
前言
本项目是基于YOLOv5的井盖隐患智能识别系统。在数据预处理阶段,为提升数据质量,采用了数据增强、数据标注等方式。在模型训练阶段,不局限于单一检测算法的使用,可采用集成学习思想,训练多模型并将结果融合,以提升模型效果及泛化能力。最后,选择合适的后处理方式输出井盖隐患的识别结果。由于本项目主要用到目标检测,所以选择了YOLO模型进行训练。
主要功能
- 支持
图片、视频及摄像头进行检测; - 可对
检测结果进行单独分析,并且显示单次检测的置信度;
项目地址
GitHub - Xuding0829/Well: 基于YOLOv5的井盖隐患智能识别系统
环境配置
python
访问官网 https://www.python.org/downloads/windows/ 下载python包
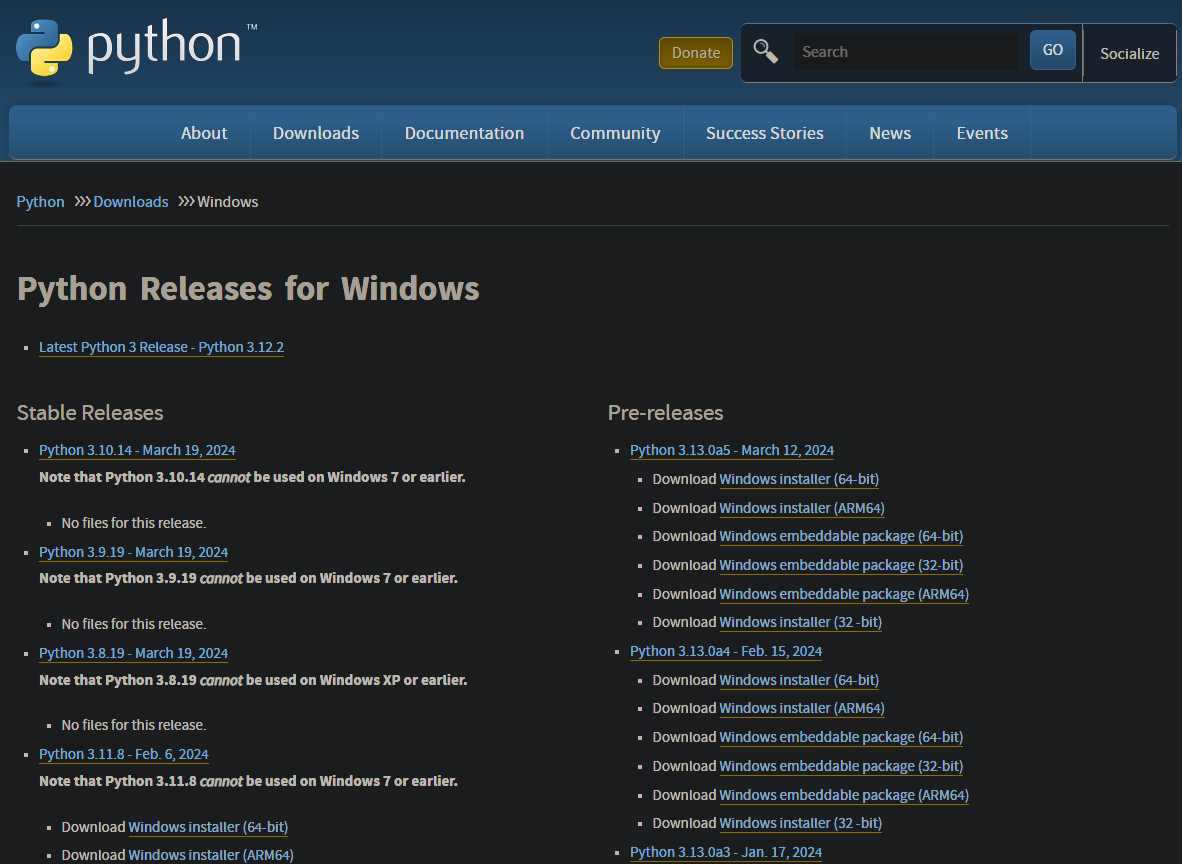
3.9版本(包括3.9)以上的无法在win7上安装
对前缀的说明:
- 以Windows x86-64开头的是 64 位的 Python 安装程序
- 以Windows x86开头的是 32 位的 Python 安装程序
对后缀的说明:
- embeddable zip file :表示.zip格式的绿色免安装版本,可以直接嵌入(集成)到其它的应用程序中
- executable installer :表示.exe格式的可执行程序,这是完整的离线安装包,一般选择这个即可
- web-based installer :表示通过网络安装的,也就是说下载到的是一个空壳,安装过程中还需要联网
下载完安装包之后双击安装包,选择安装偏好
- Install Now :默认安装(直接安装在C盘,并且勾选所有组件并下载)
- Customize installation:自定安装(可选择安装路径和组件)
- Install launcher for all users(requires elevation) (默认勾选)
- Add Python to PATH (一定要勾选,添加Python解释器的安装路径到系统变量,目的:为了操作系统更快的找到Python解释器)
- Documentation :安装Python官方文档
- Pip :安装Python包管理器,可下载安装Python包
- tcl/tk and IDLE :安装TK库和IDLE编辑器(开发环境)
- Python test suite :安装标准库和测试套件
- Py launcher :py 尾缀文件都以python解释器执行
- For all users :所有用户都可使用
验证python安装
打开命令行终端(在Windows上是命令提示符或PowerShell,而在Mac和Linux上是终端),输入以下命令:
**python --version**

如果能正常显示python版本就说明了安装成功
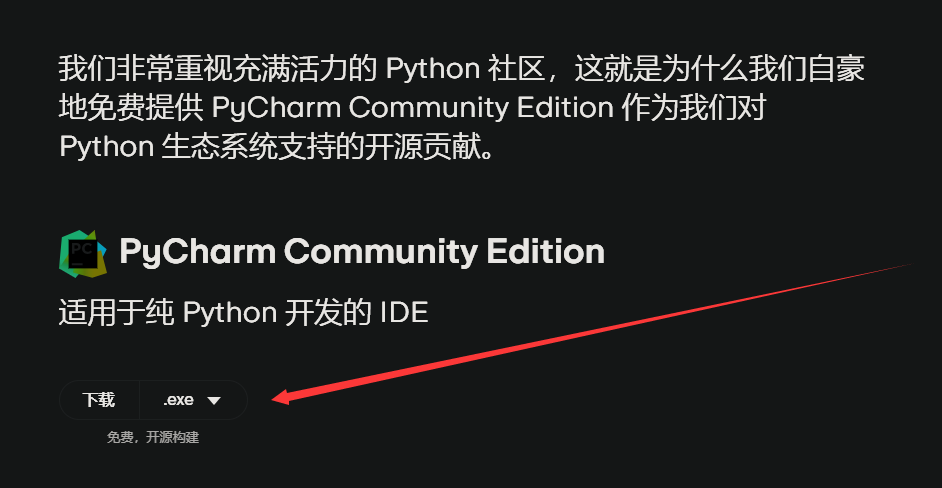
pycharm
第一步:访问官网 https://www.jetbrains.com/zh-cn/pycharm/download/ 下载「社区版 Community」 安装包
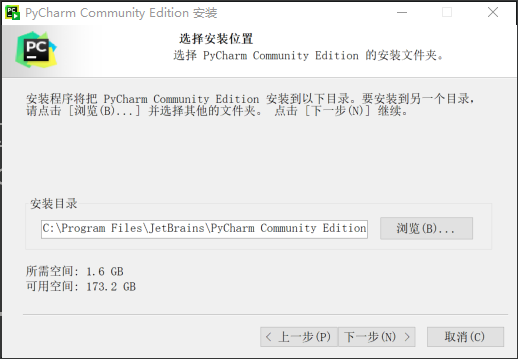
第二部:找到安装包,双击已经下载的安装包,出现下图的界面,点击'下一步'

第三步:选择安装目录,安装路径看个人偏好,选择上好路径之后点击下一步
第四步:进入安装选项,建议勾选下面所有选项
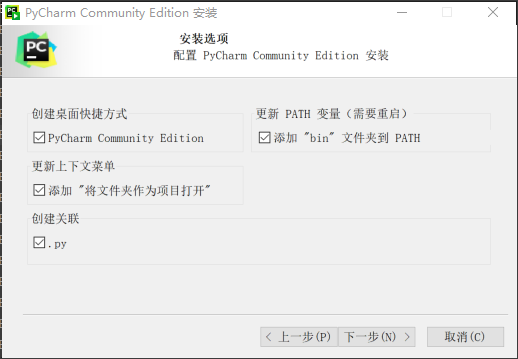
第五步:点击下一步,进入下图界面:
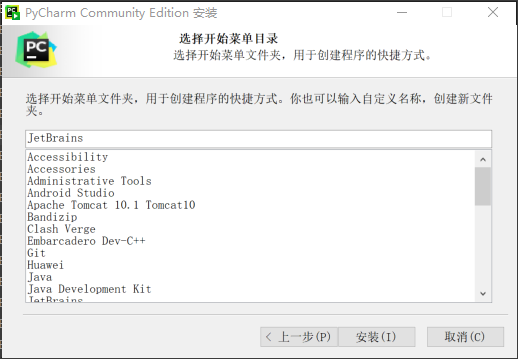
第六步:默认安装即可,等待安装完成
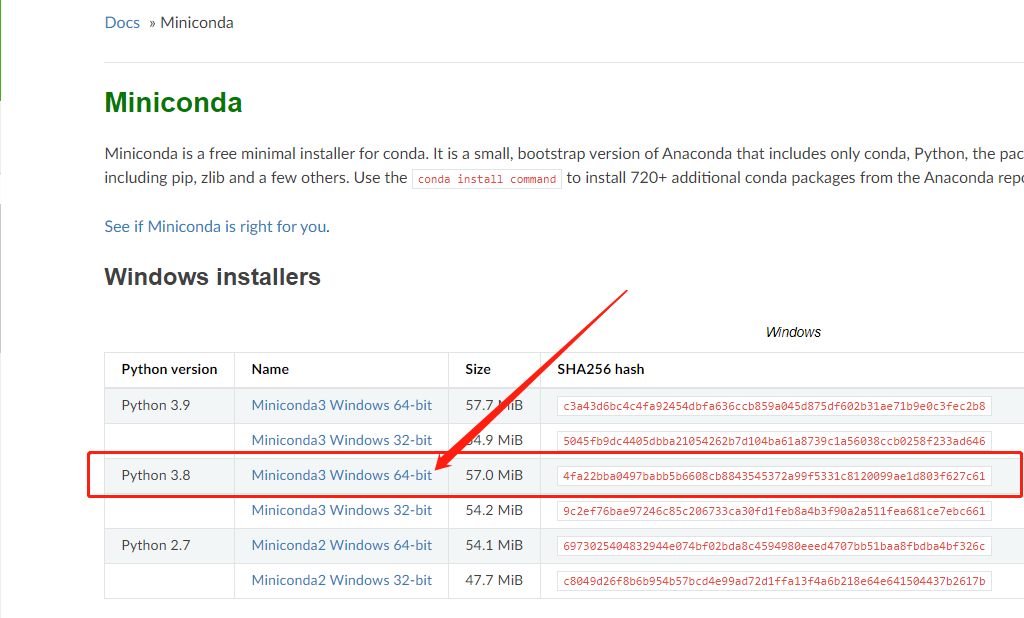
anaconda
进入官网https://docs.anaconda.com/free/miniconda/
下载完毕之后双击安装

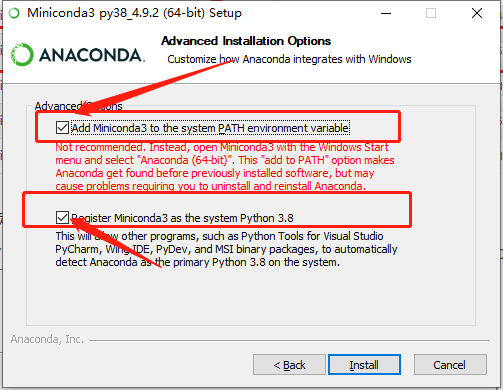
安装完成之后打开windows的命令行(cmd),输入conda env list,出现下列信息则表示conda已完成安装

在命令行中输入下列指令创建虚拟环境
python
conda create -n [环境名称] python==[版本]
输入y之后回车或者直接回车
安装的过程在本地正常,在九天毕昇这个平台出现了异常
```python UnavailableInvalidChannel: The channel is not accessible or is invalid. channel name: anaconda/pkgs/free channel url: https://mirrors.aliyun.com/anaconda/pkgs/main/ error code: 404
You will need to adjust your conda configuration to proceed. Use conda config --show channels to view your configuration's current state, and use conda config --show-sources to view config file locations. ```
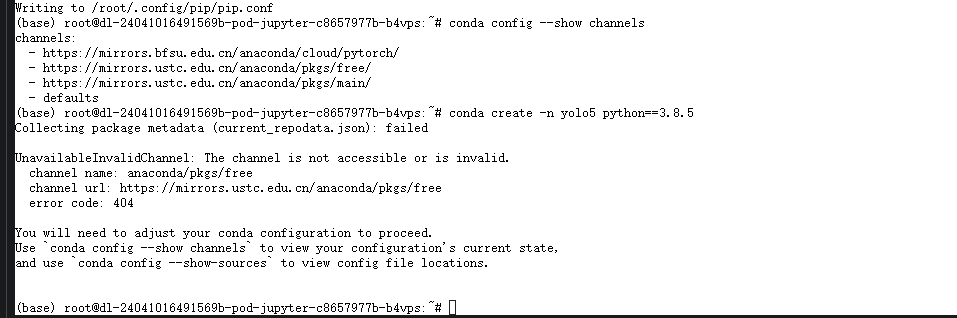
类似于如上的错误信息,但是我认为阿里云的镜像源应该不存在问题,更换了清华源以及中科大的镜像源之后还是这个问题
原因
该平台的python的源为国内安装源,pip可以正常使用,但是国内源停止了Anaconda镜像,不支持conda安装与更新。
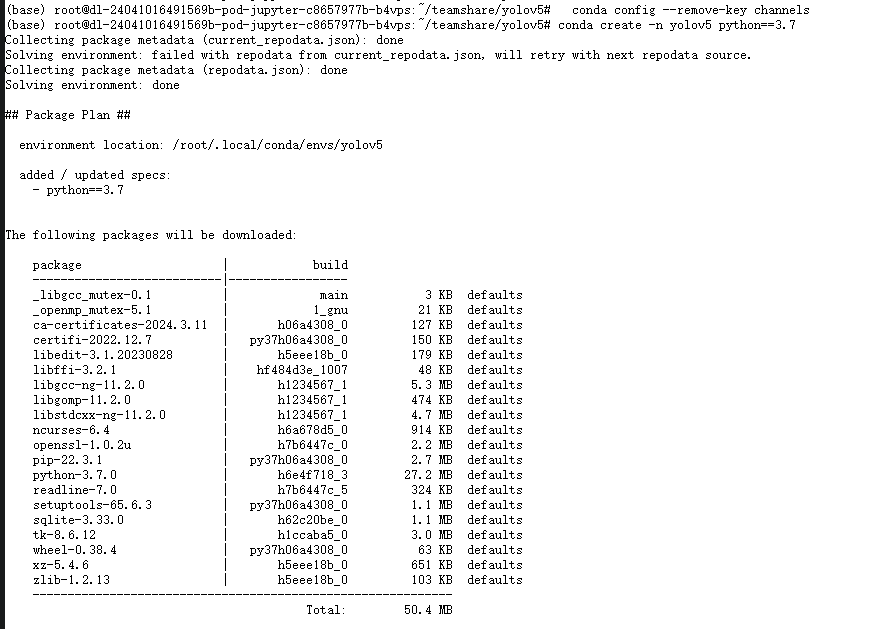
解决办法
- 使用pip安装或更新package
- 换回默认源,继续使用conda,操作如下
python
conda config --remove-key channels
安装结束之后输入下列指令激活虚拟环境
python
conda activate [环境名称]
安装程序所需要的包
接着在命令行中依次执行下列命令安装程序所需的包(请根据你的程序自由选择要安装的包)
python
pip install tensorflow-cpu == 2.3.0 -i https://mirror.baidu.com/pypi/simple
pip install pyqt5 -i https://mirror.baidu.com/pypi/simple
pip install pillow -i https://mirror.baidu.com/pypi/simple
pip install opencv-python -i https://mirror.baidu.com/pypi/simple
pip install matplotlib -i https://mirror.baidu.com/pypi/simple
在pycharm中找到添加新的解释器
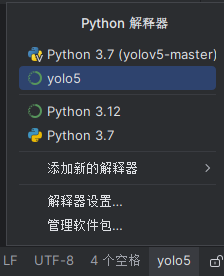
设置成功后右下角会出现虚拟环境的名称
pytorch
pytorch分GPU和CPU版本,CPU版本训练速度比较感人,有GPU的同学建议安装GPU版本的pytorch。我所用笔记本为轻薄本无GPU故使用了CPU版本。
pytorch安装需要注意以下几点:
- 安装之前一定要先更新你的显卡驱动,去官网下载对应型号的驱动安装
- 30系显卡只能使用cuda11的版本
- 一定要创建虚拟环境,这样的话各个深度学习框架之间不发生冲突
python
conda install pytorch==1.8.0 torchvision torchaudio cudatoolkit=10.2 # 注意这条命令指定Pytorch的版本和cuda的版本
conda install pytorch==1.10.0 torchvision torchaudio cudatoolkit=11.3 # 30系列以上显卡gpu版本pytorch安装指令
conda install pytorch==1.8.0 torchvision==0.9.0 torchaudio==0.8.0 cpuonly # CPU的小伙伴直接执行这条命令即可
pycocotools
使用下面这个指令来直接进行安装,不需要下载之后再来安装
python
pip install pycocotools-windows
其他包的安装
另外的话大家还需要安装程序其他所需的包,包括opencv,matplotlib这些包,不过这些包的安装比较简单,直接通过pip指令执行即可,我们cd到yolov5代码的目录下,直接执行下列指令即可完成包的安装。
python
pip install -r requirements.txt
pip install pyqt5
pip install labelme
yolov5
yolov5介绍
YOLOv5 是一个用于目标检测的深度学习模型,由 Ultralytics 开发并发布。它属于 YOLO (You Only Look Once) 系列的最新版本,最早由 Joseph Redmon 在 2016 年提出。YOLO 系列的模型采用的是一种端到端的目标检测方法,即模型在一次前向传播中同时预测图像中的物体类别和物体边界框的位置。
优势
- 多类别检测:YOLOv5能够同时检测多个类别的物体,包括井盖在内,为城市管理部门提供更全面的信息。
- 目标追踪:YOLOv5不仅可以进行目标检测,还能够进行目标追踪,确保监测的连续性和准确性。
- 自适应性:YOLOv5能够通过反馈机制不断学习和优化模型,适应不同环境下的井盖识别任务,提高系统的稳定性和适用性。
- 快速检测:YOLOv5实现实时或近实时的井盖识别,提高了工作效率。
- 较低的硬件要求:YOLOv5在保持高准确性的同时,对硬件资源的要求较低,适用于一般的计算设备。
yolov5仓库
地址https://github.com/ultralytics/yolov5
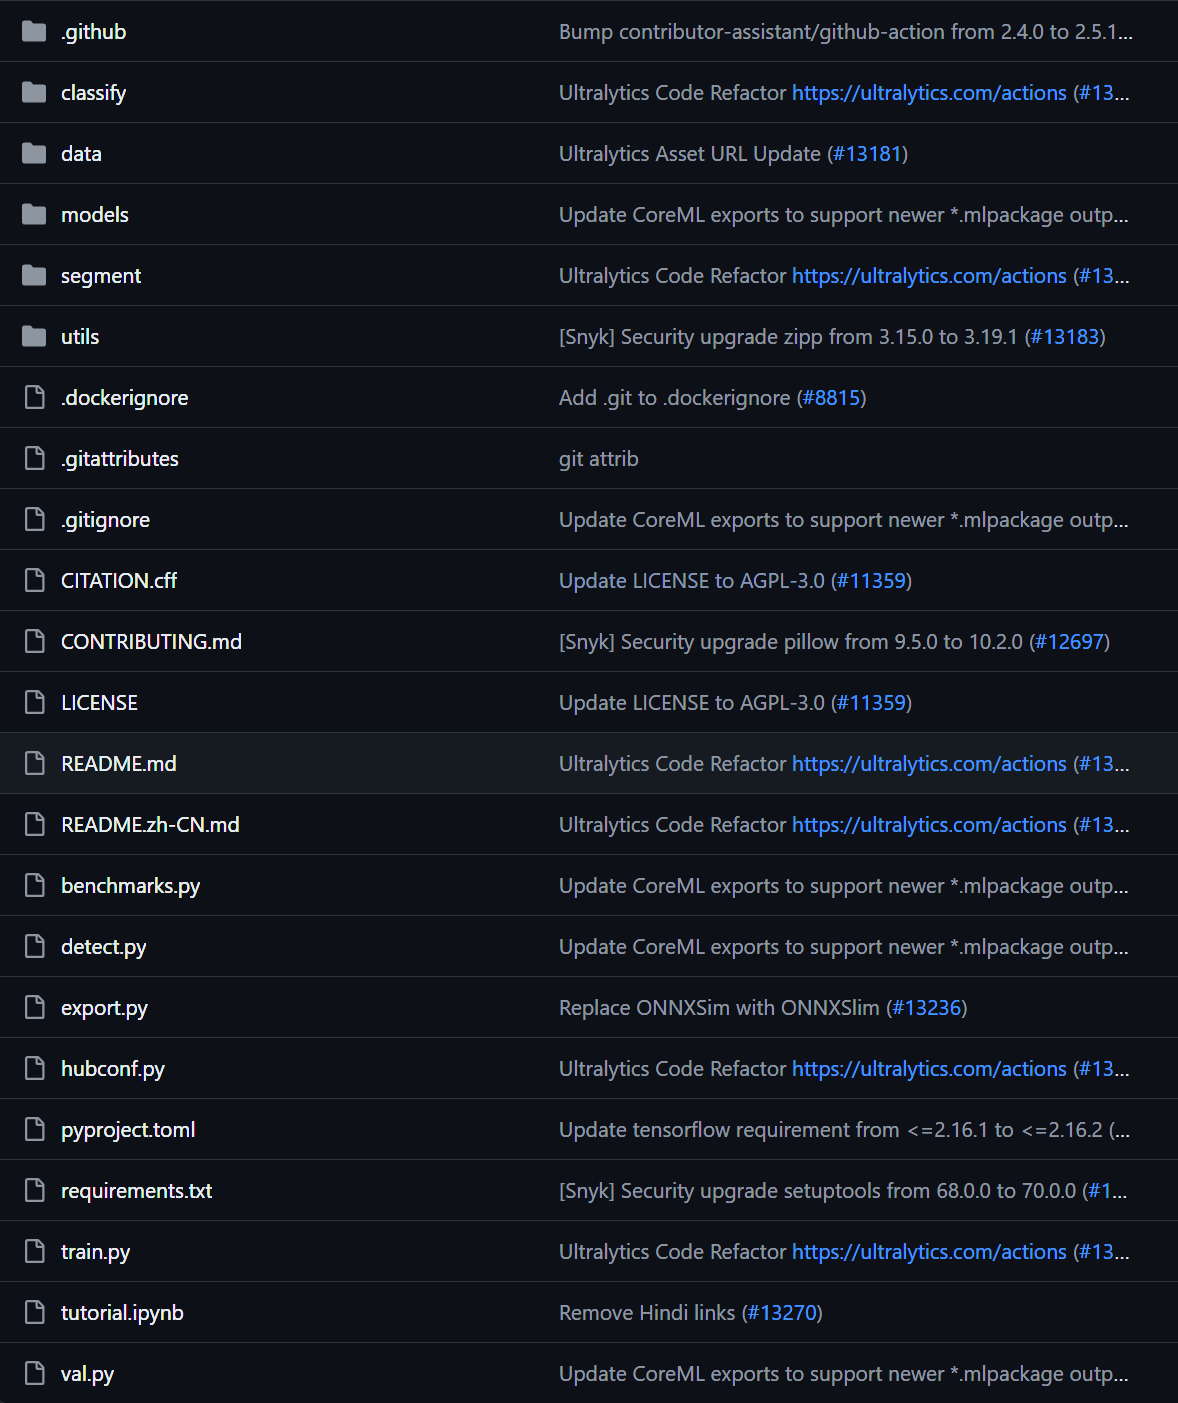
现在来对代码的整体目录做一个介绍:
- ├── data:主要是存放一些超参数的配置文件(这些文件(yaml文件)是用来配置训练集和测试集还有验证集的路径的,其中还包括目标检测的种类数和种类的名称);还有一些官方提供测试的图片。如果是训练自己的数据集的话,那么就需要修改其中的yaml文件。
- 但是自己的数据集不建议放在这个路径下面,而是建议把数据集放到yolov5项目的同级目录下面。
- ├── models:里面主要是一些网络构建的配置文件和函数,其中包含了该项目的四个不同的版本,分别为是s、m、l、x。从名字就可以看出,这几个版本的大小。他们的检测测度分别都是从快到慢,但是精确度分别是从低到高。如果训练自己的数据集,就需要修改这里面相对应的yaml文件来训练自己的模型。
- ├── utils:存放的是工具类的函数,里面有loss函数,metrics函数,plots函数等等。
- ├── detect.py:利用训练好的权重参数进行目标检测,可以进行图像、视频和摄像头的检测。
- ├── train.py:训练自己的数据集的函数。
- ├──requirements.txt:这是一个文本文件,里面写着使用yolov5项目的环境依赖包的一些版本,可以利用该文本导入相应版本的包。
- 以上就是yolov5项目代码的整体介绍。我们训练和测试自己的数据集基本就是利用到如上的代码。
进入yolov5文件夹目录,安装yolov5所需要的第三方库
python
cd [path]
pip install -r requirements.txt
参数解读
python
if __name__ == '__main__':
"""
    opt模型主要参数解析:
    --weights:初始化的权重文件的路径地址
    --cfg:模型yaml文件的路径地址
    --data:数据yaml文件的路径地址
    --hyp:超参数文件路径地址
    --epochs:训练轮次
    --batch-size:喂入批次文件的多少
    --img-size:输入图片尺寸
    --rect:是否采用矩形训练,默认False
    --resume:接着打断训练上次的结果接着训练
    --nosave:不保存模型,默认False
    --notest:不进行test,默认False
    --noautoanchor:不自动调整anchor,默认False
    --evolve:是否进行超参数进化,默认False
    --bucket:谷歌云盘bucket,一般不会用到
    --cache-images:是否提前缓存图片到内存,以加快训练速度,默认False
    --image-weights:使用加权图像选择进行训练
    --device:训练的设备,cpu;0(表示一个gpu设备cuda:0);0,1,2,3(多个gpu设备)
    --multi-scale:是否进行多尺度训练,默认False
    --single-cls:数据集是否只有一个类别,默认False
    --adam:是否使用adam优化器
    --sync-bn:是否使用跨卡同步BN,在DDP模式使用
    --local_rank:DDP参数,请勿修改
    --workers:最大工作核心数
    --project:训练模型的保存位置
    --name:模型保存的目录名称
    --exist-ok:模型目录是否存在,不存在就创建
"""
    parser = argparse.ArgumentParser()
    parser.add_argument('--weights', type=str, default='yolov5s.pt', help='initial weights path')
    parser.add_argument('--cfg', type=str, default='', help='model.yaml path')
    parser.add_argument('--data', type=str, default='data/coco128.yaml', help='data.yaml path')
    parser.add_argument('--hyp', type=str, default='data/hyp.scratch.yaml', help='hyperparameters path')
    parser.add_argument('--epochs', type=int, default=300)
    parser.add_argument('--batch-size', type=int, default=16, help='total batch size for all GPUs')
    parser.add_argument('--img-size', nargs='+', type=int, default=[640, 640], help='[train, test] image sizes')
    parser.add_argument('--rect', action='store_true', help='rectangular training')
    parser.add_argument('--resume', nargs='?', const=True, default=False, help='resume most recent training')
    parser.add_argument('--nosave', action='store_true', help='only save final checkpoint')
    parser.add_argument('--notest', action='store_true', help='only test final epoch')
    parser.add_argument('--noautoanchor', action='store_true', help='disable autoanchor check')
    parser.add_argument('--evolve', action='store_true', help='evolve hyperparameters')
    parser.add_argument('--bucket', type=str, default='', help='gsutil bucket')
    parser.add_argument('--cache-images', action='store_true', help='cache images for faster training')
    parser.add_argument('--image-weights', action='store_true', help='use weighted image selection for training')
    parser.add_argument('--device', default='', help='cuda device, i.e. 0 or 0,1,2,3 or cpu')
    parser.add_argument('--multi-scale', action='store_true', help='vary img-size +/- 50%%')
    parser.add_argument('--single-cls', action='store_true', help='train multi-class data as single-class')
    parser.add_argument('--adam', action='store_true', help='use torch.optim.Adam() optimizer')
    parser.add_argument('--sync-bn', action='store_true', help='use SyncBatchNorm, only available in DDP mode')
    parser.add_argument('--local_rank', type=int, default=-1, help='DDP parameter, do not modify')
    parser.add_argument('--workers', type=int, default=8, help='maximum number of dataloader workers')
    parser.add_argument('--project', default='runs/train', help='save to project/name')
    parser.add_argument('--entity', default=None, help='W&B entity')
    parser.add_argument('--name', default='exp', help='save to project/name')
    parser.add_argument('--exist-ok', action='store_true', help='existing project/name ok, do not increment')
    parser.add_argument('--quad', action='store_true', help='quad dataloader')
    parser.add_argument('--linear-lr', action='store_true', help='linear LR')
    parser.add_argument('--label-smoothing', type=float, default=0.0, help='Label smoothing epsilon')
    parser.add_argument('--upload_dataset', action='store_true', help='Upload dataset as W&B artifact table')
    parser.add_argument('--bbox_interval', type=int, default=-1, help='Set bounding-box image logging interval for W&B')
    parser.add_argument('--save_period', type=int, default=-1, help='Log model after every "save_period" epoch')
    parser.add_argument('--artifact_alias', type=str, default="latest", help='version of dataset artifact to be used')
    opt = parser.parse_args()
需要修改的
```python 最后,在根目录中对train.py中的一些参数进行修改,主要参数解释如下。平时训练,主要用到的只有这几个参数而已:–weights,–cfg,–data,–epochs,–batch-size,–img-size,–project。
parser = argparse.ArgumentParser()
加载预训练的模型权重文件,如果文件夹下没有该文件,则在训练前会自动下载
parser.add_argument('--weights', type=str, default=ROOT / 'yolov5l.pt', help='initial weights path')
模型配置文件,网络结构,使用修改好的yolov5l.yaml文件
parser.add_argument('--cfg', type=str, default='models/yolov5l.yaml', help='model.yaml path')
数据集配置文件,数据集路径,类名等,使用配置好的cat.yaml文件
parser.add_argument('--data', type=str, default=ROOT / 'data/cat.yaml', help='dataset.yaml path')
超参数文件
parser.add_argument('--hyp', type=str, default=ROOT / 'data/hyps/hyp.scratch.yaml', help='hyperparameters path')
训练总轮次,1个epoch等于使用训练集中的全部样本训练一次,值越大模型越精确,训练时间也越长,默认为300
parser.add_argument('--epochs', type=int, default=300)
批次大小,一次训练所选取的样本数,显卡不太行的话,就调小点,反正3060是带不动batch-size=16的,传-1的话就是autobatch
parser.add_argument('--batch-size', type=int, default=16, help='total batch size for all GPUs')
输入图片分辨率大小,默认为640
parser.add_argument('--imgsz', '--img', '--img-size', type=int, default=640, help='train, val image size (pixels)')
是否采用矩形训练,默认False,开启后可显著的减少推理时间
parser.addargument('--rect', action='storetrue', help='rectangular training')
继续训练,默认从打断后的最后一次训练继续,需开启default=True
parser.add_argument('--resume', nargs='?', const=True, default=False, help='resume most recent training')
仅保存最终一次epoch所产生的模型
parser.addargument('--nosave', action='storetrue', help='only save final checkpoint')
仅在最终一次epoch后进行测试
parser.addargument('--noval', action='storetrue', help='only validate final epoch')
禁用自动锚点检查
parser.addargument('--noautoanchor', action='storetrue', help='disable autoanchor check')
超参数演变
parser.add_argument('--evolve', type=int, nargs='?', const=300, help='evolve hyperparameters for x generations')
谷歌云盘bucket,一般不会用到
parser.add_argument('--bucket', type=str, default='', help='gsutil bucket')
是否提前缓存图片到内存,以加快训练速度,默认False
parser.add_argument('--cache', type=str, nargs='?', const='ram', help='--cache images in "ram" (default) or "disk"')
选用加权图像进行训练
parser.addargument('--image-weights', action='storetrue', help='use weighted image selection for training')
训练的设备,cpu;0(表示一个gpu设备cuda:0);0,1,2,3(多个gpu设备)。值为空时,训练时默认使用计算机自带的显卡或CPU
parser.add_argument('--device', default='', help='cuda device, i.e. 0 or 0,1,2,3 or cpu')
是否进行多尺度训练,默认False
parser.addargument('--multi-scale', action='storetrue', help='vary img-size +/- 50%%')
数据集是否只有一个类别,默认False
parser.addargument('--single-cls', action='storetrue', help='train multi-class data as single-class')
是否使用adam优化器,默认False
parser.addargument('--adam', action='storetrue', help='use torch.optim.Adam() optimizer')
是否使用跨卡同步BN,在DDP模式使用
parser.addargument('--sync-bn', action='storetrue', help='use SyncBatchNorm, only available in DDP mode')
dataloader的最大worker数量,大于0时使用子进程读取数据,训练程序有可能会卡住
parser.add_argument('--workers', type=int, default=8, help='maximum number of dataloader workers')
训练结果所存放的路径,默认为runs/train
parser.add_argument('--project', default=ROOT / 'runs/train', help='save to project/name')
训练结果所在文件夹的名称,默认为exp
parser.add_argument('--name', default='exp', help='save to project/name')
如训练结果存放路径重名,不覆盖已存在的文件夹
parser.addargument('--exist-ok', action='storetrue', help='existing project/name ok, do not increment')
使用四合一dataloader
parser.addargument('--quad', action='storetrue', help='quad dataloader')
线性学习率
parser.addargument('--linear-lr', action='storetrue', help='linear LR')
标签平滑处理,默认0.0
parser.add_argument('--label-smoothing', type=float, default=0.0, help='Label smoothing epsilon')
已训练多少次epoch后结果仍没有提升就终止训练,默认100
parser.add_argument('--patience', type=int, default=100, help='EarlyStopping patience (epochs without improvement)')
冻结模型层数,默认0不冻结,冻结主干网就传10,冻结所有就传24
parser.add_argument('--freeze', type=int, default=0, help='Number of layers to freeze. backbone=10, all=24')
设置多少次epoch保存一次模型
parser.add_argument('--save-period', type=int, default=-1, help='Save checkpoint every x epochs (disabled if < 1)')
分布式训练参数,请勿修改
parser.addargument('--localrank', type=int, default=-1, help='DDP parameter, do not modify')
Weights & Biases arguments(一般上用不着)
parser.addargument('--entity', default=None, help='W&B: Entity') parser.addargument('--uploaddataset', action='storetrue', help='W&B: Upload dataset as artifact table') parser.addargument('--bboxinterval', type=int, default=-1, help='W&B: Set bounding-box image logging interval') parser.addargument('--artifactalias', type=str, default='latest', help='W&B: Version of dataset artifact to use')
opt = parser.parseknownargs()[0] if known else parser.parse_args() ```
可视化
tensorboard --logdir runs/train/exp
yolov5测试
- 激活虚拟环境
python
conda activate yolo5
- 进入yolov5所在环境
笔者这边为
d:/code/python/yolov5-master
python
cd d:/code/python/yolov5-master
- 在命令行输入一下指令
python
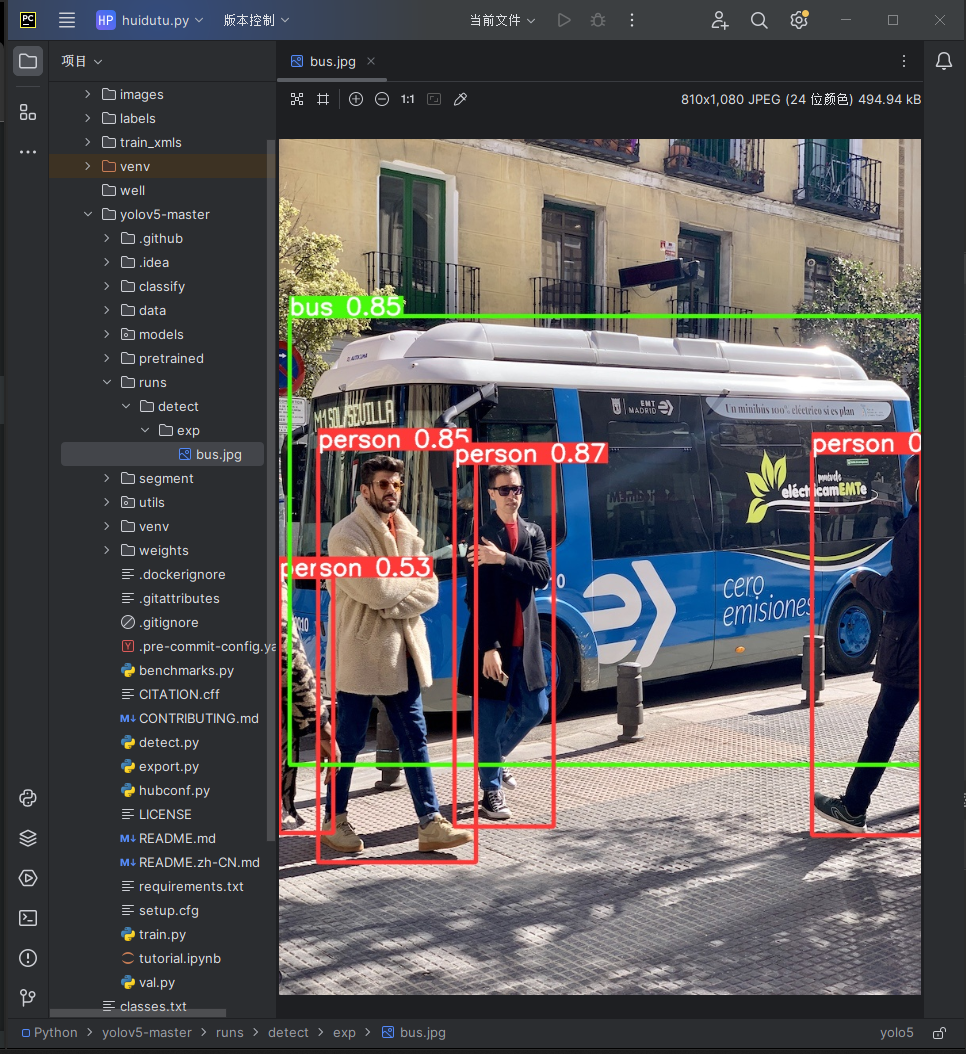
python detect.py --source data/images/bus.jpg --weights pretrained/yolov5s.pt
 得到以上输出
- 在本地runs目录下可以找到检测之后的结果
数据处理
自定义数据集
建立井盖隐患数据集
利用python爬虫代码在百度上爬取井盖隐患图片(完好、破损、缺失、未盖、井圈受损),各类分别爬取五百张,从而建立2500张的井盖隐患数据集,但实际并没有这么多符合我们要求的图片。
```python import requests startpn = 0 # 初始 pn 值 str = ('https://image.baidu.com/search/acjson?tn=resultjsoncom&logid=7735428982766424353&ipn=rj&ct=201326592&is=&fp' '=result&fr=&word=%E4%BA%95%E5%9C%88%E7%A0%B4%E6%8D%9F&queryWord=%E4%BA%95%E5%9C%88%E7%A0%B4%E6%8D%9F&cl=2&lm' '=-1&ie=utf-8&oe=utf-8&adpicid=&st=-1&z=&ic=&hd=&latest=©right=&s=&se=&tab=&width=&height=&face=0&istype=2' f'&qc=&nc=1&expermode=&nojc=&isAsync=&pn={startpn}&rn=30&gsm=1e&1711546213081=') headers = { 'Host': 'image.baidu.com', 'Cookie': 'BDqhfp=%E4%BA%95%E7%9B%96%E5%AE%8C%E5%A5%BD%E5%9B%BE%E7%89%87%26%26NaN-1undefined%26%260%26%261; ' 'BIDUPSID=D02A8140B4BB076983DDEC1ED5BA460A; PSTM=1709897174; ', 'Referer': ('https://image.baidu.com/search/acjson?tn=resultjsoncom&logid=7735428982766424353&ipn=rj&ct=201326592&is=&fp' '=result&fr=&word=%E4%BA%95%E5%9C%88%E7%A0%B4%E6%8D%9F&queryWord=%E4%BA%95%E5%9C%88%E7%A0%B4%E6%8D%9F&cl=2&lm' '=-1&ie=utf-8&oe=utf-8&adpicid=&st=-1&z=&ic=&hd=&latest=©right=&s=&se=&tab=&width=&height=&face=0&istype=2' f'&qc=&nc=1&expermode=&nojc=&isAsync=&pn={start_pn}&rn=30&gsm=1e&1711546213081='), 'User-Agent': 'Mozilla/5.0 (Windows NT 10.0; Win64; x64) AppleWebKit/537.36 (KHTML, like Gecko) Chrome/121.0.0.0 ' 'Safari/537.36 Edg/121.0.0.0 ', } number = 1
for page in range(0, 20): str = ('https://image.baidu.com/search/acjson?tn=resultjsoncom&logid=7735428982766424353&ipn=rj&ct=201326592&is=&fp' '=result&fr=&word=%E4%BA%95%E5%9C%88%E7%A0%B4%E6%8D%9F&queryWord=%E4%BA%95%E5%9C%88%E7%A0%B4%E6%8D%9F&cl=2&lm' '=-1&ie=utf-8&oe=utf-8&adpicid=&st=-1&z=&ic=&hd=&latest=©right=&s=&se=&tab=&width=&height=&face=0&istype=2' f'&qc=&nc=1&expermode=&nojc=&isAsync=&pn={startpn + page * 30}&rn=30&gsm=1e&1711546213081=') url = str response = requests.get(url=url, headers=headers) jsondata = response.json() datalist = jsondata['data'] for data in datalist[:-1]: fromPageTitleEnc = data['fromPageTitleEnc'] middleURL = data['middleURL'] print(fromPageTitleEnc, middleURL) imgdata = requests.get(middleURL).content with open(f'img/{number}.jpg', mode='wb') as f: f.write(imgdata) number += 1 ```

数据集预处理
利用labelimg数据标注网站对井盖隐患数据集进行预处理,将图片中的每一类井盖框起来并打上标签。
数据标注
labelimg
labelimg是一款开源的数据标注工具,可以标注三种格式
- voc 标签格式,保存为xml文件
- yolo标签格式,保存为txt文件
- createML标签格式,保存为json格式
python
cd 文件目录
- 安装labelimg
python
pip install labelimg
- 导入标签信息
python
labelimg JPEGImage predefined_classes.txt
- 打开labelimg
python
labelimg
- 界面介绍如下
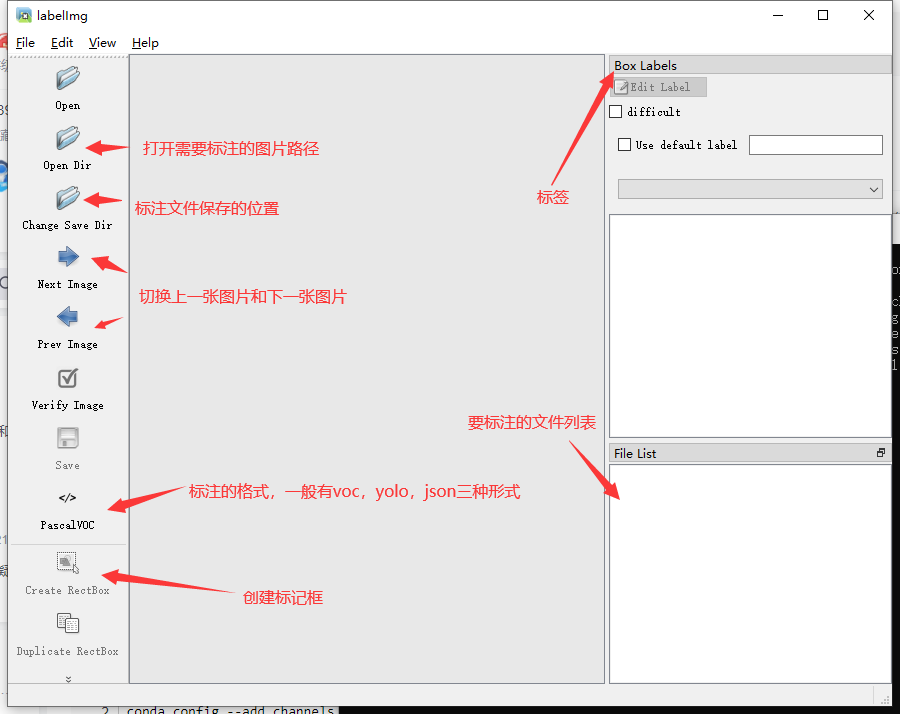
- labelimg的快捷键如下

标注步骤
- 打开图片目录
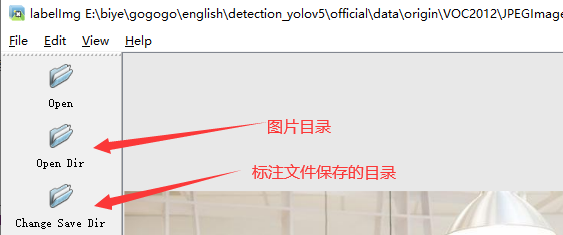
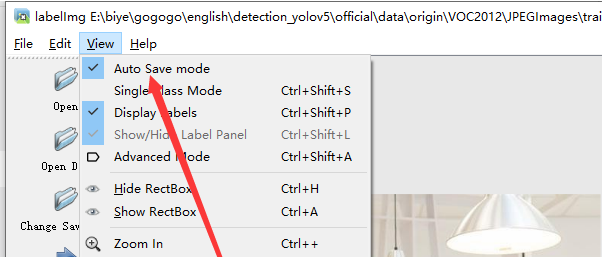
- 设置标注文件保存的目录并设置自动保存
- 开始标注画框,并选择分类标签,保存快捷键ctrl + s
- d切换到下一张继续标注,不断重复
- 导出数据集标签,选择yolo需要的txt格式
给每张图片中的每一个井盖都标注好类别以后,导出标注完的数据,导出的数据是txt格式的labels,每个txt里面有n行(n为每张图片中的井盖标注数量),每行有五个数据,分别是该井盖的类别(用数字表示的)以及标注井盖的标注框的坐标位置信息:

- 生成txt文件以后,对数据集进行处理,整理成能输入进yolo模型源代码的样子
专用数据集
该数据集包含1325张井盖隐患图片以及这些图片对应的xml格式标签:

而本项目中,yolo模型用到的代码需要数据集的标签为txt格式才能输入,所以需要把比赛数据集给的xml格式标签改为txt格式。
XML和TXT标签
ML格式的标签通常用于PASCAL VOC数据集,包含以下信息:
文件扩展名: .xml
标签内容:
XML格式标签
plain
<annotation>
    <filename>example.jpg</filename>
    <size>
        <width>640</width>
        <height>480</height>
    </size>
    <object>
        <name>cat</name>
        <bndbox>
            <xmin>100</xmin>
            <ymin>150</ymin>
            <xmax>200</xmax>
            <ymax>250</ymax>
        </bndbox>
    </object>
</annotation>
TXT格式标签
TXT格式的标签通常用于Darknet框架,包含以下信息:
文件扩展名: .txt
每行的内容:每行描述一个对象,包括类别和边界框中心的相对坐标以及宽度和高度
格式:
: 对象类别的索引
, : 边界框中心相对于图像宽度和高度的比例
, : 边界框宽度和高度相对于整个图像的比例
示例TXT标签:
plain
0 0.4 0.5 0.2 0.3
这表示类别为0的对象,中心位于图像宽度的40%和高度的50%,宽度占图像宽度的20%,高度占图像高度的30%。
区别
格式:
XML使用一种结构化的文本格式,包含标签和嵌套元素,易于阅读和解析。
TXT是一种简单的文本格式,每行描述一个对象,直接包含类别和相对位置信息。
适用性:
XML常用于PASCAL VOC等数据集,支持更多的元数据信息,适合在更多上下文中使用。
TXT格式通常用于Darknet框架,简单直观,适合YOLO模型的训练和预测。
解析:
解析XML需要使用XML解析器,通常需要额外的代码来处理。
解析TXT则更为简单直接,可以直接读取和解析文本文件。
XML标签修复
XML标签有一定问题,很多图片标注的size部分不正确,导致转换txt格式出现错误

异常XML格式标签修复
```python import os import xml.etree.ElementTree as ET from PIL import Image
def fixxmlsize(xmlfile, imagefolder): # Parse XML tree = ET.parse(xml_file) root = tree.getroot()
# Find size element
size_elem = root.find('size')
if size_elem is None:
    print(f"Error: 'size' element not found in {xml_file}")
    return False

# Get image filename
image_filename = os.path.splitext(os.path.basename(xml_file))[0] + '.jpg'
image_path = os.path.join(image_folder, image_filename)

# Check if image file exists
if not os.path.exists(image_path):
    print(f"Error: Image file {image_path} not found")
    return False

# Get image size
image = Image.open(image_path)
width, height = image.size

# Update size element
size_elem.find('width').text = str(width)
size_elem.find('height').text = str(height)

# Save updated XML
tree.write(xml_file)

print(f"Fixed size for {xml_file}: {width} x {height}")
return True
def fixxmlswithzerosize(xmlfolder, imagefolder): for xmlfile in os.listdir(xmlfolder): if xmlfile.endswith('.xml'): xmlpath = os.path.join(xmlfolder, xmlfile) try: if not fixxmlsize(xmlpath, imagefolder): print(f"Failed to fix {xmlpath}") except Exception as e: print(f"Error processing {xmlpath}: {e}")
if name == "main": xmlfolder = r'D:\Download\data\trainxmls' imagefolder = r'D:\Download\data\trainimages'
fix_xmls_with_zero_size(xml_folder, image_folder)
```
格式转换
xml格式转换成能输入yolo模型的txt格式
```python import xml.etree.ElementTree as ET import os
def convert(size, box): width, height = size xcenter = (box[0] + box[1]) / 2.0 ycenter = (box[2] + box[3]) / 2.0
# Calculate width and height relative to image size
w = (box[1] - box[0]) / width
h = (box[3] - box[2]) / height

# Normalize x_center, y_center, w, h to range [0, 1]
x_center = x_center / width
y_center = y_center / height
w = w
h = h

return x_center, y_center, w, h
def convertannotation(xmlfilespath, savetxtfilespath, classes): xmlfiles = os.listdir(xmlfilespath) print(xmlfiles) for xmlname in xmlfiles: print(xmlname) xmlfile = os.path.join(xmlfilespath, xmlname) outtxtpath = os.path.join(savetxtfilespath, xmlname.split('.')[0] + '.txt') with open(outtxtpath, 'w') as outtxtf: tree = ET.parse(xmlfile) root = tree.getroot() size = root.find('size') if size is None: print(f"Error: 'size' not found in {xml_name}") continue w = int(size.find('width').text) h = int(size.find('height').text)
        for obj in root.iter('object'):
            difficult = obj.find('difficult').text
            cls = obj.find('name').text
            if cls not in classes or int(difficult) == 1:
                continue
            cls_id = classes.index(cls)
            xmlbox = obj.find('bndbox')
            if xmlbox is None:
                print(f"Error: 'bndbox' not found in {xml_name}")
                continue
            b = (float(xmlbox.find('xmin').text), float(xmlbox.find('xmax').text),
                 float(xmlbox.find('ymin').text), float(xmlbox.find('ymax').text))
            bb = convert((w, h), b)
            out_txt_f.write(str(cls_id) + " " + " ".join([str(a) for a in bb]) + '\n')
if name == "main": classes1 = ['good', 'broke', 'lose', 'uncovered', 'circle'] xmlfiles1 = r'D:\Code\Python\od\testxmls' savetxtfiles1 = r'D:\Code\Python\od\testtxt' convertannotation(xmlfiles1, savetxtfiles1, classes1) with open(os.path.join(savetxtfiles1, 'classes.txt'), 'w') as file: for classname in classes1: file.write(class_name + '\n') ```
数据增强
目前数据集仅仅只有一千多张,加上自己自制的数据集,一共不到两千张,远远不够深度学习模型的训练需求量,数据集太少了,目前没有在网上找到更多数据集,因此只有对已有数据进行数据增强,泛化数据集。本次数据增强采用了旋转、翻转、裁剪、高斯模糊、高斯噪声、调整RGB通道、调亮度等处理,对每张图片进行了1-4张的泛化,最终达到了五千多张数据集。
数据增强不仅仅增强图片,还要对每张图片的标签也要增强,所以images和labels要一一对应同时泛化。
格式转化
```python import os import xml.etree.ElementTree as ET from PIL import Image
def convertyolotoxml(yolopath, imagefolder, xmloutputpath, classnames): for filename in os.listdir(yolopath): if filename.endswith(".txt"): # Read YOLO txt file with open(os.path.join(yolopath, filename), "r") as file: lines = file.readlines()
        # Get image size from image file
        image_name = filename.replace(".txt", ".jpg")
        image_path = os.path.join(image_folder, image_name)
        if not os.path.exists(image_path):
            print(f"Image not found: {image_path}")
            continue
        image = Image.open(image_path)
        image_width, image_height = image.size

        # Create XML
        xml_root = ET.Element("annotation")

        # Filename
        ET.SubElement(xml_root, "filename").text = image_name

        # Size
        size_elem = ET.SubElement(xml_root, "size")
        ET.SubElement(size_elem, "width").text = str(image_width)
        ET.SubElement(size_elem, "height").text = str(image_height)

        for line in lines:
            class_id, x_center, y_center, width, height = map(float, line.split())
            class_name = class_names[int(class_id)]

            # Convert YOLO format to Pascal VOC format
            x_min = (x_center - width / 2) * image_width
            y_min = (y_center - height / 2) * image_height
            x_max = (x_center + width / 2) * image_width
            y_max = (y_center + height / 2) * image_height

            # Object
            object_elem = ET.SubElement(xml_root, "object")
            ET.SubElement(object_elem, "name").text = class_name
            bndbox_elem = ET.SubElement(object_elem, "bndbox")
            ET.SubElement(bndbox_elem, "xmin").text = str(int(x_min))
            ET.SubElement(bndbox_elem, "ymin").text = str(int(y_min))
            ET.SubElement(bndbox_elem, "xmax").text = str(int(x_max))
            ET.SubElement(bndbox_elem, "ymax").text = str(int(y_max))

        # Write XML to file
        xml_tree = ET.ElementTree(xml_root)
        xml_tree.write(os.path.join(xml_output_path, filename.replace(".txt", ".xml")), encoding="utf-8", xml_declaration=True)
Example usage
yololabelpath = "E:/well(match)/labels/test" imagefolder = "E:/well(match)/images/test" xmloutputpath = "E:/well(match)/labelsxmls/test" classnames = ['good','broke','lose','uncovered','circle'] # Update with your class names convertyolotoxml(yololabelpath, imagefolder, xmloutputpath, classnames) 、、、、
```
图像增强
本次数据增强采用了旋转、翻转、裁剪、高斯模糊、高斯噪声、调整RGB通道、调亮度等处理,对每张图片进行了1-4张的泛化,最终达到了五千多张数据集。
```python
数据增强选项
self.aug = A.Compose([ A.RandomBrightnessContrast(brightnesslimit=0.3, contrastlimit=0.3, p=0.5), # 随机亮度对比度 # A.RandomBrightness(limit=0.3, p=0.5), A.GaussianBlur(p=0.3), # 高斯模糊 A.GaussNoise(varlimit=(400, 450), mean=0, p=0.7), # 高斯噪声 A.CLAHE(cliplimit=2.0, tilegridsize=(4, 4), p=0.3), # 直方图均衡 A.Equalize(p=0.3), # 均衡图像直方图 A.Rotate(limit=90, interpolation=0, bordermode=0, p=0.7), # 旋转 A.RandomRotate90(p=0.8), # A.CoarseDropout(p=0.5), # 随机生成矩阵黑框 A.OneOf([ A.RGBShift(rshiftlimit=30, gshiftlimit=30, bshift_limit=30, p=0.3), # RGB图像的每个通道随机移动值 A.ChannelShuffle(p=0.3), # 随机排列通道 A.ColorJitter(p=0.3), # 随机改变图像的亮度、对比度、饱和度、色调 A.ChannelDropout(p=0.3), # 随机丢弃通道 ], p=0.3), A.Downscale(p=0.2), # 随机缩小和放大来降低图像质量 A.Emboss(p=0.3), # 压印输入图像并将结果与原始图像叠加 ],
voc: [xmin, ymin, xmax, ymax] # 经过归一化
min_area: 表示bbox占据的像素总个数, 当数据增强后, 若bbox小于这个值则从返回的bbox列表删除该bbox.
min_visibility: 值域为[0,1], 如果增强后的bbox面积和增强前的bbox面积比值小于该值, 则删除该bbox
A.BboxParams(format='pascalvoc', minarea=0., minvisibility=0., labelfields=['category_id']) )
print('----------------------------') print("labels: ", self.labels) if self.startaugid is None: self.startaugid = len(os.listdir(self.prexmlpath)) + 1 print("the startaugid is not set, default: len(images)", self.startaugid) print('----------------------------') ```
将泛化后的xml格式标签又转换回txt格式,然后带进YOLOv5模型进行模型训练
数据集划分
数据集文件夹内分为两个文件夹,分别是images(图片)以及labels(每个图片生成的txt格式文件),每个image和label一定要一一对应,images和labels文件夹内又分成train和test两个文件夹。
python
dataset
├── images
       ├── train
              ├── xx.jpg
       ├── test
              ├── xx.jpg
├── labels
       ├── train
              ├── xx.txt
       ├── test
              ├── xx.txt
```python import os import random from shutil import copyfile
def splitdataset(imagefolder, txtfolder, outputfolder, splitratio=(0.8, 0.1, 0.1)): # Ensure output folders exist for dataset in ['train', 'val', 'test']: if not os.path.exists(os.path.join(outputfolder, dataset, 'images')): os.makedirs(os.path.join(outputfolder, dataset, 'images')) if not os.path.exists(os.path.join(outputfolder, dataset, 'txt')): os.makedirs(os.path.join(output_folder, dataset, 'txt'))
# Get list of image files
image_files = [f for f in os.listdir(image_folder) if f.endswith(('.jpg', '.jpeg', '.png'))]
random.shuffle(image_files)

num_images = len(image_files)
num_train = int(split_ratio[0] * num_images)
num_val = int(split_ratio[1] * num_images)

train_images = image_files[:num_train]
val_images = image_files[num_train:num_train + num_val]
test_images = image_files[num_train + num_val:]

# Copy images to respective folders
for dataset, images_list in zip(['train', 'val', 'test'], [train_images, val_images, test_images]):
    for image_file in images_list:
        image_path = os.path.join(image_folder, image_file)
        copyfile(image_path, os.path.join(output_folder, dataset, 'images', image_file))
        txt_file = os.path.splitext(image_file)[0] + '.txt'
        txt_path = os.path.join(txt_folder, txt_file)

        # Copy corresponding txt file if exists
        if os.path.exists(txt_path):
            copyfile(txt_path, os.path.join(output_folder, dataset, 'txt', txt_file))
if name == "main": imagefolderpath = "D:\Code\Python\well\images" txtfolderpath = "D:\Code\Python\well\labels" outputdatasetpath = "D:\Code\Python\well\data"
split_dataset(image_folder_path, txt_folder_path, output_dataset_path)
```
模型训练
训练环境
Ubuntu18.04, 8核32G + 1 V100,CUDA10.1,python3.11
将数据集导入代码中先需要一个yaml格式代码文件,将数据集中的train数据和test数据导入:
well.yaml文件:
```python train: welldataDemo/images/train # 128 images val: welldataDemo/images/test # 128 images
number of classes
nc: 5
class names
names: ['broke', 'circle', 'good', 'lose', 'uncovered']
```
将得到的well.yaml代入yolo模型的train部分代码:
python
if __name__ == '__main__':
    parser = argparse.ArgumentParser()
    parser.add_argument('--weights', type=str, default='yolov5s.pt', help='initial weights path')
    parser.add_argument('--cfg', type=str, default='', help='model.yaml path')
    parser.add_argument('--data', type=str, default='data/well.yaml', help='data.yaml path')
    parser.add_argument('--hyp', type=str, default='data/hyp.scratch.yaml', help='hyperparameters path')#一些超参数,学习率什么的
    parser.add_argument('--epochs', type=int, default=300)
    parser.add_argument('--batch-size', type=int, default=16, help='total batch size for all GPUs')
    parser.add_argument('--img-size', nargs='+', type=int, default=[640, 640], help='[train, test] image sizes')
    parser.add_argument('--rect', action='store_true', help='rectangular training')
    parser.add_argument('--resume', nargs='?', const=True, default=False, help='resume most recent training')
    parser.add_argument('--nosave', action='store_true', help='only save final checkpoint')
    parser.add_argument('--notest', action='store_true', help='only test final epoch')
    parser.add_argument('--noautoanchor', action='store_true', help='disable autoanchor check')
    parser.add_argument('--evolve', action='store_true', help='evolve hyperparameters')
    parser.add_argument('--bucket', type=str, default='', help='gsutil bucket')
    parser.add_argument('--cache-images', action='store_true', help='cache images for faster training')
    parser.add_argument('--image-weights', action='store_true', help='use weighted image selection for training')
    parser.add_argument('--device', default='', help='cuda device, i.e. 0 or 0,1,2,3 or cpu')
    parser.add_argument('--multi-scale', action='store_true', help='vary img-size +/- 50%%')
    parser.add_argument('--single-cls', action='store_true', help='train multi-class data as single-class')
    parser.add_argument('--adam', action='store_true', help='use torch.optim.Adam() optimizer')
    parser.add_argument('--sync-bn', action='store_true', help='use SyncBatchNorm, only available in DDP mode')
    parser.add_argument('--local_rank', type=int, default=-1, help='DDP parameter, do not modify')
    parser.add_argument('--workers', type=int, default=0, help='maximum number of dataloader workers')
    parser.add_argument('--project', default='runs/train', help='save to project/name')
    parser.add_argument('--entity', default=None, help='W&B entity')
    parser.add_argument('--name', default='exp', help='save to project/name')
    parser.add_argument('--exist-ok', action='store_true', help='existing project/name ok, do not increment')
    parser.add_argument('--quad', action='store_true', help='quad dataloader')
    parser.add_argument('--linear-lr', action='store_true', help='linear LR')
    parser.add_argument('--label-smoothing', type=float, default=0.0, help='Label smoothing epsilon')
    parser.add_argument('--upload_dataset', action='store_true', help='Upload dataset as W&B artifact table')
    parser.add_argument('--bbox_interval', type=int, default=-1, help='Set bounding-box image logging interval for W&B')
    parser.add_argument('--save_period', type=int, default=-1, help='Log model after every "save_period" epoch')
    parser.add_argument('--artifact_alias', type=str, default="latest", help='version of dataset artifact to be used')
    opt = parser.parse_args()
运行train.py训练即可
python
python train.py --data well.yaml --cfg yolov5l_well.yaml --weights pretrained/yolov5l.pt --epoch 300 --batch-size 2 --device gpu
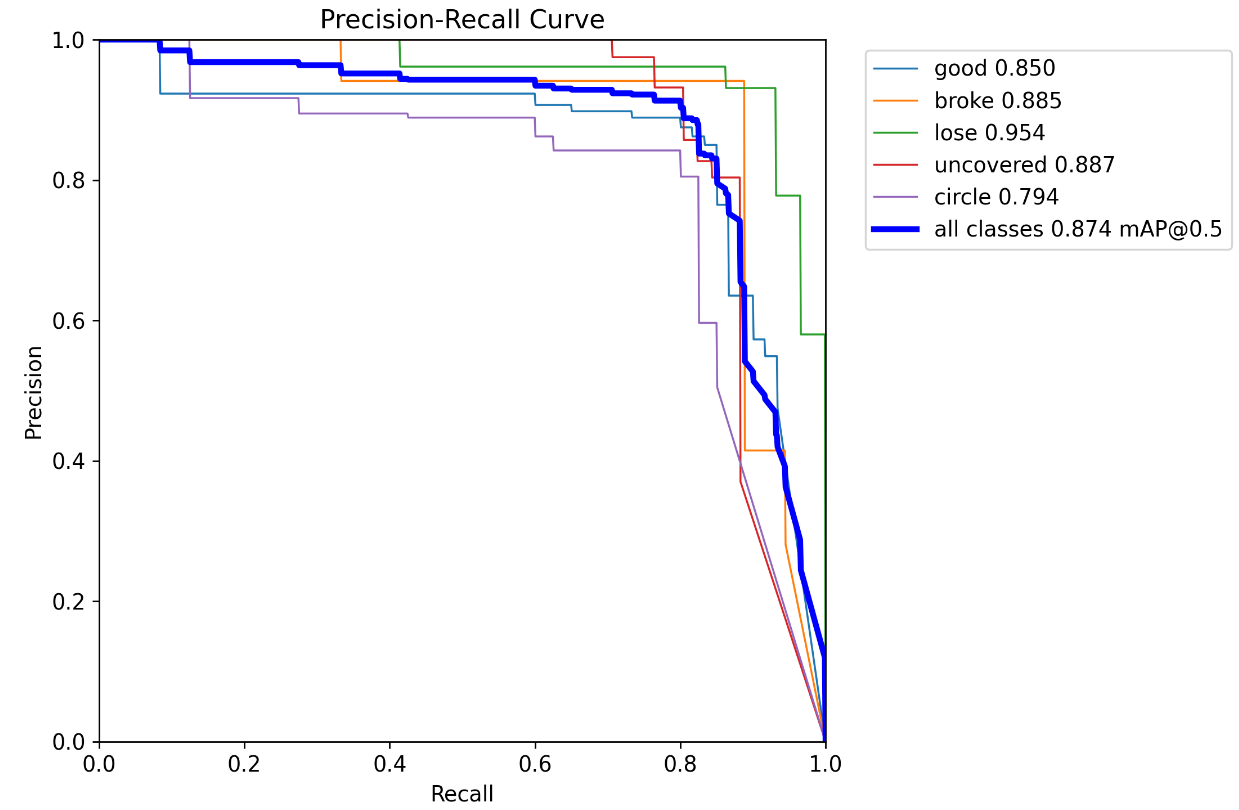
每次训练成功以后就可以得到该次训练的一些评估结果:p曲线、r曲线、pr曲线、F1曲线、mAp值等。

其中pr曲线和各类的Ap以及整个模型训练出来的mAp值就是这个课题评估本实验成果好坏的评估标准。
pr曲线:PR曲线(Precision-Recall Curve)是一种用于评估分类模型性能的方法,它展示了模型在特定召回率水平上的精确率(Precision)与召回率(Recall)之间的相互关系。PR曲线通常是以召回率为横坐标,精确率为纵坐标的二维图形。
Ap值:AP(Average Precision)是平均精准率,一种常用的模型训练指标, 用于衡量模型在一定IOU下,不同分类阈值的精确率和召回率之间的权衡的整体指标。用于评估目标检测和图像分类等任务中模型的性能。
mAp值:所有类别的Ap值的平均数。
该次训练的pr曲线呈现以及右上角的每一类的ap值和所有类别的map值: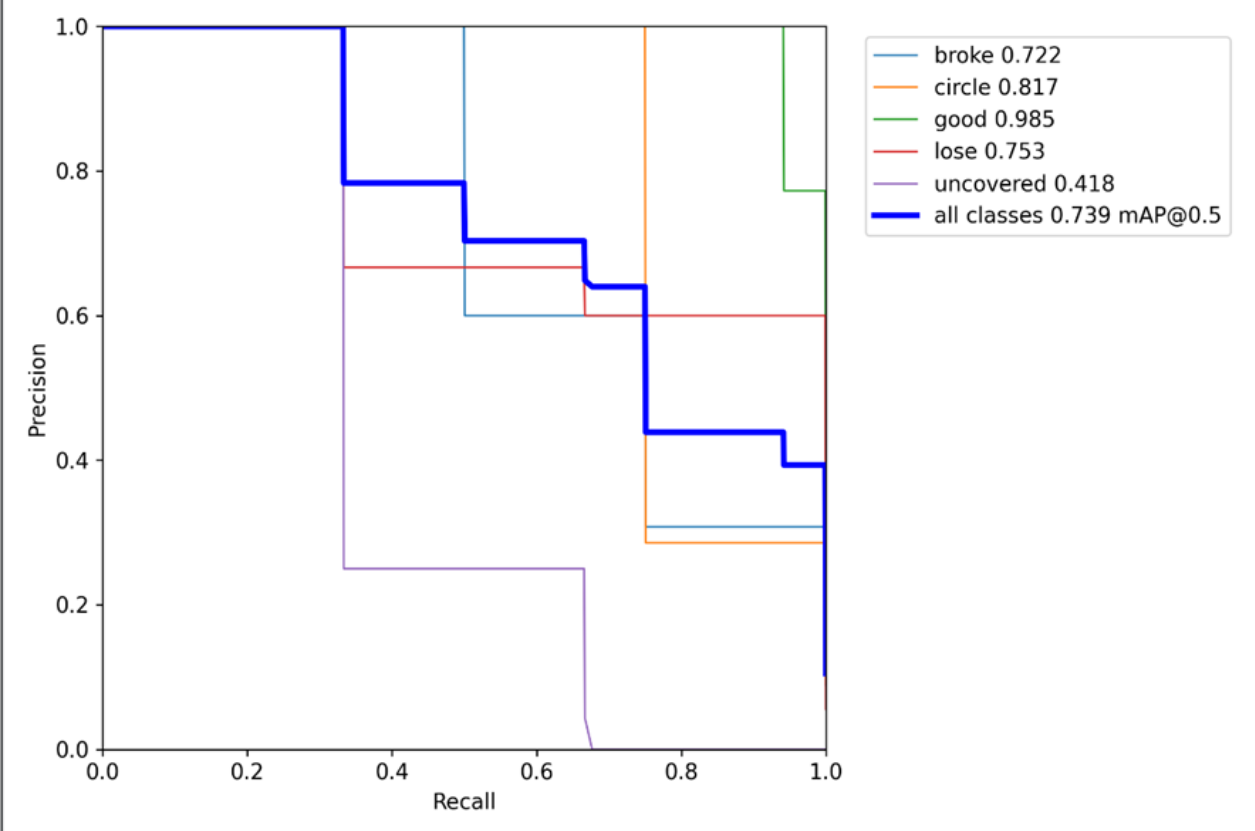 训练结束后会在根目录下生成一个run文件夹,里面存放训练结果和权重
结果输出
```python import os import re import torch
加载YOLOv5模型
model = torch.hub.load('D:/code/python/od/yolov5', 'custom', 'runs/train/exp/weights/best.pt', source='local')
输入图像文件夹路径
img_folder = 'D:/code/python/od/dataset/test/images'
输出txt文件路径
output_txt = 'predictions.txt'
获取图像文件列表并按照名称中的数字部分进行排序
def sortedalphanumeric(data): convert = lambda text: int(text) if text.isdigit() else text.lower() alphanumkey = lambda key: [convert(c) for c in re.split('([0-9]+)', key)] return sorted(data, key=alphanum_key)
imgfiles = sortedalphanumeric( [os.path.join(imgfolder, f) for f in os.listdir(imgfolder) if f.endswith(('.jpg', '.png', '.jpeg'))])
打开txt文件以写入预测结果
with open(outputtxt, 'w') as f: # 遍历每张图片进行目标检测 for imgpath in imgfiles: print("正在处理图像:", imgpath) # 进行目标检测 results = model(img_path)
    # 打印检测到的信息
    print("检测到的信息:")
    for det in results.pred[0]:
        class_id = int(det[5])
        confidence = det[4]
        # 将坐标四舍五入为整数
        xmin, ymin, xmax, ymax = map(lambda x: int(round(x.item())), det[:4])
        print(f"类别: {class_id}, 置信度: {confidence:.2f}, 坐标: ({xmin}, {ymin}, {xmax}, {ymax})")
        # 将结果写入txt文件,包含文件后缀
        filename = os.path.splitext(os.path.basename(img_path))[0] + os.path.splitext(img_path)[1]
        line = f"{filename} {class_id} {confidence:.2f} {xmin} {ymin} {xmax} {ymax}\n"
        f.write(line)

    # # 写入换行符以分隔不同图像的结果
    # f.write('\n')
print("预测结果已保存到", output_txt) ```
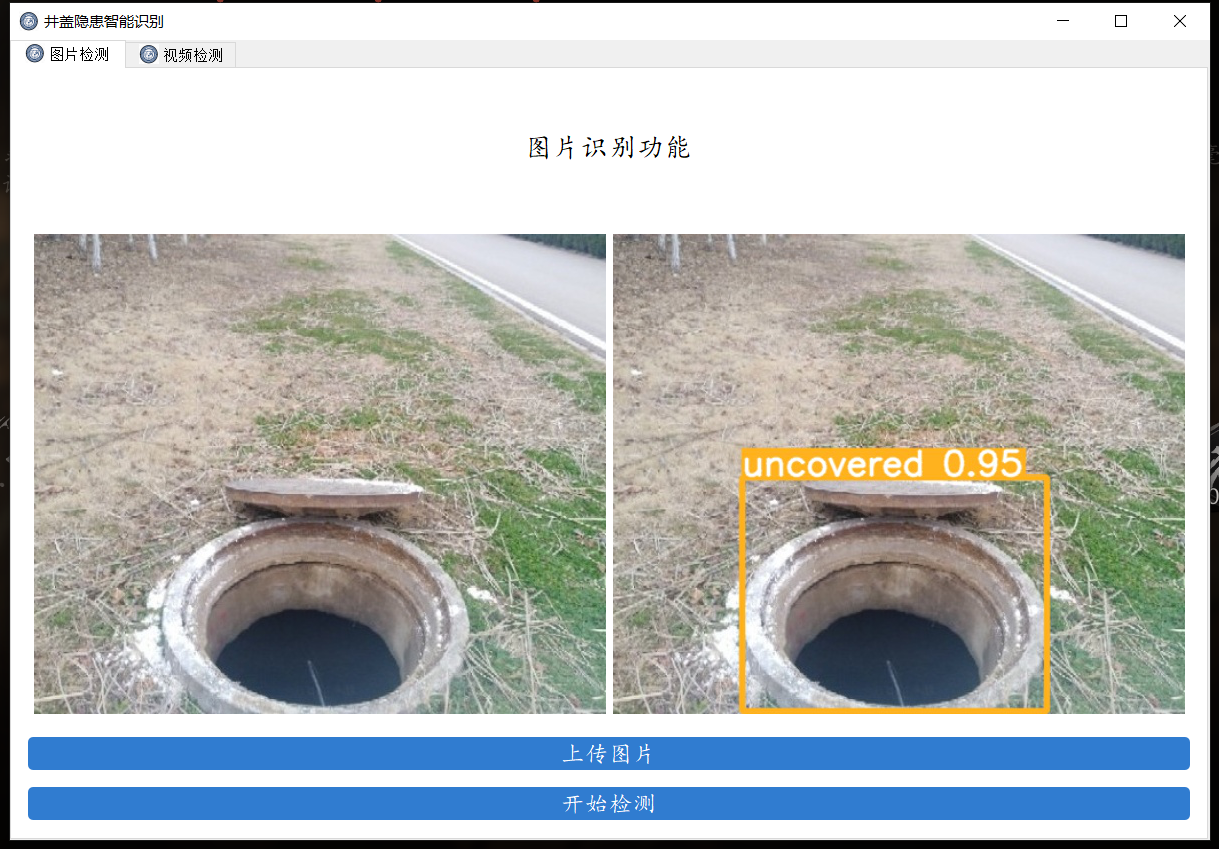
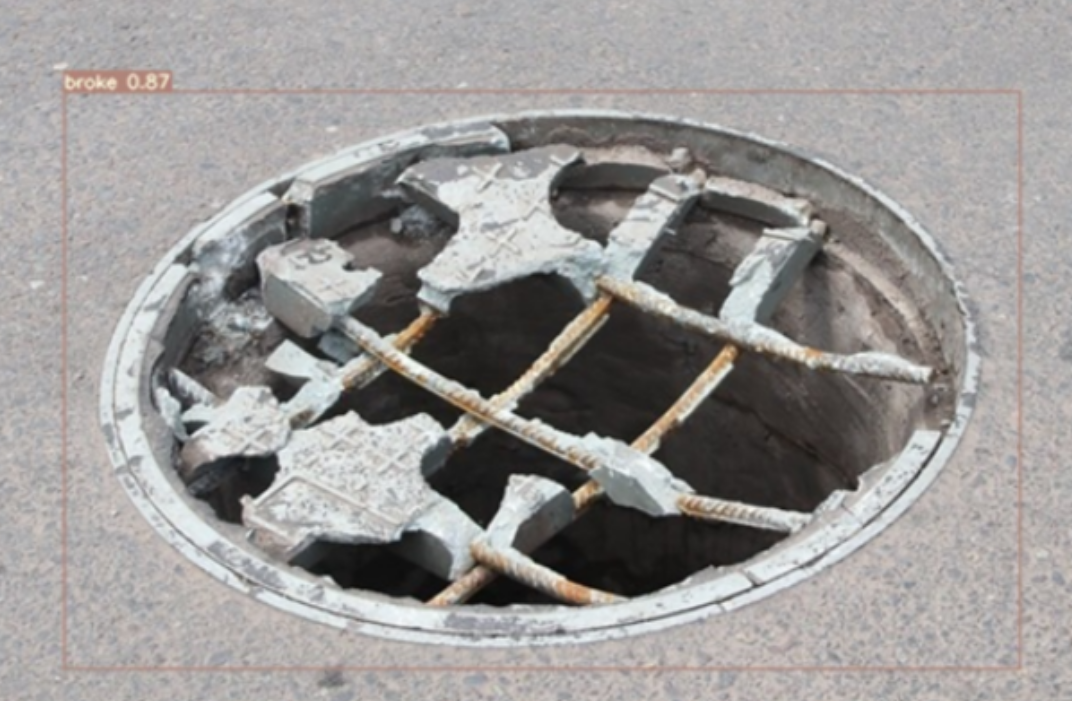
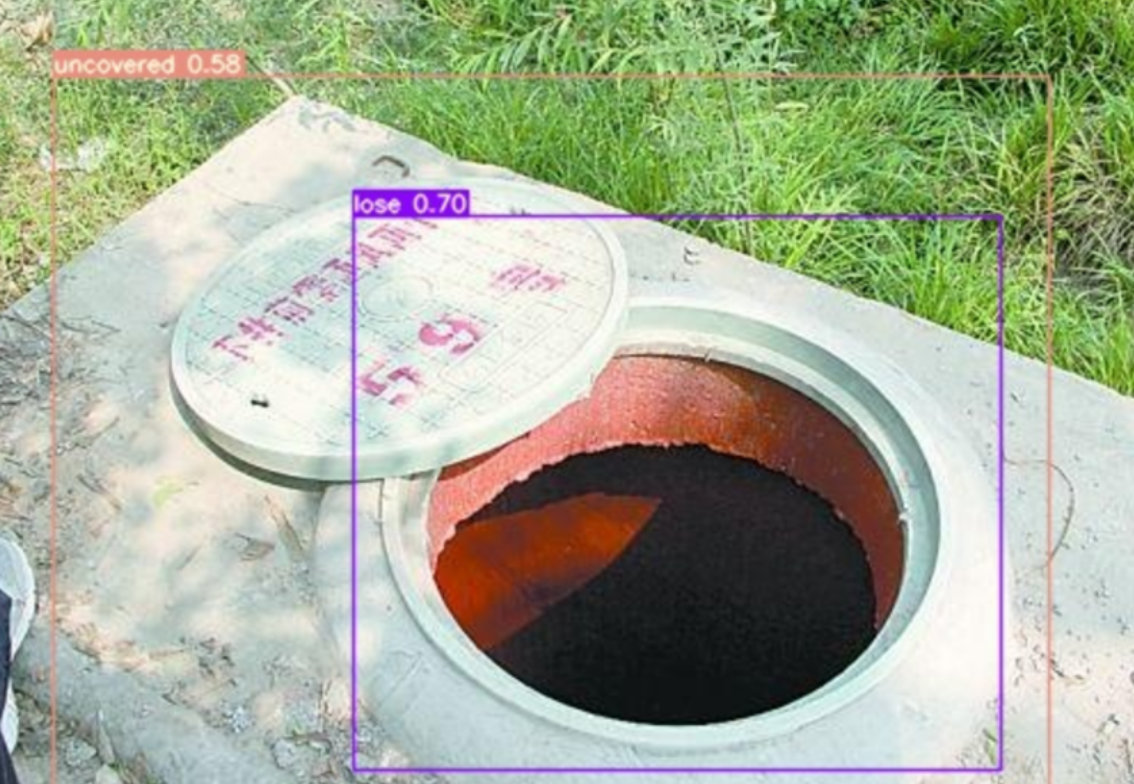
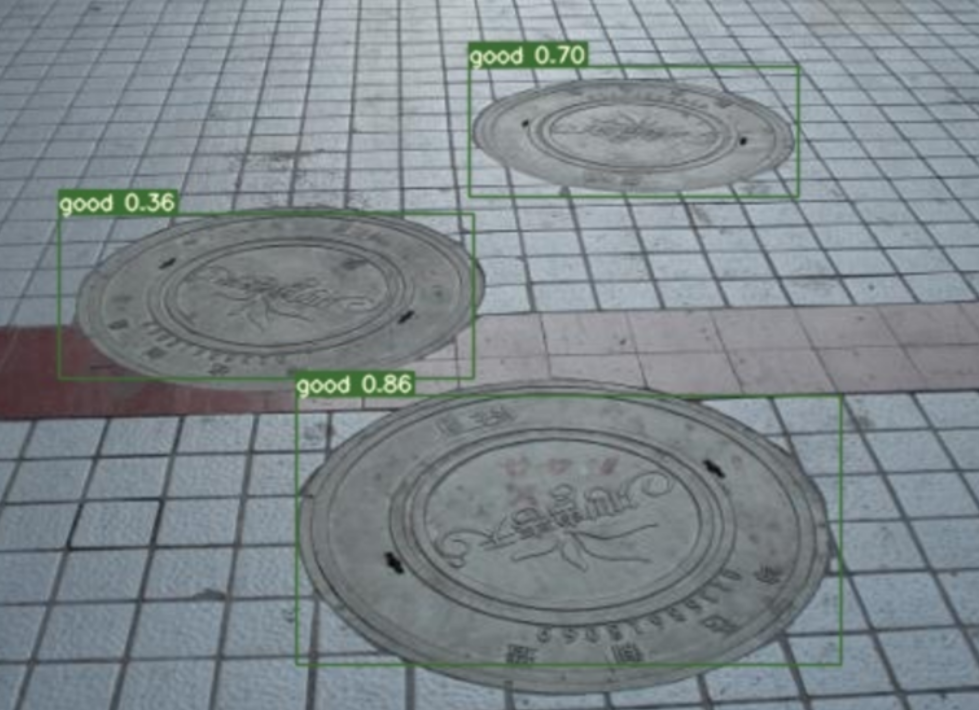
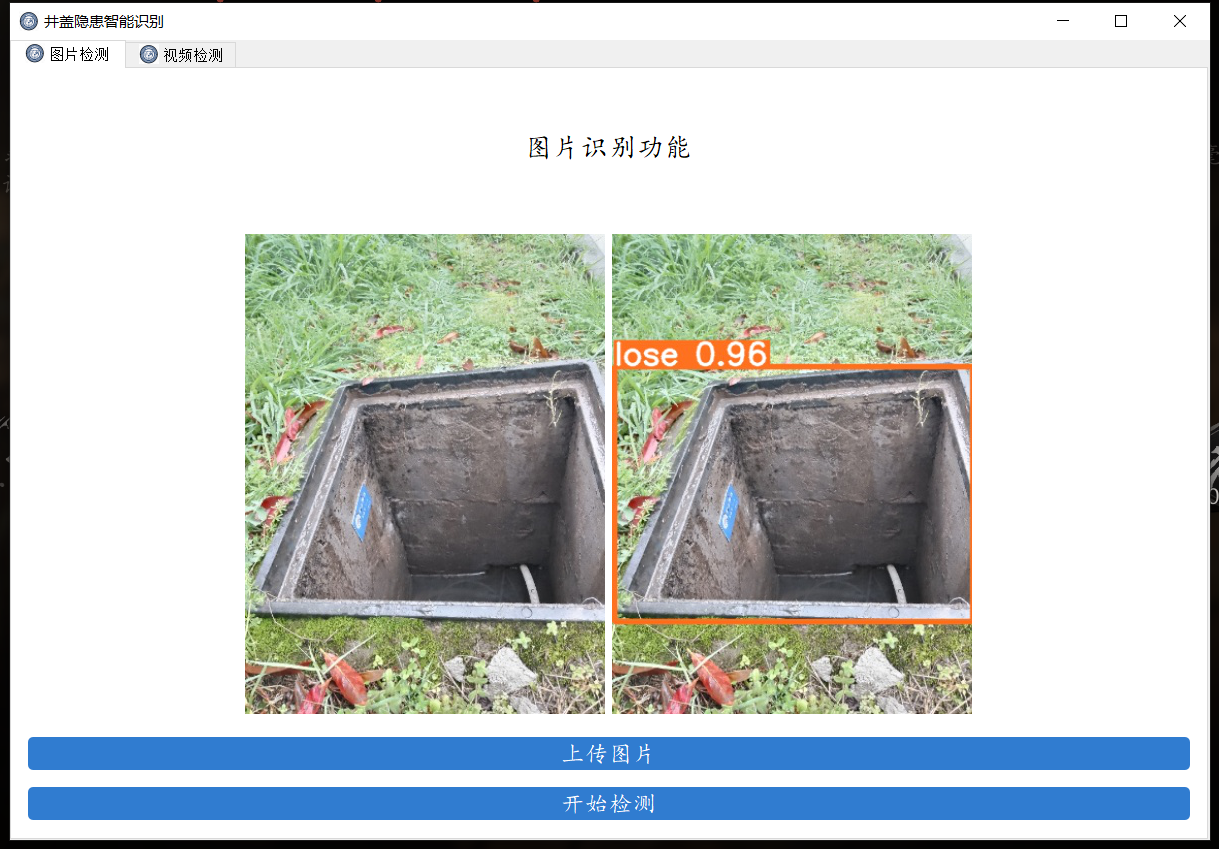
成果展示
用目前数据集跑出来的模型对图片目标检测的成果展示
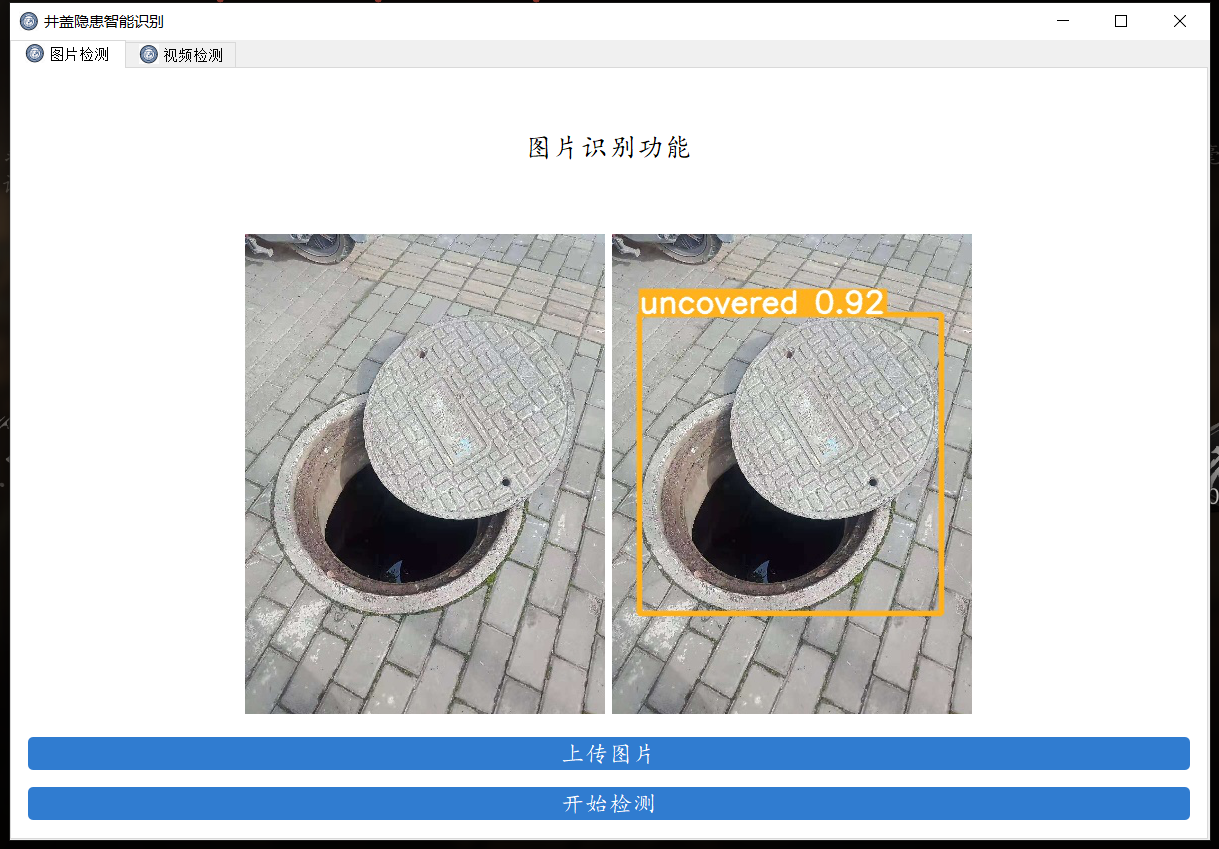
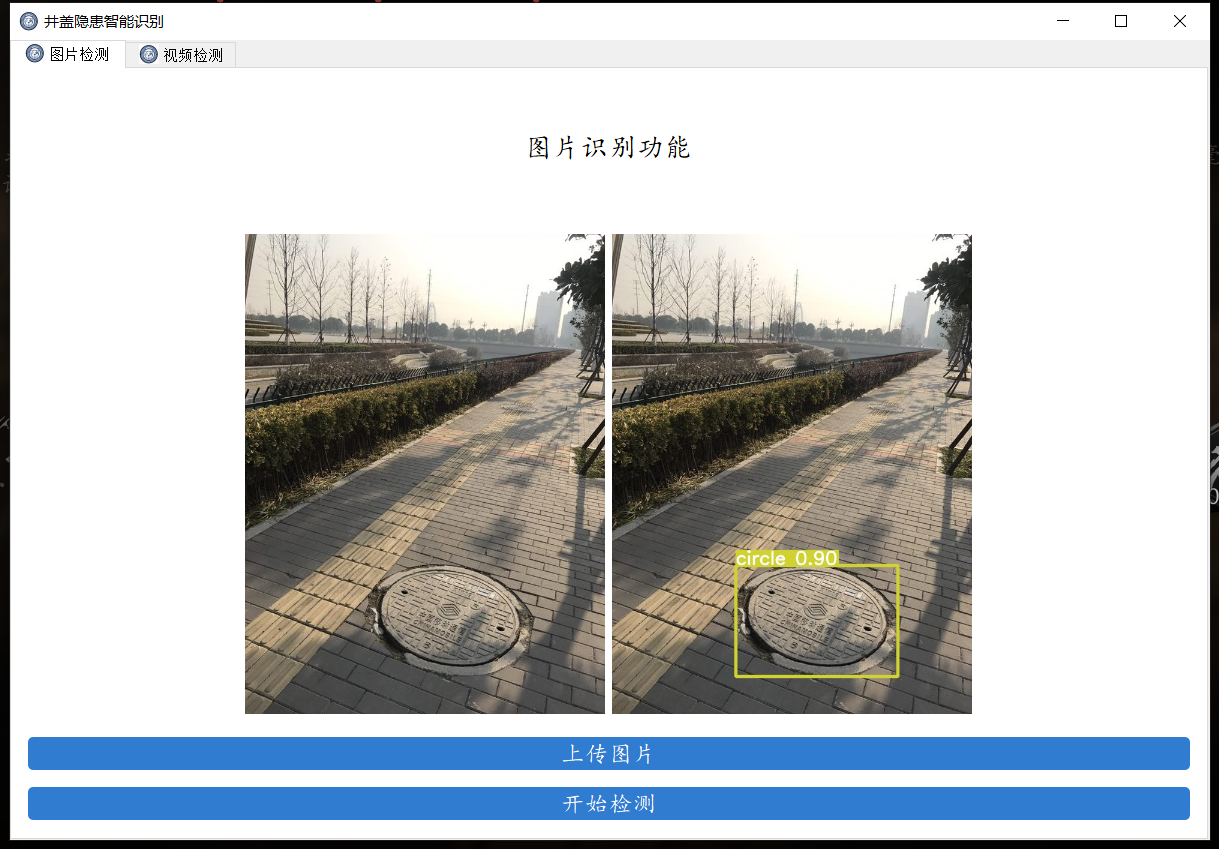
可视化界面
使用pyqt构建可视化界面
```python
应该在界面启动的时候就将模型加载出来,设置tmp的目录来放中间的处理结果
import os import os.path as osp import shutil import sys import threading from pathlib import Path
import cv2 import torch import torch.backends.cudnn as cudnn
from PyQt5.QtCore import * from PyQt5.QtGui import * from PyQt5.QtWidgets import *
from models.common import DetectMultiBackend
from utils.datasets import LoadImages, LoadStreams from utils.general import (LOGGER, checkimgsize, checkimshow, nonmaxsuppression, scalecoords, xyxy2xywh) from utils.plots import Annotator, colors from utils.torchutils import selectdevice, time_sync
FILE = Path(file).resolve() ROOT = FILE.parents[0] # YOLOv5 root directory if str(ROOT) not in sys.path: sys.path.append(str(ROOT)) # add ROOT to PATH ROOT = Path(os.path.relpath(ROOT, Path.cwd())) # relative
添加一个关于界面
窗口主类
class MainWindow(QTabWidget): # 基本配置不动,然后只动第三个界面 def init(self): # 初始化界面 super().init() self.setWindowTitle('井盖隐患智能识别') self.resize(1200, 800) self.setWindowIcon(QIcon("images/UI/lufei.png")) # 图片读取进程 self.outputsize = 480 self.img2predict = "" self.device = 'cpu' # # 初始化视频读取线程 self.vidsource = '0' # 初始设置为摄像头 self.stopEvent = threading.Event() self.webcam = True self.stopEvent.clear() self.model = self.modelload(weights="runs/train/exp/weights/best.pt", device=self.device) # todo 指明模型加载的位置的设备 self.initUI() self.resetvid()
'''
***模型初始化***
'''
@torch.no_grad()
def model_load(self, weights="",  # model.pt path(s)
               device='',  # cuda device, i.e. 0 or 0,1,2,3 or cpu
               half=False,  # use FP16 half-precision inference
               dnn=False,  # use OpenCV DNN for ONNX inference
               ):
    device = select_device(device)
    half &= device.type != 'cpu'  # half precision only supported on CUDA
    device = select_device(device)
    model = DetectMultiBackend(weights, device=device, dnn=dnn)
    stride, names, pt, jit, onnx = model.stride, model.names, model.pt, model.jit, model.onnx
    # Half
    half &= pt and device.type != 'cpu'  # half precision only supported by PyTorch on CUDA
    if pt:
        model.model.half() if half else model.model.float()
    print("模型加载完成!")
    return model

'''
***界面初始化***
'''
def initUI(self):
    # 图片检测子界面
    font_title = QFont('楷体', 16)
    font_main = QFont('楷体', 14)
    # 图片识别界面, 两个按钮,上传图片和显示结果
    img_detection_widget = QWidget()
    img_detection_layout = QVBoxLayout()
    img_detection_title = QLabel("图片识别功能")
    img_detection_title.setFont(font_title)
    mid_img_widget = QWidget()
    mid_img_layout = QHBoxLayout()
    self.left_img = QLabel()
    self.right_img = QLabel()
    self.left_img.setPixmap(QPixmap("images/UI/up.jpeg"))
    self.right_img.setPixmap(QPixmap("images/UI/right.jpeg"))
    self.left_img.setAlignment(Qt.AlignCenter)
    self.right_img.setAlignment(Qt.AlignCenter)
    mid_img_layout.addWidget(self.left_img)
    mid_img_layout.addStretch(0)
    mid_img_layout.addWidget(self.right_img)
    mid_img_widget.setLayout(mid_img_layout)
    up_img_button = QPushButton("上传图片")
    det_img_button = QPushButton("开始检测")
    up_img_button.clicked.connect(self.upload_img)
    det_img_button.clicked.connect(self.detect_img)
    up_img_button.setFont(font_main)
    det_img_button.setFont(font_main)
    up_img_button.setStyleSheet("QPushButton{color:white}"
                                "QPushButton:hover{background-color: rgb(2,110,180);}"
                                "QPushButton{background-color:rgb(48,124,208)}"
                                "QPushButton{border:2px}"
                                "QPushButton{border-radius:5px}"
                                "QPushButton{padding:5px 5px}"
                                "QPushButton{margin:5px 5px}")
    det_img_button.setStyleSheet("QPushButton{color:white}"
                                 "QPushButton:hover{background-color: rgb(2,110,180);}"
                                 "QPushButton{background-color:rgb(48,124,208)}"
                                 "QPushButton{border:2px}"
                                 "QPushButton{border-radius:5px}"
                                 "QPushButton{padding:5px 5px}"
                                 "QPushButton{margin:5px 5px}")
    img_detection_layout.addWidget(img_detection_title, alignment=Qt.AlignCenter)
    img_detection_layout.addWidget(mid_img_widget, alignment=Qt.AlignCenter)
    img_detection_layout.addWidget(up_img_button)
    img_detection_layout.addWidget(det_img_button)
    img_detection_widget.setLayout(img_detection_layout)

    # todo 视频识别界面
    # 视频识别界面的逻辑比较简单,基本就从上到下的逻辑
    vid_detection_widget = QWidget()
    vid_detection_layout = QVBoxLayout()
    vid_title = QLabel("视频检测功能")
    vid_title.setFont(font_title)
    self.vid_img = QLabel()
    self.vid_img.setPixmap(QPixmap("images/UI/up.jpeg"))
    vid_title.setAlignment(Qt.AlignCenter)
    self.vid_img.setAlignment(Qt.AlignCenter)
    self.webcam_detection_btn = QPushButton("摄像头实时监测")
    self.mp4_detection_btn = QPushButton("视频文件检测")
    self.vid_stop_btn = QPushButton("停止检测")
    self.webcam_detection_btn.setFont(font_main)
    self.mp4_detection_btn.setFont(font_main)
    self.vid_stop_btn.setFont(font_main)
    self.webcam_detection_btn.setStyleSheet("QPushButton{color:white}"
                                            "QPushButton:hover{background-color: rgb(2,110,180);}"
                                            "QPushButton{background-color:rgb(48,124,208)}"
                                            "QPushButton{border:2px}"
                                            "QPushButton{border-radius:5px}"
                                            "QPushButton{padding:5px 5px}"
                                            "QPushButton{margin:5px 5px}")
    self.mp4_detection_btn.setStyleSheet("QPushButton{color:white}"
                                         "QPushButton:hover{background-color: rgb(2,110,180);}"
                                         "QPushButton{background-color:rgb(48,124,208)}"
                                         "QPushButton{border:2px}"
                                         "QPushButton{border-radius:5px}"
                                         "QPushButton{padding:5px 5px}"
                                         "QPushButton{margin:5px 5px}")
    self.vid_stop_btn.setStyleSheet("QPushButton{color:white}"
                                    "QPushButton:hover{background-color: rgb(2,110,180);}"
                                    "QPushButton{background-color:rgb(48,124,208)}"
                                    "QPushButton{border:2px}"
                                    "QPushButton{border-radius:5px}"
                                    "QPushButton{padding:5px 5px}"
                                    "QPushButton{margin:5px 5px}")
    self.webcam_detection_btn.clicked.connect(self.open_cam)
    self.mp4_detection_btn.clicked.connect(self.open_mp4)
    self.vid_stop_btn.clicked.connect(self.close_vid)
    # 添加组件到布局上
    vid_detection_layout.addWidget(vid_title)
    vid_detection_layout.addWidget(self.vid_img)
    vid_detection_layout.addWidget(self.webcam_detection_btn)
    vid_detection_layout.addWidget(self.mp4_detection_btn)
    vid_detection_layout.addWidget(self.vid_stop_btn)
    vid_detection_widget.setLayout(vid_detection_layout)

    self.left_img.setAlignment(Qt.AlignCenter)
    self.addTab(img_detection_widget, '图片检测')
    self.addTab(vid_detection_widget, '视频检测')
    self.setTabIcon(0, QIcon('images/UI/lufei.png'))
    self.setTabIcon(1, QIcon('images/UI/lufei.png'))
    self.setTabIcon(2, QIcon('images/UI/lufei.png'))

'''
***上传图片***
'''
def upload_img(self):
    # 选择录像文件进行读取
    fileName, fileType = QFileDialog.getOpenFileName(self, 'Choose file', '', '*.jpg *.png *.tif *.jpeg')
    if fileName:
        suffix = fileName.split(".")[-1]
        save_path = osp.join("images/tmp", "tmp_upload." + suffix)
        shutil.copy(fileName, save_path)
        # 调整一下图片的大小,然后统一放在一起
        im0 = cv2.imread(save_path)
        resize_scale = self.output_size / im0.shape[0]
        im0 = cv2.resize(im0, (0, 0), fx=resize_scale, fy=resize_scale)
        cv2.imwrite("images/tmp/upload_show_result.jpg", im0)
        self.img2predict = fileName
        self.left_img.setPixmap(QPixmap("images/tmp/upload_show_result.jpg"))
        # todo 上传图片之后右侧的图片重置,
        self.right_img.setPixmap(QPixmap("images/UI/right.jpeg"))

'''
***检测图片***
'''
def detect_img(self):
    model = self.model
    output_size = self.output_size
    source = self.img2predict  # file/dir/URL/glob, 0 for webcam
    imgsz = [640,640]  # inference size (pixels)
    conf_thres = 0.25  # confidence threshold
    iou_thres = 0.45  # NMS IOU threshold
    max_det = 1000  # maximum detections per image
    device = self.device  # cuda device, i.e. 0 or 0,1,2,3 or cpu
    view_img = False  # show results
    save_txt = False  # save results to *.txt
    save_conf = False  # save confidences in --save-txt labels
    save_crop = False  # save cropped prediction boxes
    nosave = False  # do not save images/videos
    classes = None  # filter by class: --class 0, or --class 0 2 3
    agnostic_nms = False  # class-agnostic NMS
    augment = False  # ugmented inference
    visualize = False  # visualize features
    line_thickness = 3  # bounding box thickness (pixels)
    hide_labels = False  # hide labels
    hide_conf = False  # hide confidences
    half = False  # use FP16 half-precision inference
    dnn = False  # use OpenCV DNN for ONNX inference
    print(source)
    if source == "":
        QMessageBox.warning(self, "请上传", "请先上传图片再进行检测")
    else:
        source = str(source)
        device = select_device(self.device)
        webcam = False
        stride, names, pt, jit, onnx = model.stride, model.names, model.pt, model.jit, model.onnx
        imgsz = check_img_size(imgsz, s=stride)  # check image size
        save_img = not nosave and not source.endswith('.txt')  # save inference images
        # Dataloader
        if webcam:
            view_img = check_imshow()
            cudnn.benchmark = True  # set True to speed up constant image size inference
            dataset = LoadStreams(source, img_size=imgsz, stride=stride, auto=pt and not jit)
            bs = len(dataset)  # batch_size
        else:
            dataset = LoadImages(source, img_size=imgsz, stride=stride, auto=pt and not jit)
            bs = 1  # batch_size
        vid_path, vid_writer = [None] * bs, [None] * bs
        # Run inference
        if pt and device.type != 'cpu':
            model(torch.zeros(1, 3, *imgsz).to(device).type_as(next(model.model.parameters())))  # warmup
        dt, seen = [0.0, 0.0, 0.0], 0
        for path, im, im0s, vid_cap, s in dataset:
            t1 = time_sync()
            im = torch.from_numpy(im).to(device)
            im = im.half() if half else im.float()  # uint8 to fp16/32
            im /= 255  # 0 - 255 to 0.0 - 1.0
            if len(im.shape) == 3:
                im = im[None]  # expand for batch dim
            t2 = time_sync()
            dt[0] += t2 - t1
            # Inference
            # visualize = increment_path(save_dir / Path(path).stem, mkdir=True) if visualize else False
            pred = model(im, augment=augment, visualize=visualize)
            t3 = time_sync()
            dt[1] += t3 - t2
            # NMS
            pred = non_max_suppression(pred, conf_thres, iou_thres, classes, agnostic_nms, max_det=max_det)
            dt[2] += time_sync() - t3
            # Second-stage classifier (optional)
            # pred = utils.general.apply_classifier(pred, classifier_model, im, im0s)
            # Process predictions
            for i, det in enumerate(pred):  # per image
                seen += 1
                if webcam:  # batch_size >= 1
                    p, im0, frame = path[i], im0s[i].copy(), dataset.count
                    s += f'{i}: '
                else:
                    p, im0, frame = path, im0s.copy(), getattr(dataset, 'frame', 0)
                p = Path(p)  # to Path
                s += '%gx%g ' % im.shape[2:]  # print string
                gn = torch.tensor(im0.shape)[[1, 0, 1, 0]]  # normalization gain whwh
                imc = im0.copy() if save_crop else im0  # for save_crop
                annotator = Annotator(im0, line_width=line_thickness, example=str(names))
                if len(det):
                    # Rescale boxes from img_size to im0 size
                    det[:, :4] = scale_coords(im.shape[2:], det[:, :4], im0.shape).round()

                    # Print results
                    for c in det[:, -1].unique():
                        n = (det[:, -1] == c).sum()  # detections per class
                        s += f"{n} {names[int(c)]}{'s' * (n > 1)}, "  # add to string

                    # Write results
                    for *xyxy, conf, cls in reversed(det):
                        if save_txt:  # Write to file
                            xywh = (xyxy2xywh(torch.tensor(xyxy).view(1, 4)) / gn).view(
                                -1).tolist()  # normalized xywh
                            line = (cls, *xywh, conf) if save_conf else (cls, *xywh)  # label format
                            # with open(txt_path + '.txt', 'a') as f:
                            #     f.write(('%g ' * len(line)).rstrip() % line + '\n')

                        if save_img or save_crop or view_img:  # Add bbox to image
                            c = int(cls)  # integer class
                            label = None if hide_labels else (names[c] if hide_conf else f'{names[c]} {conf:.2f}')
                            annotator.box_label(xyxy, label, color=colors(c, True))
                            # if save_crop:
                            #     save_one_box(xyxy, imc, file=save_dir / 'crops' / names[c] / f'{p.stem}.jpg',
                            #                  BGR=True)
                # Print time (inference-only)
                LOGGER.info(f'{s}Done. ({t3 - t2:.3f}s)')
                # Stream results
                im0 = annotator.result()
                # if view_img:
                #     cv2.imshow(str(p), im0)
                #     cv2.waitKey(1)  # 1 millisecond
                # Save results (image with detections)
                resize_scale = output_size / im0.shape[0]
                im0 = cv2.resize(im0, (0, 0), fx=resize_scale, fy=resize_scale)
                cv2.imwrite("images/tmp/single_result.jpg", im0)
                # 目前的情况来看,应该只是ubuntu下会出问题,但是在windows下是完整的,所以继续
                self.right_img.setPixmap(QPixmap("images/tmp/single_result.jpg"))

# 视频检测,逻辑基本一致,有两个功能,分别是检测摄像头的功能和检测视频文件的功能,先做检测摄像头的功能。

'''
### 界面关闭事件 ###
'''
def closeEvent(self, event):
    reply = QMessageBox.question(self,
                                 'quit',
                                 "Are you sure?",
                                 QMessageBox.Yes | QMessageBox.No,
                                 QMessageBox.No)
    if reply == QMessageBox.Yes:
        self.close()
        event.accept()
    else:
        event.ignore()

'''
### 视频关闭事件 ###
'''

def open_cam(self):
    self.webcam_detection_btn.setEnabled(False)
    self.mp4_detection_btn.setEnabled(False)
    self.vid_stop_btn.setEnabled(True)
    self.vid_source = '0'
    self.webcam = True
    # 把按钮给他重置了
    # print("GOGOGO")
    th = threading.Thread(target=self.detect_vid)
    th.start()

'''
### 开启视频文件检测事件 ###
'''

def open_mp4(self):
    fileName, fileType = QFileDialog.getOpenFileName(self, 'Choose file', '', '*.mp4 *.avi')
    if fileName:
        self.webcam_detection_btn.setEnabled(False)
        self.mp4_detection_btn.setEnabled(False)
        # self.vid_stop_btn.setEnabled(True)
        self.vid_source = fileName
        self.webcam = False
        th = threading.Thread(target=self.detect_vid)
        th.start()

'''
### 视频开启事件 ###
'''

# 视频和摄像头的主函数是一样的,不过是传入的source不同罢了
def detect_vid(self):
    # pass
    model = self.model
    output_size = self.output_size
    # source = self.img2predict  # file/dir/URL/glob, 0 for webcam
    imgsz = [640, 640]  # inference size (pixels)
    conf_thres = 0.25  # confidence threshold
    iou_thres = 0.45  # NMS IOU threshold
    max_det = 1000  # maximum detections per image
    # device = self.device  # cuda device, i.e. 0 or 0,1,2,3 or cpu
    view_img = False  # show results
    save_txt = False  # save results to *.txt
    save_conf = False  # save confidences in --save-txt labels
    save_crop = False  # save cropped prediction boxes
    nosave = False  # do not save images/videos
    classes = None  # filter by class: --class 0, or --class 0 2 3
    agnostic_nms = False  # class-agnostic NMS
    augment = False  # ugmented inference
    visualize = False  # visualize features
    line_thickness = 3  # bounding box thickness (pixels)
    hide_labels = False  # hide labels
    hide_conf = False  # hide confidences
    half = False  # use FP16 half-precision inference
    dnn = False  # use OpenCV DNN for ONNX inference
    source = str(self.vid_source)
    webcam = self.webcam
    device = select_device(self.device)
    stride, names, pt, jit, onnx = model.stride, model.names, model.pt, model.jit, model.onnx
    imgsz = check_img_size(imgsz, s=stride)  # check image size
    save_img = not nosave and not source.endswith('.txt')  # save inference images
    # Dataloader
    if webcam:
        view_img = check_imshow()
        cudnn.benchmark = True  # set True to speed up constant image size inference
        dataset = LoadStreams(source, img_size=imgsz, stride=stride, auto=pt and not jit)
        bs = len(dataset)  # batch_size
    else:
        dataset = LoadImages(source, img_size=imgsz, stride=stride, auto=pt and not jit)
        bs = 1  # batch_size
    vid_path, vid_writer = [None] * bs, [None] * bs
    # Run inference
    if pt and device.type != 'cpu':
        model(torch.zeros(1, 3, *imgsz).to(device).type_as(next(model.model.parameters())))  # warmup
    dt, seen = [0.0, 0.0, 0.0], 0
    for path, im, im0s, vid_cap, s in dataset:
        t1 = time_sync()
        im = torch.from_numpy(im).to(device)
        im = im.half() if half else im.float()  # uint8 to fp16/32
        im /= 255  # 0 - 255 to 0.0 - 1.0
        if len(im.shape) == 3:
            im = im[None]  # expand for batch dim
        t2 = time_sync()
        dt[0] += t2 - t1
        # Inference
        # visualize = increment_path(save_dir / Path(path).stem, mkdir=True) if visualize else False
        pred = model(im, augment=augment, visualize=visualize)
        t3 = time_sync()
        dt[1] += t3 - t2
        # NMS
        pred = non_max_suppression(pred, conf_thres, iou_thres, classes, agnostic_nms, max_det=max_det)
        dt[2] += time_sync() - t3
        # Second-stage classifier (optional)
        # pred = utils.general.apply_classifier(pred, classifier_model, im, im0s)
        # Process predictions
        for i, det in enumerate(pred):  # per image
            seen += 1
            if webcam:  # batch_size >= 1
                p, im0, frame = path[i], im0s[i].copy(), dataset.count
                s += f'{i}: '
            else:
                p, im0, frame = path, im0s.copy(), getattr(dataset, 'frame', 0)
            p = Path(p)  # to Path
            # save_path = str(save_dir / p.name)  # im.jpg
            # txt_path = str(save_dir / 'labels' / p.stem) + (
            #     '' if dataset.mode == 'image' else f'_{frame}')  # im.txt
            s += '%gx%g ' % im.shape[2:]  # print string
            gn = torch.tensor(im0.shape)[[1, 0, 1, 0]]  # normalization gain whwh
            imc = im0.copy() if save_crop else im0  # for save_crop
            annotator = Annotator(im0, line_width=line_thickness, example=str(names))
            if len(det):
                # Rescale boxes from img_size to im0 size
                det[:, :4] = scale_coords(im.shape[2:], det[:, :4], im0.shape).round()

                # Print results
                for c in det[:, -1].unique():
                    n = (det[:, -1] == c).sum()  # detections per class
                    s += f"{n} {names[int(c)]}{'s' * (n > 1)}, "  # add to string

                # Write results
                for *xyxy, conf, cls in reversed(det):
                    if save_txt:  # Write to file
                        xywh = (xyxy2xywh(torch.tensor(xyxy).view(1, 4)) / gn).view(
                            -1).tolist()  # normalized xywh
                        line = (cls, *xywh, conf) if save_conf else (cls, *xywh)  # label format
                        # with open(txt_path + '.txt', 'a') as f:
                        #     f.write(('%g ' * len(line)).rstrip() % line + '\n')

                    if save_img or save_crop or view_img:  # Add bbox to image
                        c = int(cls)  # integer class
                        label = None if hide_labels else (names[c] if hide_conf else f'{names[c]} {conf:.2f}')
                        annotator.box_label(xyxy, label, color=colors(c, True))
                        # if save_crop:
                        #     save_one_box(xyxy, imc, file=save_dir / 'crops' / names[c] / f'{p.stem}.jpg',
                        #                  BGR=True)
            # Print time (inference-only)
            LOGGER.info(f'{s}Done. ({t3 - t2:.3f}s)')
            # Stream results
            # Save results (image with detections)
            im0 = annotator.result()
            frame = im0
            resize_scale = output_size / frame.shape[0]
            frame_resized = cv2.resize(frame, (0, 0), fx=resize_scale, fy=resize_scale)
            cv2.imwrite("images/tmp/single_result_vid.jpg", frame_resized)
            self.vid_img.setPixmap(QPixmap("images/tmp/single_result_vid.jpg"))
            # self.vid_img
            # if view_img:
            # cv2.imshow(str(p), im0)
            # self.vid_img.setPixmap(QPixmap("images/tmp/single_result_vid.jpg"))
            # cv2.waitKey(1)  # 1 millisecond
        if cv2.waitKey(25) & self.stopEvent.is_set() == True:
            self.stopEvent.clear()
            self.webcam_detection_btn.setEnabled(True)
            self.mp4_detection_btn.setEnabled(True)
            self.reset_vid()
            break
    # self.reset_vid()

'''
### 界面重置事件 ###
'''

def reset_vid(self):
    self.webcam_detection_btn.setEnabled(True)
    self.mp4_detection_btn.setEnabled(True)
    self.vid_img.setPixmap(QPixmap("images/UI/up.jpeg"))
    self.vid_source = '0'
    self.webcam = True

'''
### 视频重置事件 ###
'''

def close_vid(self):
    self.stopEvent.set()
    self.reset_vid()
if name == "main": app = QApplication(sys.argv) mainWindow = MainWindow() mainWindow.show() sys.exit(app.exec_()) ```
首页
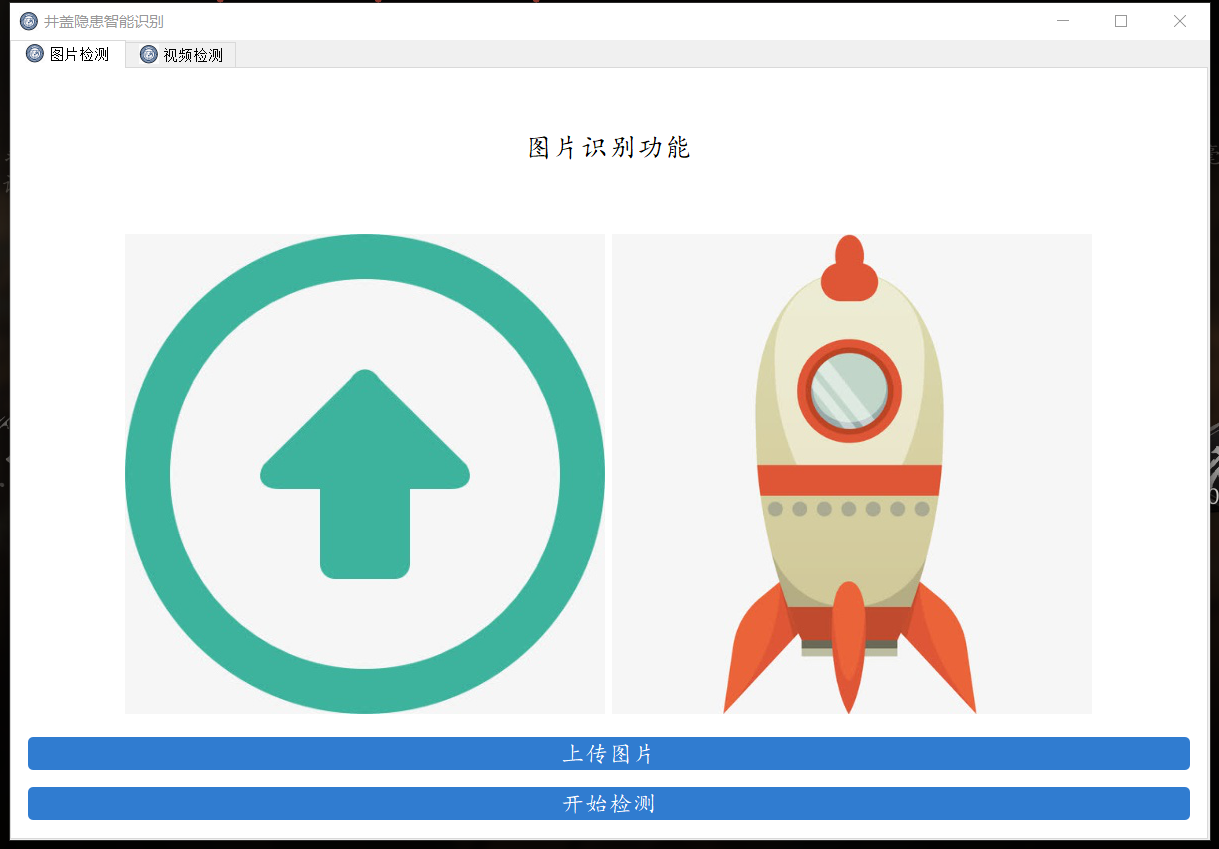
使用可视化界面检测
模型调参
通过查询资料学习怎么对YOLOv5模型进行调参,得到一些小知识
hyp.finetune.yaml和hyp.scratch.yaml
在data文件夹中放置了一些yaml文件,通过查阅资料得知这些文件的作用:
argoverse_hd.yaml:yaml后缀的都为某一个数据集的配置文件,.前的为数据集的名称
coco.yaml:coco数据集配置文件
coco128.yaml同理:coco128为coco数据集的前128个图片,学习时为了训练快一点从而减小数据量
hyp.finetune.yaml:超参数微调配置文件
hyp.scratch.yaml:超参数起始配置文件
voc.yaml:voc数据集配置文件
其中hyp.finetune.yaml和hyp.scratch.yaml里面是该模型训练的超参数,学习率、动量、批次大小等等,因此对模型的调参就在这里面调。hyp.scratch.yaml是超参数起始配置文件,就是第一次训练模型时就用这些超参数,而hyp.finetune.yaml是超参数微调配置文件,可以用于预训练的模型用的超参数。
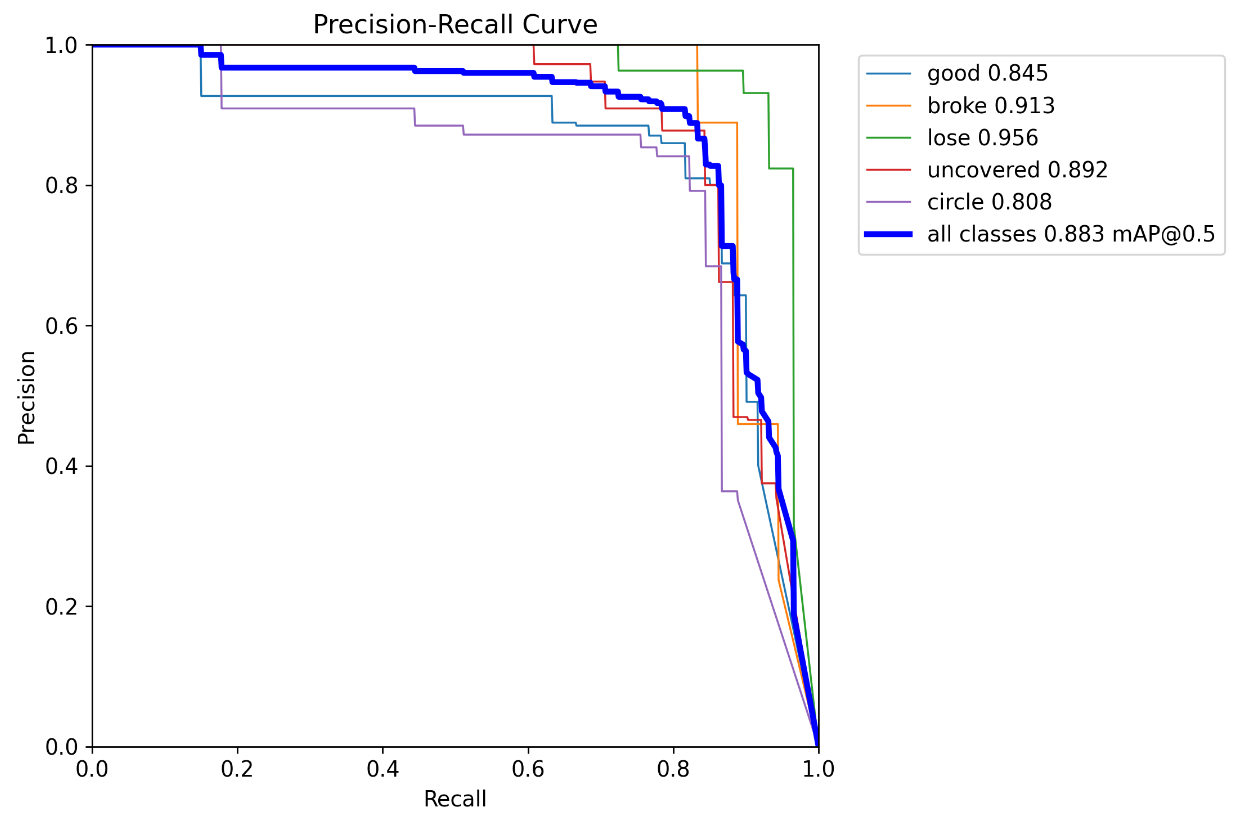
因此我将模型的预训练模型设成之前跑的结果最好的那一个.pt文件,在这个预训练模型基础上再进行训练,超参数设置成hyp.finetune.yaml文件,最终跑出来的效果如下:

训练出来的效果比之前又有所好转了一点,但是map值还不算高。
模型优化
经过数据增强、超参数调整,但模型的成效依旧不尽如人意。因此,打算转换策略,尝试使用YOLOv8模型,看看是否能带来更佳的实验结果。
获取YOLOv8源代码
在Github上找到YOLOv8源代码:GitHub - ultralytics/ultralytics: NEW - YOLOv8 🚀 in PyTorch > ONNX > OpenVINO > CoreML > TFLite
YOLOv8使用步骤
安装依赖环境
```python
requirements.txt
matplotlib>=3.3.0 numpy>=1.22.2 opencv-python>=4.6.0 pillow>=7.1.2 pyyaml>=5.3.1 requests>=2.23.0 scipy>=1.4.1 torch>=1.8.0 torchvision>=0.9.0 tqdm>=4.64.0 # progress bars psutil # system utilization py-cpuinfo # display CPU info thop>=0.1.1 # FLOPs computation pandas>=1.1.4 seaborn>=0.11.0 # plotting ```
YOLOv8使用流程
首先对数据集的文件夹格式处理以及yaml文件等预处理在此不再赘述,记得将处理好的数据集放在datasets文件夹里。
以下是YOLOv8的一个大概使用流程记录,其中训练阶段、预测图片以及验证模型都是在终端命令行下运行
准备阶段:
- 下载代码包: https://github.com/ultralytics/ultralytics
- 环境配置:
- Python: 3.11
- PyTorch: 2.01
- CUDA: 11.8
- 安装依赖:
plain
pip install -r requirements.txt
pip install ultralytics
- 下载预训练权重路径:
- 权重路径: docs/models/yolov8
- 安装预测工具:
预测图片:
plain
yolo predict model=yolov8n.pt source="https://ultralytics.com/images/bus.jpg"
注意: 请修改图片路径。
数据集 coco128:
- 下载链接: https://ultralytics.com/assets/coco128.zip
- coco128.yaml 文件路径: ultralytics/cfg/datasets/coco128.yaml
- 数据集格式: 根据 coco128 数据集格式整理好自己的数据放到 datasets 目录下。
训练阶段:
plain
yolo detect train data=datasets/mydata/mydata.yaml model=yolov8n.yaml pretrained=ultralytics/yolov8n.pt epochs=300 batch=4 lr0=0.01 resume=True
验证模型:
plain
yolo detect val data=datasets/mydata/mydata.yaml model=runs/detect/train/weights/best.pt batch=4
方法二:除了在终端输入以上命令运行训练,还可以新建一个train.py,代码如下:
```python from ultralytics import YOLO
if name == 'main': model = YOLO("ultralytics/cfg/models/v8/yolov8n.yaml") # model=YOLO('runs/detect/train2/weights/best.pt') model.train(**{'cfg': 'ultralytics/cfg/default.yaml'})
```
其中三行分别为模型配置文件、预训练模型、模型超参数,其中'cfg':'ultralytics/cfg/default.yaml'就是训练模型的超参数,数据集路径、训练轮数、学习率等等都在里面调整。
default.yaml:
```plain
Ultralytics YOLO 🚀, AGPL-3.0 license
Default training settings and hyperparameters for medium-augmentation COCO training task: detect
(str) YOLO task, i.e. detect, segment, classify, pose
mode: train # (str) YOLO mode, i.e. train, val, predict, export, track, benchmark
Train settings
model: # (str, optional) path to model file, i.e. yolov8n.pt, yolov8n.yaml data: datasets/well(match)+/well(match)+.yaml # (str, optional) path to data file, i.e. coco128.yaml epochs: 50 # (int) number of epochs to train for time: # (float, optional) number of hours to train for, overrides epochs if supplied patience: 100 # (int) epochs to wait for no observable improvement for early stopping of training batch: 16 # (int) number of images per batch (-1 for AutoBatch) imgsz: 640 # (int | list) input images size as int for train and val modes, or list[w,h] for predict and export modes save: True # (bool) save train checkpoints and predict results saveperiod: -1 # (int) Save checkpoint every x epochs (disabled if < 1) cache: False # (bool) True/ram, disk or False. Use cache for data loading device: # (int | str | list, optional) device to run on, i.e. cuda device=0 or device=0,1,2,3 or device=cpu workers: 8 # (int) number of worker threads for data loading (per RANK if DDP) project: # (str, optional) project name name: # (str, optional) experiment name, results saved to 'project/name' directory existok: False # (bool) whether to overwrite existing experiment pretrained: True # (bool | str) whether to use a pretrained model (bool) or a model to load weights from (str) optimizer: auto # (str) optimizer to use, choices=[SGD, Adam, Adamax, AdamW, NAdam, RAdam, RMSProp, auto] verbose: True # (bool) whether to print verbose output seed: 0 # (int) random seed for reproducibility deterministic: True # (bool) whether to enable deterministic mode singlecls: False # (bool) train multi-class data as single-class rect: False # (bool) rectangular training if mode='train' or rectangular validation if mode='val' coslr: False # (bool) use cosine learning rate scheduler closemosaic: 10 # (int) disable mosaic augmentation for final epochs (0 to disable) resume: False # (bool) resume training from last checkpoint amp: True # (bool) Automatic Mixed Precision (AMP) training, choices=[True, False], True runs AMP checkfraction: 1.0 # (float) dataset fraction to train on (default is 1.0, all images in train set) profile: False # (bool) profile ONNX and TensorRT speeds during training for loggers freeze: None # (int | list, optional) freeze first n layers, or freeze list of layer indices during training multiscale: False # (bool) Whether to use multiscale during training
Val/Test settings
val: True # (bool) validate/test during training split: val # (str) dataset split to use for validation, i.e. 'val', 'test' or 'train' savejson: False # (bool) save results to JSON files savehybrid: False # (bool) save hybrid version of labels (labels + additional predictions) conf: # (float, optional) object confidence threshold for detection (default 0.25 predict, 0.001 val) iou: 0.7 # (float) intersection over union (IoU) threshold for NMS max_det: 300 # (int) maximum number of detections per image half: False # (bool) use half precision (FP16) dnn: False # (bool) use OpenCV DNN for ONNX inference plots: True # (bool) save plots and images during train/val
Predict settings
source: # (str, optional) source directory for images or videos vidstride: 1 # (int) video frame-rate stride streambuffer: False # (bool) buffer all streaming frames (True) or return the most recent frame (False) visualize: False # (bool) visualize model features augment: False # (bool) apply image augmentation to prediction sources agnosticnms: False # (bool) class-agnostic NMS classes: # (int | list[int], optional) filter results by class, i.e. classes=0, or classes=[0,2,3] retinamasks: False # (bool) use high-resolution segmentation masks embed: # (list[int], optional) return feature vectors/embeddings from given layers
Visualize settings
show: False # (bool) show predicted images and videos if environment allows saveframes: False # (bool) save predicted individual video frames savetxt: False # (bool) save results as .txt files saveconf: False # (bool) save results with confidence scores savecrop: False # (bool) save cropped images with results showlabels: True # (bool) show prediction labels, i.e. 'person' showconf: True # (bool) show prediction confidence, i.e. '0.99' showboxes: True # (bool) show prediction boxes linewidth: # (int, optional) line width of the bounding boxes. Scaled to image size if None.
Export settings
format: torchscript # (str) format to export to, choices at https://docs.ultralytics.com/modes/export/#export-formats keras: False # (bool) use Keras optimize: False # (bool) TorchScript: optimize for mobile int8: False # (bool) CoreML/TF INT8 quantization dynamic: False # (bool) ONNX/TF/TensorRT: dynamic axes simplify: False # (bool) ONNX: simplify model opset: # (int, optional) ONNX: opset version workspace: 4 # (int) TensorRT: workspace size (GB) nms: False # (bool) CoreML: add NMS
Hyperparameters
lr0: 0.0001 # (float) initial learning rate (i.e. SGD=1E-2, Adam=1E-3) lrf: 0.0001 # (float) final learning rate (lr0 * lrf) momentum: 0.937 # (float) SGD momentum/Adam beta1 weightdecay: 0.0005 # (float) optimizer weight decay 5e-4 warmupepochs: 3.0 # (float) warmup epochs (fractions ok) warmupmomentum: 0.8 # (float) warmup initial momentum warmupbiaslr: 0.1 # (float) warmup initial bias lr box: 7.5 # (float) box loss gain cls: 0.5 # (float) cls loss gain (scale with pixels) dfl: 1.5 # (float) dfl loss gain pose: 12.0 # (float) pose loss gain kobj: 1.0 # (float) keypoint obj loss gain labelsmoothing: 0.0 # (float) label smoothing (fraction) nbs: 64 # (int) nominal batch size hsvh: 0.015 # (float) image HSV-Hue augmentation (fraction) hsvs: 0.7 # (float) image HSV-Saturation augmentation (fraction) hsvv: 0.4 # (float) image HSV-Value augmentation (fraction) degrees: 0.0 # (float) image rotation (+/- deg) translate: 0.1 # (float) image translation (+/- fraction) scale: 0.5 # (float) image scale (+/- gain) shear: 0.0 # (float) image shear (+/- deg) perspective: 0.0 # (float) image perspective (+/- fraction), range 0-0.001 flipud: 0.0 # (float) image flip up-down (probability) fliplr: 0.5 # (float) image flip left-right (probability) mosaic: 1.0 # (float) image mosaic (probability) mixup: 0.0 # (float) image mixup (probability) copypaste: 0.0 # (float) segment copy-paste (probability) autoaugment: randaugment # (str) auto augmentation policy for classification (randaugment, autoaugment, augmix) erasing: 0.4 # (float) probability of random erasing during classification training (0-1) cropfraction: 1.0 # (float) image crop fraction for classification evaluation/inference (0-1)
Custom config.yaml
cfg: # (str, optional) for overriding defaults.yaml
Tracker settings
tracker: botsort.yaml # (str) tracker type, choices=[botsort.yaml, bytetrack.yaml]
```
代入数据集进行训练
yaml文件
以下是数据集的yaml文件:
```python
Ultralytics YOLO 🚀, AGPL-3.0 license
COCO128 dataset https://www.kaggle.com/ultralytics/coco128 (first 128 images from COCO train2017) by Ultralytics
Documentation: https://docs.ultralytics.com/datasets/detect/coco/
Example usage: yolo train data=coco128.yaml
parent
├── ultralytics
└── datasets
└── coco128 ← downloads here (7 MB)
Train/val/test sets as
1) dir: path/to/imgs,
2) file: path/to/imgs.txt, or
3) list: [path/to/imgs1, path/to/imgs2, ..]
path: D:/code/yolov8/datasets/well # dataset root dir
train: images/train # train images (relative to 'path') 1463 images val: images/test # val images (relative to 'path') 189 images test: # test images (optional)
Classes
names: 0: good 1: broke 2: lose 3: uncovered 4: circle ```
训练结果展示
第一次用YOLOv8训练自己的数据集(基于之前的数据集又加了部分circle类的图片,之前circle图片太少了导致circle类准确率一直提升不起来),最终效果确实比YOLOv5好了许多,准确率提升了接近10%
epoch:100 batchsize:16 lr:0.0001 pretrain:YOLOv8n:

epoch:100 batchsize:32 lr:0.001 pretrain:train1(上一次的训练模型):
epoch:50 batchsize:16 lr:0.0001 pretrain:train2(上一次的训练模型):
其中还尝试调整了imgsz、数据增强等操作,效果都没太大变化就不展示了,感觉变化不大
模型调整
更换损失函数
经过学习,得知YOLOv8适合的损失函数有好几种:CIoU / DIoU / EIoU / GIoU / SIoU / WIoU,而本身默认的损失函数是CIoU,源代码中可以更换成DIoU和GIoU,而经过以下操作可以更换更多损失函数
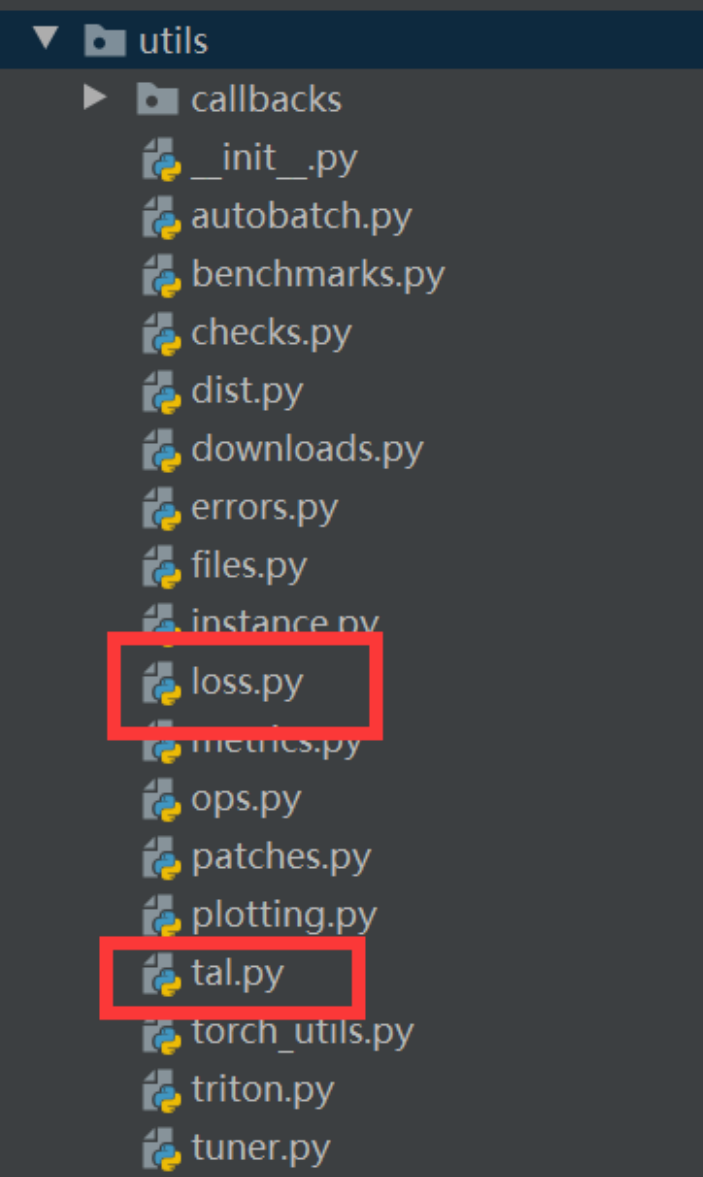
第一步:打开需要修改的文件
在ultralytics/utils文件中打开,loss.py和tal.py这两个文件
在loss.py文件中找到 class BboxLoss(nn.Module)函数,再找到bbox_iou,按住Ctrl键后进入
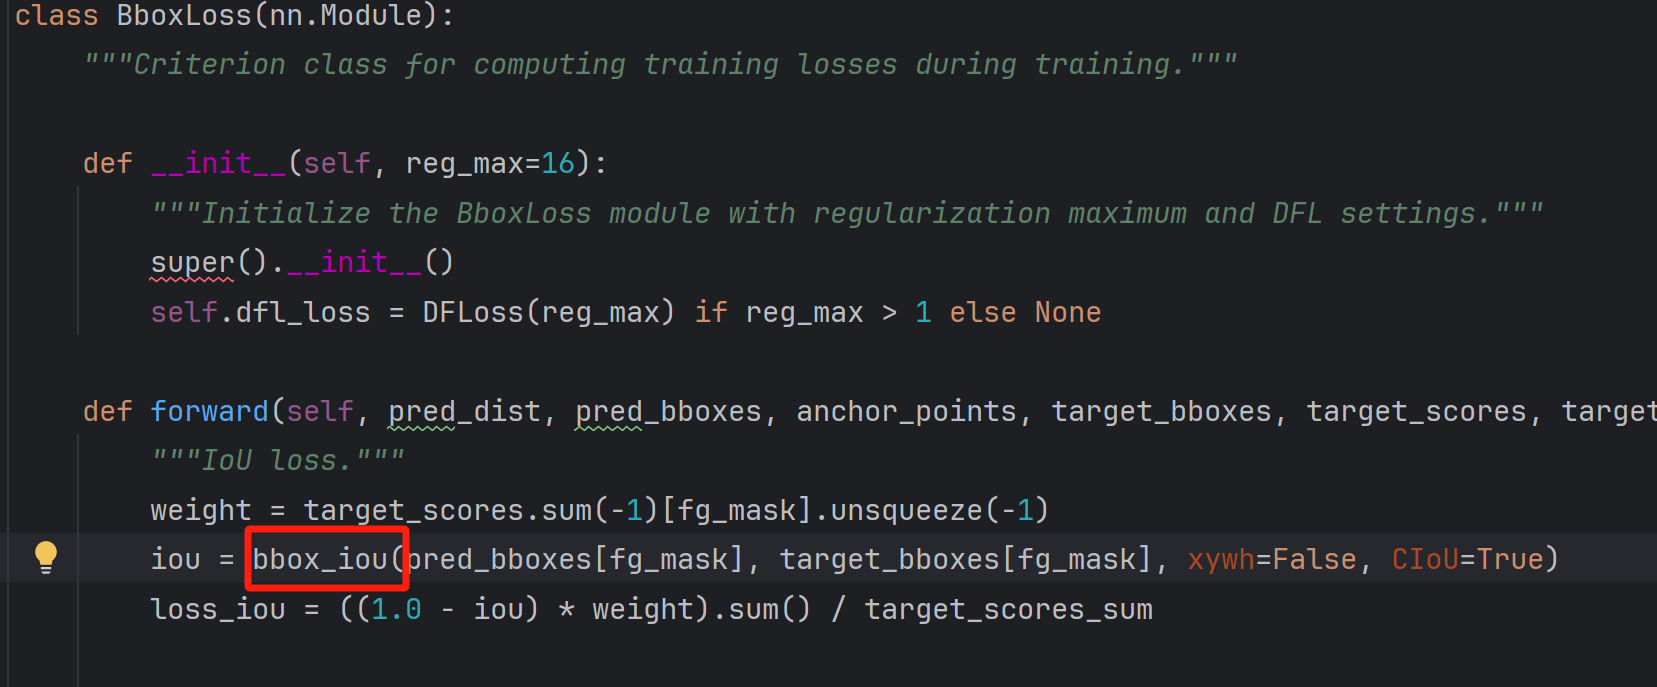
第二步:修改函数
将def bbox_iou函数注释掉,然后在后面添加如下代码:
```python class WIoUScale: ''' monotonous: { None: origin v1 True: monotonic FM v2 False: non-monotonic FM v3 } momentum: The momentum of running mean ''' ioumean = 1. monotonous = False momentum = 1 - 0.5 ** (1 / 7000) _istrain = True
def __init__(self, iou):
    self.iou = iou
    self._update(self)

@classmethod
def _update(cls, self):
    if cls._is_train:
        cls.iou_mean = (1 - cls._momentum) * cls.iou_mean + \
                        cls._momentum * self.iou.detach().mean().item()

@classmethod
def _scaled_loss(cls, self, gamma=1.9, delta=3):
    if isinstance(self.monotonous, bool):
        if self.monotonous:
            return (self.iou.detach() / self.iou_mean).sqrt()
        else:
            beta = self.iou.detach() / self.iou_mean
            alpha = delta * torch.pow(gamma, beta - delta)
            return beta / alpha
    return 1
def bbox_iou(box1, box2, x1y1x2y2=True, GIoU=False, DIoU=False, CIoU=False, SIoU=False, EIoU=False, WIoU=False, Focal=False, alpha=1, gamma=0.5, scale=False, eps=1e-7): # Returns the IoU of box1 to box2. box1 is 4, box2 is nx4 box2 = box2.T
# Get the coordinates of bounding boxes
if x1y1x2y2:  # x1, y1, x2, y2 = box1
    b1_x1, b1_y1, b1_x2, b1_y2 = box1[0], box1[1], box1[2], box1[3]
    b2_x1, b2_y1, b2_x2, b2_y2 = box2[0], box2[1], box2[2], box2[3]
else:  # transform from xywh to xyxy
    b1_x1, b1_x2 = box1[0] - box1[2] / 2, box1[0] + box1[2] / 2
    b1_y1, b1_y2 = box1[1] - box1[3] / 2, box1[1] + box1[3] / 2
    b2_x1, b2_x2 = box2[0] - box2[2] / 2, box2[0] + box2[2] / 2
    b2_y1, b2_y2 = box2[1] - box2[3] / 2, box2[1] + box2[3] / 2

# Intersection area
inter = (torch.min(b1_x2, b2_x2) - torch.max(b1_x1, b2_x1)).clamp(0) * \
        (torch.min(b1_y2, b2_y2) - torch.max(b1_y1, b2_y1)).clamp(0)

# Union Area
w1, h1 = b1_x2 - b1_x1, b1_y2 - b1_y1 + eps
w2, h2 = b2_x2 - b2_x1, b2_y2 - b2_y1 + eps
union = w1 * h1 + w2 * h2 - inter + eps

if scale:
    self = WIoU_Scale(1 - (inter / union))

# IoU
iou = torch.pow(inter / (union + eps), alpha)  # alpha iou

if CIoU or DIoU or GIoU or EIoU or SIoU or WIoU:
    cw = b1_x2.maximum(b2_x2) - b1_x1.minimum(b2_x1)  # convex (smallest enclosing box) width
    ch = b1_y2.maximum(b2_y2) - b1_y1.minimum(b2_y1)  # convex height

    if CIoU or DIoU or EIoU or SIoU or WIoU:  # Distance or Complete IoU
        c2 = (cw ** 2 + ch ** 2) ** alpha + eps  # convex diagonal squared
        rho2 = (((b2_x1 + b2_x2 - b1_x1 - b1_x2) ** 2 + (
                    b2_y1 + b2_y2 - b1_y1 - b1_y2) ** 2) / 4) ** alpha  # center dist ** 2

        if CIoU:  # https://github.com/Zzh-tju/DIoU-SSD-pytorch/blob/master/utils/box/box_utils.py#L47
            v = (4 / math.pi ** 2) * (torch.atan(w2 / h2) - torch.atan(w1 / h1)).pow(2)
            with torch.no_grad():
                alpha_ciou = v / (v - iou + (1 + eps))
            if Focal:
                return iou - (rho2 / c2 + torch.pow(v * alpha_ciou + eps, alpha)), torch.pow(inter / (union + eps),
                                                                                            gamma)  # Focal_CIoU
            else:
                return iou - (rho2 / c2 + torch.pow(v * alpha_ciou + eps, alpha))  # CIoU

        elif EIoU:
            rho_w2 = ((b2_x2 - b2_x1) - (b1_x2 - b1_x1)) ** 2
            rho_h2 = ((b2_y2 - b2_y1) - (b1_y2 - b1_y1)) ** 2
            cw2 = torch.pow(cw ** 2 + eps, alpha)
            ch2 = torch.pow(ch ** 2 + eps, alpha)

            if Focal:
                return iou - (rho2 / c2 + rho_w2 / cw2 + rho_h2 / ch2), torch.pow(inter / (union + eps), gamma)
            else:
                return iou - (rho2 / c2 + rho_w2 / cw2 + rho_h2 / ch2)  # EIou

        elif SIoU:
            # SIoU Loss
            s_cw = (b2_x1 + b2_x2 - b1_x1 - b1_x2) * 0.5 + eps
            s_ch = (b2_y1 + b2_y2 - b1_y1 - b1_y2) * 0.5 + eps
            sigma = torch.pow(s_cw ** 2 + s_ch ** 2, 0.5)
            sin_alpha_1 = torch.abs(s_cw) / sigma
            sin_alpha_2 = torch.abs(s_ch) / sigma
            threshold = pow(2, 0.5) / 2
            sin_alpha = torch.where(sin_alpha_1 > threshold, sin_alpha_2, sin_alpha_1)
            angle_cost = torch.cos(torch.arcsin(sin_alpha) * 2 - math.pi / 2)
            rho_x = (s_cw / cw) ** 2
            rho_y = (s_ch / ch) ** 2
            gamma = angle_cost - 2
            distance_cost = 2 - torch.exp(gamma * rho_x) - torch.exp(gamma * rho_y)
            omiga_w = torch.abs(w1 - w2) / torch.max(w1, w2)
            omiga_h = torch.abs(h1 - h2) / torch.max(h1, h2)
            shape_cost = torch.pow(1 - torch.exp(-1 * omiga_w), 4) + torch.pow(1 - torch.exp(-1 * omiga_h), 4)

            if Focal:
                return iou - torch.pow(0.5 * (distance_cost + shape_cost) + eps, alpha), torch.pow(
                    inter / (union + eps), gamma)  # Focal_SIou
            else:
                return iou - torch.pow(0.5 * (distance_cost + shape_cost) + eps, alpha)  # SIou

        elif WIoU:
            if Focal:
                raise RuntimeError("WIoU do not support Focal.")
            elif scale:
                return getattr(WIoU_Scale, '_scaled_loss')(self), (1 - iou) * torch.exp(
                    (rho2 / c2)), iou  # WIoU
            else:
                return iou, torch.exp((rho2 / c2))  # WIoU v1
        if Focal:
            return iou - rho2 / c2, torch.pow(inter / (union + eps), gamma)  # Focal_DIoU
        else:
            return iou - rho2 / c2  # DIoU

    c_area = cw * ch + eps  # convex area
    if Focal:
        return iou - torch.pow((c_area - union) / c_area + eps, alpha), torch.pow(inter / (union + eps),
                                                                                  gamma)  # Focal_GIoU
    else:
        return iou - torch.pow((c_area - union) / c_area + eps, alpha)  # GIoU

if Focal:
    return iou, torch.pow(inter / (union + eps), gamma)  # Focal_IoU
else:
    return iou  # IoU
```
打开loss.py函数文件,然后找到 class BboxLoss(nn.Module),在里面将 loss_iou函数注释掉,添加如下代码:
```python if type(iou) is tuple: if len(iou) == 2: lossiou = ((1.0 - iou[0]) * iou[1].detach() * weight.sum() / targetscoressum) else: lossiou = iou[0] * iou[1] * weight.sum() / targetscoressum else: lossiou = ((1.0 - iou) * weight.sum() / targetscores_sum)
```
第三步:选择损失函数
在loss.py文件中修改损失函数(选择CIoU / DIoU / EIoU / GIoU / SIoU / WIoU都行)

在tal.py文件中修改损失函数(和上述选一样的):

这样损失函数就更换成功了,但我对比发现不同的损失函数所训练的最终效果差别不大,其中换成DIoU函数后效果好转1%,为89.3%,我就不展示训练结果了,感兴趣的友友们可以想想如何更能提高效果。
更换模型配置文件
YOLOv8的配置文件定义了模型的关键参数和结构,包括类别数、模型尺寸、骨架(backbone)和头部(head)结构。这些配置决定了模型的性能和复杂性。
yolov8.yaml
```python
Ultralytics YOLO 🚀, AGPL-3.0 license
YOLOv8目标检测模型,具有P3-P5输出。使用示例请参见 https://docs.ultralytics.com/tasks/detect
Parameters
nc: 80 # 类别数目
scales: # 模型复合缩放常数,例如 'model=yolov8n.yaml' 将调用带有 'n' 缩放的 yolov8.yaml # [depth, width, max_channels] n: [0.33, 0.25, 1024] # YOLOv8n概览:225层, 3157200参数, 3157184梯度, 8.9 GFLOPs s: [0.33, 0.50, 1024] # YOLOv8s概览:225层, 11166560参数, 11166544梯度, 28.8 GFLOPs m: [0.67, 0.75, 768] # YOLOv8m概览:295层, 25902640参数, 25902624梯度, 79.3 GFLOPs l: [1.00, 1.00, 512] # YOLOv8l概览:365层, 43691520参数, 43691504梯度, 165.7 GFLOPs x: [1.00, 1.25, 512] # YOLOv8x概览:365层, 68229648参数, 68229632梯度, 258.5 GFLOPs
YOLOv8.0n骨架backbone:
[from, repeats, module, args]
- [-1, 1, Conv, [64, 3, 2]] # 0-P1/2
- [-1, 1, Conv, [128, 3, 2]] # 1-P2/4
- [-1, 3, C2f, [128, True]]
- [-1, 1, Conv, [256, 3, 2]] # 3-P3/8
- [-1, 6, C2f, [256, True]]
- [-1, 1, Conv, [512, 3, 2]] # 5-P4/16
- [-1, 6, C2f, [512, True]]
- [-1, 1, Conv, [1024, 3, 2]] # 7-P5/32
- [-1, 3, C2f, [1024, True]]
- [-1, 1, SPPF, [1024, 5]] # 9
YOLOv8.0n头部head:
- [-1, 1, nn.Upsample, [None, 2, 'nearest']]
- [[-1, 6], 1, Concat, [1]] # 合并骨架P4
- [-1, 3, C2f, [512]] # 12
- [-1, 1, nn.Upsample, [None, 2, 'nearest']]
- [[-1, 4], 1, Concat, [1]] # 合并骨架P3
- [-1, 3, C2f, [256]] # 15 (P3/8-小)
- [-1, 1, Conv, [256, 3, 2]]
- [[-1, 12], 1, Concat, [1]] # 合并头部P4
- [-1, 3, C2f, [512]] # 18 (P4/16-中)
- [-1, 1, Conv, [512, 3, 2]]
- [[-1, 9], 1, Concat, [1]] # 合并头部P5
- [-1, 3, C2f, [1024]] # 21 (P5/32-大)
- [[15, 18, 21], 1, Detect, [nc]] # 检测(P3, P4, P5)
```
在YOLOv8模型中,参数nc代表类别数目,这边已经将其调整为5。scales参数用于设定模型的不同尺寸和复杂度,它由一系列缩放参数构成。这里的n, s, m, l, x分别代表了不同尺寸的模型,每种尺寸模型都有其特定的depth(深度)、width(宽度)和max_channels(最大通道数)配置。为了适应不同的需求,YOLOv8提供了五个配置文件:yolov8n.yaml, yolov8s.yaml, yolov8m.yaml, yolov8l.yaml, yolov8x.yaml,以及对应的五个预训练权重文件:yolov8n.pt, yolov8s.pt, yolov8m.pt, yolov8l.pt, yolov8x.pt。
在尝试提升模型性能的过程中,不再使用原有的yolov8n.yaml配置文件,而是尝试了yolov8s.yaml和yolov8m.yaml。遗憾的是,尽管进行了这些调整,模型的性能表现并没有显著改善。
后续尝试-->加入注意力机制
参考资料
手把手带你 YOLOv5/v7 添加注意力机制(并附上30多种顶会Attention原理图)2024/2/5更新_yolo 注意力机制-CSDN博客
万字长文!YOLO算法模型yaml文件史上最详细解析与教程!小白也能看懂!掌握了这个就掌握了魔改YOLO的核心!_yolov5 yaml解析-CSDN博客
遇到的一些问题
conda安装包报错
python
UnavailableInvalidChannel: The channel is not accessible or is invalid.channel name:
anaconda/pkgs/freechannel url:
https://mirrors.tuna.tsinghua.edu.cn/anaconda/pkgs/freeerror code: 404
You will need to adjust your conda configuration to proceed.
Use conda config --show channels to view your configuration's current state,and use conda config --show-sources to view config file locations.
原因
读者手动更新过python的源为国内安装源,pip可以正常使用,但是国内源停止了Anaconda镜像,不支持conda安装与更新。
解决方法:
- 使用pip安装或更新package
- 换回默认源,继续使用conda,操作如下
lua
conda config --remove-key channels
训练意外中断,想继续训练
解决方法:
- 保证runs目录下的exp是最大的
- 在train.py中找到resume,将default改为True
python
parser.add_argument('--resume', nargs='?', const=True, default=True, help='resume most recent training')
- 在train.py中找到smartresume函数,ctrl到torchutils.py
 进行如下修改
python
ckpt['epoch']=下一轮训练的编号
start_epoch = ckpt['epoch'] # +1去掉
- 重新训练
python
python train.py --weights last.pt路径

其他的一些知识点
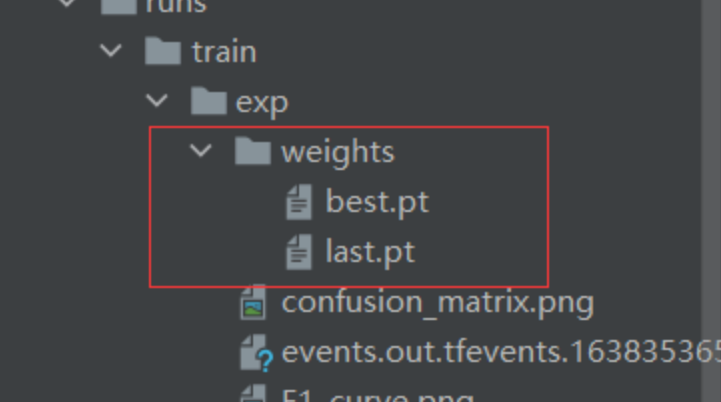
best.pt和last.pt区别
- best.pt和last.pt都是yolo模型的训练权重文件
- best.pt:保存的是训练过程中在验证集上表现最好的模型权重。在训练过程中,每个epoch结束后都会对验证集进行一次评估,并记录下表现最好的模型的权重。这个文件通常用于推理和部署阶段,因为它包含了在验证集上表现最好的模型的权重,可以获得最佳的性能。
- last.pt:保存的是最后一次训练迭代结束后的模型权重。这个文件通常用于继续训练模型,因为它包含了最后一次训练迭代结束时的模型权重,可以继续从上一次训练结束的地方继续训练模型。
- 使用上的区别是,当需要在之前的训练基础上继续训练时,应该使用last.pt作为起点进行训练;当需要使用训练后的模型进行推理和部署时,应该使用best.pt。
Star Histroy
Owner
- Name: Ding Xu
- Login: Xuding0829
- Kind: user
- Location: Hangzhou
- Company: Zhejiang A&F University
- Website: https://www.zafu.edu.cn/
- Repositories: 1
- Profile: https://github.com/Xuding0829
I want to learn coding and try to make contribution to the community.
Citation (CITATION.cff)
cff-version: 1.2.0
preferred-citation:
  type: software
  message: If you use YOLOv5, please cite it as below.
  authors:
  - family-names: Jocher
    given-names: Glenn
    orcid: "https://orcid.org/0000-0001-5950-6979"
  title: "YOLOv5 by Ultralytics"
  version: 7.0
  doi: 10.5281/zenodo.3908559
  date-released: 2020-5-29
  license: GPL-3.0
  url: "https://github.com/ultralytics/yolov5"
GitHub Events
Total
- Watch event: 11
- Push event: 4
- Fork event: 1
Last Year
- Watch event: 11
- Push event: 4
- Fork event: 1