helio-lite
AWS Open Source Software for Heliophysics community
Science Score: 44.0%
This score indicates how likely this project is to be science-related based on various indicators:
-
✓CITATION.cff file
Found CITATION.cff file -
✓codemeta.json file
Found codemeta.json file -
✓.zenodo.json file
Found .zenodo.json file -
○DOI references
-
○Academic publication links
-
○Academic email domains
-
○Institutional organization owner
-
○JOSS paper metadata
-
○Scientific vocabulary similarity
Low similarity (13.8%) to scientific vocabulary
Repository
AWS Open Source Software for Heliophysics community
Basic Info
- Host: GitHub
- Owner: indiajacksonphd
- License: mit
- Language: Python
- Default Branch: main
- Size: 3.99 MB
Statistics
- Stars: 0
- Watchers: 1
- Forks: 0
- Open Issues: 0
- Releases: 0
Metadata Files
README.md
Helio-Lite: A Streamlined Heliophysics Research Platform
Helio-Lite is a streamlined, cost-effective version of HelioCloud, designed to empower heliophysics researchers in smaller groups and citizen scientists, particularly those operating within budget constraints. As an open-source platform, it facilitates broader community engagement and collaboration in the field of heliophysics research.
Key Features
Customized Kernels: Helio-Lite comes equipped with two specialized kernels. One is tailored for heliophysics research, and the other is optimized for artificial intelligence and machine learning applications.
Dynamic Data Extraction Modules: The platform includes custom modules for the dynamic extraction of data:
- AIA Images from JSOC: A module for fetching AIA (Atmospheric Imaging Assembly) images from the Joint Science Operations Center.
- Space Weather Data from DONKI: A module for retrieving space weather data from DONKI (Database Of Notifications, Knowledge, Information).
Extensive Examples Repository: Hosted on a JupyterHub server, Helio-Lite provides a comprehensive set of examples. This server is hosted on an Amazon Elastic Cloud Computing (EC2) Instance, offering robust performance and scalability.
Storage of CSV Datasets in S3 Bucket: Helio-Lite enables the storage of CSV datasets in an Amazon S3 bucket. This approach includes "parsing in place" capabilities to conserve storage inside the EC2 instance, optimizing resource utilization.
AWS Ecosystem: Leveraging the AWS ecosystem, Helio-Lite offers a scalable and cost-effective solution for data sharing and computational needs in heliophysics research.
Open Source Community
As an open-source project, Helio-Lite invites contributions and collaborations from researchers, developers, and enthusiasts in the field of heliophysics. We welcome innovations and improvements to enhance the platform's capabilities.
Setting Up Helio-Lite
We’ve provided a 20 minute video tutorial demonstrating the full setup process from AWS account creation to running your first Jupyter notebook.
This guide outlines the steps to set up Helio-Lite on AWS, providing a user-friendly experience for researchers and enthusiasts in heliophysics.
We hope this platform accelerates your research and exploration in the fascinating field of heliophysics. For more information on setup, usage, and contribution, please refer to the subsequent sections.
Prerequisites
Before starting, ensure you have an AWS account with billing enabled. If you do not already have one, you can create it by following Step 1 below. The remaining steps will guide you through launching an EC2 instance, connecting to it, and setting up Helio-Lite from scratch.
Step 1: Create an AWS Account
- Go to the AWS homepage and sign up.
- Enter your email address, billing information, and select your preferred AWS region.
Step 2: Create an EC2 Instance
- Navigate to the EC2 dashboard and click "Launch Instance".
- Name: Assign a meaningful name to your instance.
- Operating System: Select Ubuntu.
- Instance Type: Choose
c5.4xlargeor larger. - Key Pair: Create a new key pair for SSH access. Download and save the
.pemfile securely. - Network Settings:
- PC and Subnet should be set to default, but you are welcome to change then. See AWS guide for creating a custom VPC and Subnet for guidance.
- Configure rules to allow SSH and HTTP traffic from the internet.
- ⚠️ Security Notice: This configuration does not use HTTPS, meaning data will be transmitted in plain text. This setup is not secure for production use. To secure the system, configure HTTPS and proper IAM policies. See AWS Security Best Practices for guidance.
- Storage: Choose Elastic Block Storage (EBS) with at least 500 GiB gp3.
- Advanced Details:
- In the user data section, enter the following script:
```bash
!/bin/bash
set -euxo pipefail
Basics
sudo apt-get update sudo apt-get install -y python3 python3-pip curl
Install TLJH (JupyterHub)
curl -fsSL https://raw.githubusercontent.com/indiajacksonphd/Helio-Lite/main/START_HERE/jupyterHubBootstrap.py \ | sudo python3 - --admin admin1
Wait until Hub files exist
until [ -d /opt/tljh/hub/share/jupyterhub/templates ]; do sleep 5; done
Use your custom login template
sudo mkdir -p /opt/tljh/custom/templates curl -fsSL https://raw.githubusercontent.com/indiajacksonphd/Helio-Lite/main/custom_templates/login.html \ -o /opt/tljh/custom/templates/login.html
sudo mkdir -p /opt/tljh/config/jupyterhubconfig.d cat <<'PY' | sudo tee /opt/tljh/config/jupyterhubconfig.d/customtemplates.py >/dev/null c.JupyterHub.templatepaths = ['/opt/tljh/custom/templates'] PY
Force HTTP-only (no HTTPS, no redirects)
sudo tljh-config set https.enabled false sudo tljh-config reload proxy
```
Step 3: Add an Elastic IP Address
- In the EC2 dashboard, select Elastic IPs from the left menu.
- Click Allocate Elastic IP address and follow the prompts to allocate a new Elastic IP.
- Once allocated, select Actions and choose Associate Elastic IP address.
- For Resource type, choose Instance.
- For Instance, select your previously created instance.
- Private IP: (optional) Specify if needed.
- Check Allow this Elastic IP to be reassociated if you plan to reuse it.
- Click Associate to link the Elastic IP with your instance.
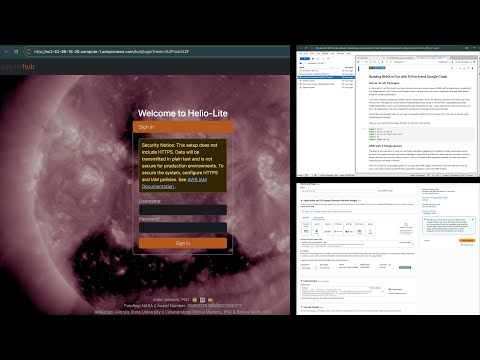
Step 4: Access the Server
Open your browser and go to:
http://ec2-<Elastic-IP-ADDRESS>.compute-1.amazonaws.comImportant: The server is not yet secure. You must use HTTP to access it until HTTPS is configured.
Do not use HTTPS — it will not work until the server is secured.
Example: If your Elastic IP is 12.34.56.78, your URL will be: http://ec2-12-34-56-78.compute-1.amazonaws.com
Your homepage should like similar to the following:
Step 5: Explore Your EC2 Instance
- With your instance selected in the EC2 dashboard, take some time to explore the various tabs and settings available. Understanding your instance's configuration and available options is crucial for effective management and troubleshooting.
Step 6: Create the Helio-Lite Environment
- Access your EC2 instance using SSH or the AWS Management Console.
- Log in with:
- Username:
admin1 - Password:
create initial
- Username:
- Open a terminal in JupyterLab to execute setup scripts.
Initialize Conda Enviroment
bash
conda init bash
exit
Open the terminal again and make sure that conda is activated:
bash
conda deactivate
conda env list
You should see:
Creating Jupyter Kernels for AI/ML and PyHC Projects
This guide details the process of setting up dedicated Jupyter kernels for AI/ML and PyHC projects on a JupyterHub server. These steps assume you have administrative access to the server and the necessary permissions to install software.
Creating Directories
Let's pull in the script to create our directories, activate it, then run it. After you run the command, check to make sure that all of your directories have been created and all of your scripts and examples have downloaded in their respective folders.
```bash curl -o createdirectories.sh https://raw.githubusercontent.com/indiajacksonphd/Helio-Lite/main/STARTHERE/create_directories.sh
chmod +x create_directories.sh
sudo ./create_directories.sh
sudo systemctl restart jupyterhub.service exit ``` Open another teminal, in a few seconds you should see a shared folder appear. This folder contains all of the examples.
Creating the AI/ML Kernel
Step 1: Create a New Environment
Create a new conda environment that is accessible to all JupyterHub users.
bash
conda deactivate # if you are in another environment environment, deactivate first
sudo conda env create --prefix /opt/tljh/user/envs/ai-ml -f python_libraries_dependencies/ml.yml
Step 2: Activate the Environment
Activate the newly created environment.
bash
conda activate /opt/tljh/user/envs/ai-ml
Step 3: Install Additional Packages
Copy custom Python modules into the environment directory and install additional requirements.
bash
sudo cp custom_modules/aiaImages.py /opt/tljh/user/envs/ai-ml/lib/python3.7
sudo cp custom_modules/hmiImages.py /opt/tljh/user/envs/ai-ml/lib/python3.7
sudo cp custom_modules/donkiData.py /opt/tljh/user/envs/ai-ml/lib/python3.7
sudo cp custom_modules/dmLab.py /opt/tljh/user/envs/ai-ml/lib/python3.7
sudo pip install torch
sudo pip install --use-pep517 --retries 5 --no-cache-dir -r python_libraries_dependencies/custom_requirements.txt
sudo pip install --upgrade ipywidgets
sudo pip install --upgrade Pillow
Step 4: Register the Kernel
Install ipykernel and register the environment as a Jupyter kernel.
bash
sudo conda install ipykernel -y
sudo ipython kernel install --prefix /opt/tljh/user/ --name=ai-ml --display-name "AI-ML Packages"
Step 5: Restart JupyterHub
Deactivate the conda environment and restart the JupyterHub service to make the new kernel available.
bash
conda deactivate
sudo systemctl restart jupyterhub.service
exit
Creating the PyHC Kernel
Step 1: Create a New Environment
Open another terminal to set up a new conda environment for PyHC projects.
bash
conda deactivate # if you are in another environment environment, deactivate first
sudo conda env create --prefix /opt/tljh/user/envs/pyhc-all -f python_libraries_dependencies/environment.yml
Step 2: Activate the Environment
Activate the PyHC environment.
bash
conda activate /opt/tljh/user/envs/pyhc-all
Step 3: Install System and Python Packages
Install necessary system packages and Python libraries.
bash
sudo apt-get install -y gcc g++ gfortran ncurses-dev build-essential cmake
You may be prompted to reboot after this installation. If this is the case then go back into the terminal insert the following and continue
```bash conda deactivate conda activate /opt/tljh/user/envs/pyhc-all
```
bash
sudo pip install --no-cache-dir "Cython<3" "numpy<2" wheel
sudo pip install --no-cache-dir numpy==1.24.3
sudo pip install --use-pep517 --retries 5 --no-cache-dir -r python_libraries_dependencies/requirements.txt
sudo pip install --no-cache-dir --no-build-isolation spacepy regularizepsf==0.2.3
sudo pip install --use-pep517 --retries 5 --no-cache-dir -r python_libraries_dependencies/custom_requirements.txt
sudo pip install --no-cache-dir pytplot==1.7.28
sudo pip install --no-cache-dir pytplot-mpl-temp
sudo pip install --no-cache-dir pyspedas
sudo pip install --upgrade ipywidgets
sudo pip install --upgrade Pillow
Step 4: Copy Custom Modules and Register the Kernel
Copy custom Python modules and make the environment available as a Jupyter kernel.
```bash sudo cp custommodules/aiaImages.py /opt/tljh/user/envs/pyhc-all/lib/python3.9 sudo cp custommodules/hmiImages.py /opt/tljh/user/envs/pyhc-all/lib/python3.9 sudo cp custommodules/donkiData.py /opt/tljh/user/envs/pyhc-all/lib/python3.9 sudo cp custommodules/dmLab.py /opt/tljh/user/envs/pyhc-all/lib/python3.9
sudo conda install ipykernel -y sudo ipython kernel install --prefix /opt/tljh/user/ --name=pyhc-all --display-name "PyHC All Packages" ```
Step 5: Restart JupyterHub
Finally, deactivate the environment and restart the JupyterHub service.
bash
conda deactivate
sudo systemctl restart jupyterhub.service
exit
Verify the Installation**
After completing the setup, it's important to verify that everything is installed correctly and operational. Open another terminal and use the following commands to check the Jupyter kernels and Conda environments:
bash
conda deactivate
jupyter kernelspec list
conda env list
You should see the following in the terminal:Next check both of your environments to ensure that all libraries and packages have been installed:
```bash conda activate ai-ml conda list conda deactivate
conda activate pyhc-all conda list conda deactivate ```
These commands will list the available Jupyter kernels and Conda environments, ensuring that your Helio-Lite environment is correctly set up and ready for use.
Log Out and Reboot Your EC2 Instance**
To ensure all changes are applied and the system is running smoothly, it's a good practice to log out of your current session and restart your EC2 instance. This can be done through the AWS Management Console. Navigate to your instance, select the Actions menu, and choose Instance State > Reboot.
Account Creation / User Login
New users simply create a username and password of their liking on the homepage.
Examples
When testing example jupyter notebooks please ensure that you select the correct kernel:
Conclusion
You have now successfully set up Helio-Lite on AWS, creating a scalable and collaborative environment for heliophysics research projects. This setup provides a foundation for data sharing, extensive computing resources, and the flexibility to customize the environment according to your specific project needs. For further customization and to add more users or administrators, refer to the AWS and JupyterHub documentation.
Congratulations on your Helio-Lite environment, and happy researching!
Owner
- Name: India Jackson
- Login: indiajacksonphd
- Kind: user
- Location: Atlanta, GA
- Company: Georgia State University
- Website: https://www.linkedin.com/in/india- jackson-641a9354/
- Twitter: astro_beauty
- Repositories: 3
- Profile: https://github.com/indiajacksonphd
I'm a Phd Astrophysics Candidate and MS CSC student at Georgia State University. I'm creating a cloud environment for the space weather community.
Citation (CITATION.cff)
# This CITATION.cff file was generated with cffinit.
# Visit https://bit.ly/cffinit to generate yours today!

cff-version: 1.2.0
title: Helio-lite
message: >-
  Helio-Lite is a streamlined, cost-effective version of
  HelioCloud, designed to empower heliophysics researchers
  in smaller groups and citizen scientists, particularly
  those operating within budget constraints. As an
  open-source platform, it facilitates broader community
  engagement and collaboration in the field of heliophysics
  research.
type: software
authors:
  - given-names: India
    family-names: Jackson
    name-suffix: PhD
    email: indiajacksonphd@gmail.com
    affiliation: Georgia State University
    orcid: 'https://orcid.org/0009-0001-5404-8689'
identifiers:
  - type: doi
    value: 10.3847/1538-4365/ad3fba
repository-code: 'https://github.com/indiajacksonphd/Helio-lite'
abstract: >-
  In the rapidly evolving field of heliophysics research,
  the demand for accessible, scalable, and cost-effective
  resources is paramount. Helio-Lite, a free, open-source
  framework operating within the Amazon Web Services (AWS)
  ecosystem, utilizes its infrastructure and services.
  Derived from HelioCloud, it supports smaller research
  groups' needs, offers essential prerequisites for
  artificial intelligence (AI) and machine learning (ML)
  tasks, and acts as a specialized tool for data sharing and
  computation. Utilizing AWS's potent data storage and
  computational capabilities, Helio-Lite integrates
  customized python kernels for heliophysics and AI/ML,
  facilitating efficient data analysis and enhancing our
  understanding of solar phenomena. Key functionalities of
  Helio-Lite include interactive data extraction modules for
  Atmospheric Imaging Assembly (AIA) images, Helioseismic
  and Magnetic Imager (HMI) images, and near real-time space
  weather data directly from the Database of Notifications,
  Knowledge, Information (DONKI), alongside a comprehensive
  examples repository. Notably, Helio-Lite addresses
  challenges posed by vast solar data volumes by parsing
  directly from Amazon's Simple Storage Service (S3)
  buckets, improving accessibility and efficiency in
  analysis. Moving forward, Helio-Lite is poised to undergo
  continuous enhancements aimed at improving user experience
  and system management.
keywords:
  - >-
    space weather, heliophysics, artificial intelligence,
    machine learning, cloud computing, python, Amazon Web
    Services
license: MIT
GitHub Events
Total
- Push event: 18
Last Year
- Push event: 18
Dependencies
- beautifulsoup4 *
- boto3 ==1.34.27
- fsspec *
- ipywidgets *
- numpy *
- pandas *
- pillow *
- pyarrow *
- requests *
- s3fs *
- OMMBV ==1.0.1
- SkyWinder ==0.0.3
- SkyWinder-Analysis ==0.0.2
- aacgmv2 ==2.6.3
- aiapy ==0.7.4
- aidapy ==0.0.4
- aiohttp >=3.6
- aiosignal >=1.1.2
- aniso8601 >=0.82
- antlr4-python3-runtime ==4.7
- anyio >=3.1.0
- apexpy ==2.0.1
- appdirs >=1.4
- appnope *
- argon2-cffi *
- argon2-cffi-bindings *
- asdf >=2.13
- asdf-astropy >=0.2.0
- asdf-coordinates-schemas >=0.1
- asdf-standard >=1.0.1
- asdf-transform-schemas >=0.3
- asdf-unit-schemas >=0.1
- asdf-wcs-schemas *
- asteval >=0.9.28
- astrometry-azel ==1.3.0
- astropy >=5.3,
- astropy-iers-data >=0.2023.10.30.0.29.53
- astroquery *
- asttokens >=2.1.0
- async-timeout >=4.0,<5.0
- attrs >=22.2.0
- babel >=2.10
- beautifulsoup4 >=4.9.3
- bitarray >=2.8.0,<3.0.0
- bitstring >=3.0.0
- bleach *
- blinker >=1.6.2
- blosc2 >=2.3.0
- bokeh >=1.1
- bottleneck *
- ccsdspy ==1.2.1
- cdasws >=1.7.24
- cdflib ==0.4.9
- certifi >=2017.4.17
- cffi >=1.12
- cftime *
- charset-normalizer >=2,<4
- click >=8.1.3
- cloudpickle >=1.5.0
- cmasher *
- colorspacious >=1.1.0
- comm >=0.1.3
- contourpy >=1.0.1
- cryptography >=41.0.5,<42,
- cycler >=0.10
- cython *
- dascutils ==2.3.0
- dask >=2021.8.0
- dbprocessing ==0.1.0
- debugpy >=1.6.5
- decorator >=4.4.2
- deepdiff ==6.7.1
- deepdish *
- defusedxml *
- dill >=0.3.7
- diskcache *
- dkist >=1.0.0
- dmsp ==0.6.0
- drms *
- enlilviz ==0.2.0
- exceptiongroup >=1.0.2
- execnet >=1.1
- executing >=1.2.0
- extension *
- fastjsonschema *
- fiasco ==0.2.0
- flask ==1.1.2
- flask-cors *
- flask-restful ==0.3.8
- fonttools >=4.22.0
- fortranformat *
- frozenlist >=1.1.1
- fsspec >=2021.09.0
- future *
- geomagindices >=1.4.0
- geopack ==1.0.10
- georinex ==1.16.2
- geospacelab ==0.6.1
- globus-sdk >=3.0
- goesutils ==1.0.8
- greenlet *
- gridaurora *
- gwcs >=0.19.0
- h5netcdf *
- h5py >=3.3.0
- hapiclient ==0.2.5
- hatanaka *
- heliopy ==0.15.4
- heliopy-multid *
- hissw ==2.3
- html5lib >=0.999
- hydra-core ==0.11.3
- hypothesis ==6.92.5
- idna >=2.8,<4
- igrf ==13.0.2
- imageio >=2.31.6
- importlib-metadata >=4.13.0
- importlib-resources >=3.2.0
- incremental *
- iniconfig *
- ipykernel >=5.5.6
- ipython >=7.23.1
- ipywidgets >=7.6.5
- iri2016 ==1.11.1
- irispy-lmsal ==0.2.0
- isodate >=0.6.0
- itsdangerous >=2.1.2
- jaraco.classes *
- jedi >=0.16
- jinja2 >=3.1.2
- jmespath >=0.6.2
- joblib >=1.1.1
- json5 >=0.9.0
- jsonschema >=4.18.0
- jsonschema-specifications >=2023.03.6
- jupyter-client >=7.4.4,<9
- jupyter-core >=4.12,
- jupyter-events >=0.9.0
- jupyter-server >=2.0.0,<3
- jupyter-server-terminals *
- jupyterlab-pygments *
- jupyterlab-server >=2.3.0,<3
- jupyterlab-widgets *
- keyring >=4.0
- kiwisolver >=1.3.1
- lazy-loader >=0.3
- llvmlite >=0.41.0dev0,<0.42
- lmfit >=1.0.3
- locket *
- lowtran ==3.1.0
- lxml >=4.6.0
- madrigalWeb ==3.2.4
- madrigalweb >=3.2
- maidenhead ==1.7.0
- markdown >=3.0.1
- markupsafe >=2.1.1
- matplotlib ==3.5.3
- matplotlib-inline >=0.1
- mcalf ==1.0.0
- mistune >=2.0.3,<4
- more-itertools *
- mpmath >=1.2.1
- msgpack *
- msise00 ==1.10.1
- multidict >=4.5,<7.0
- multiprocess >=0.70.15
- natsort >=7.1.1
- nbclient >=0.5.0,<0.8
- nbconvert >=6.4.5,<8
- nbformat >=5.7
- ncompress *
- ndcube ==2.2.0
- ndindex >=1.4
- nest-asyncio *
- netcdf4 >=1.6.2
- networkx >=2.8
- nexradutils ==1.0.0
- numba >=0.56.0
- numexpr >=2.6.2
- ocbpy ==0.3.0
- omegaconf >=1.4,<1.5
- ordered-set >=4.0.2,<4.2.0
- overrides *
- packaging >=22.0
- palettable *
- pandas >=1.5.3
- pandocfilters >=1.4.1
- parfive >=2.0.0
- parso >=0.8.3,<0.9.0
- partd >=1.2.0
- pathlib2 *
- pathos >=0.2.5
- pexpect >4.3
- pfsspy *
- pillow >=9.0.1
- plasmapy ==2023.10.0
- platformdirs >=2.5
- plotly *
- pluggy >=0.12,<2.0
- portalocker *
- pox >=0.3.3
- ppft >=1.7.6.7
- prometheus-client *
- prompt-toolkit >=3.0.41,<3.1.0
- psutil *
- ptyprocess >=0.5
- pure-eval *
- py-cpuinfo *
- pycapnp *
- pycdfpp >=0.6.0
- pycparser *
- pydarn ==4.0
- pydarnio >=1.1.0
- pyerfa >=2.0
- pyflct ==0.2.3
- pygments >=2.4.1
- pyistp >=0.4.0
- pyjwt >=2.0.0,<3.0.0
- pymap3d ==3.0.1
- pyopenssl *
- pyparsing >=2.3.1
- pyqt5 >=5.15.4
- pyqt5-qt5 >=5.15.2
- pyqt5-sip >=12.13,<13
- pyqtgraph >=0.11.1
- pyqtwebengine >=5.15.2
- pyqtwebengine-qt5 >=5.15.0
- pysat ==3.1.0
- pytest >=7.0.1
- pytest-arraydiff ==0.6.1
- pytest-doctestplus ==1.1.0
- pytest-xdist ==3.5.0
- python-dateutil >=2.8.2
- python-forge *
- python-json-logger >=2.0.4
- pytz >=2020.1
- pyvo >=1.1
- pywavelets *
- pyyaml >=5.4.1
- pyzenodo3 ==1.0.2
- pyzmq >=24
- reesaurora ==1.0.5
- referencing >=0.31.0
- regularizepsf ==0.2.3
- requests >=2.31,<3.0.0
- requests-file >=1.5.1
- requests-toolbelt >=0.7.1
- rfc3339-validator *
- rfc3986-validator >=0.1.1
- rpds-py >=0.7.1
- sciencedates ==1.5.0
- scikit-image >=0.19.0
- scikit-learn >=0.22
- scipy >=1.8
- semantic-version >=2.8
- send2trash >=1.8.2
- sep *
- setuptools >=30.3.0
- setuptools-scm ==8.0.4
- six >=1.12.0
- sniffio >=1.1
- solarmach ==0.3.2
- solo-epd-loader ==0.3.6
- sortedcontainers >=2.1.0,<3.0.0
- soupsieve >1.2
- space-packet-parser ==4.1.1
- speasy ==1.2.2
- spiceypy ==6.0.0
- sqlalchemy *
- sscws *
- stack-data *
- sunkit-image ==0.5.1
- sunkit-instruments ==0.5.0
- sunpy ==5.1.0
- sunraster ==0.5.0
- sympy ==1.5.1
- tables >=3.4.4
- tenacity >=6.2.0
- terminado >=0.8.3
- themisasi ==1.2.0
- threadpoolctl >=2.0.0
- tifffile >=2022.8.12
- tinycss2 *
- toml *
- tomli >=1.0.0
- toolz >=0.10.0
- tornado >=6.2
- tqdm >=4.63
- traitlets >=5.6.0,<6
- typing-extensions >=4.6.0
- tzdata >=2022.1
- uncertainties >=3.1.4
- urllib3 >=1.26.0,<3
- viresclient ==0.11.4
- voila >=0.3.3
- wcwidth *
- webencodings >=0.4
- websocket-client *
- websockets >=9.0
- werkzeug >=3.0.0
- wget *
- widgetsnbextension *
- wmm2015 ==1.1.1
- wmm2020 ==1.1.1
- wrapt >=1.12.1
- xarray >=2022.3.0
- xyzservices >=2021.09.1
- yarl >=1.0,<2.0
- zeep *
- zipp >=3.1.0