Science Score: 44.0%
This score indicates how likely this project is to be science-related based on various indicators:
-
✓CITATION.cff file
Found CITATION.cff file -
✓codemeta.json file
Found codemeta.json file -
✓.zenodo.json file
Found .zenodo.json file -
○DOI references
-
○Academic publication links
-
○Academic email domains
-
○Institutional organization owner
-
○JOSS paper metadata
-
○Scientific vocabulary similarity
Low similarity (9.4%) to scientific vocabulary
Repository
Basic Info
- Host: GitHub
- Owner: MerihanAlhafnawi
- Language: Python
- Default Branch: gh-pages
- Size: 256 KB
Statistics
- Stars: 0
- Watchers: 1
- Forks: 0
- Open Issues: 0
- Releases: 0
Metadata Files
README.md
MOSAIX
Thanks for stopping by! You can find anything MOSAIX related on this page.
What is MOSAIX?
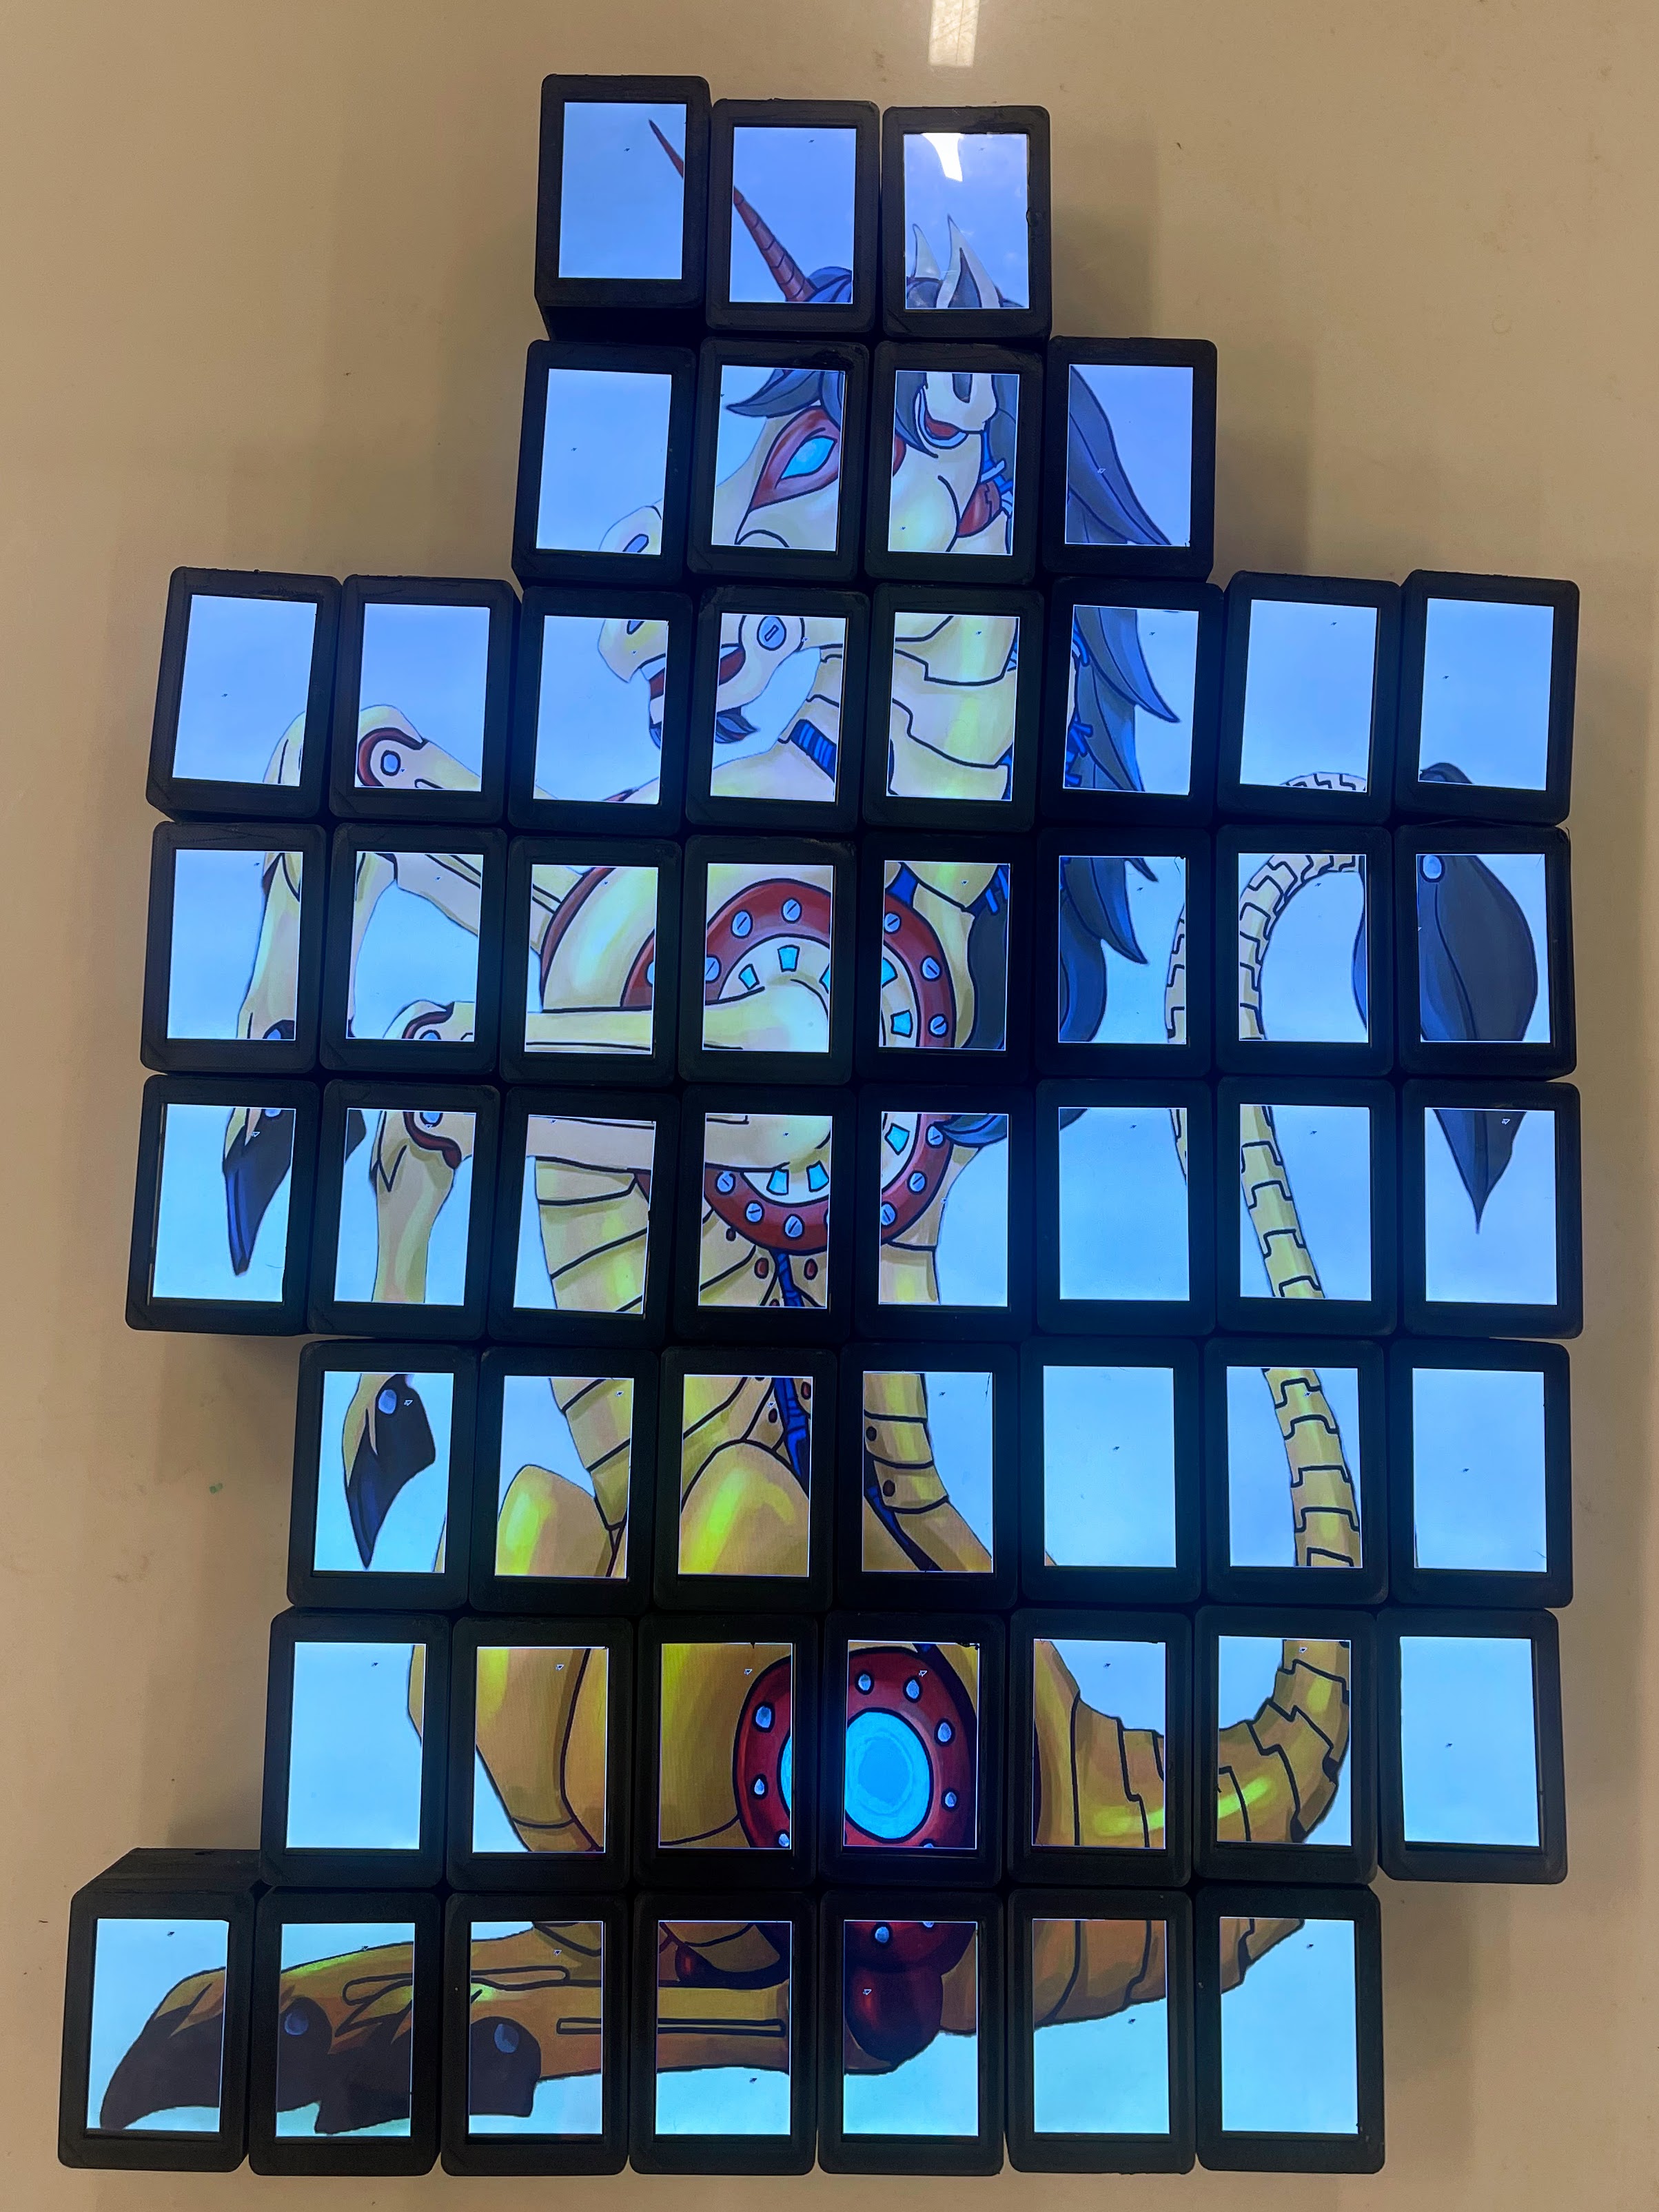
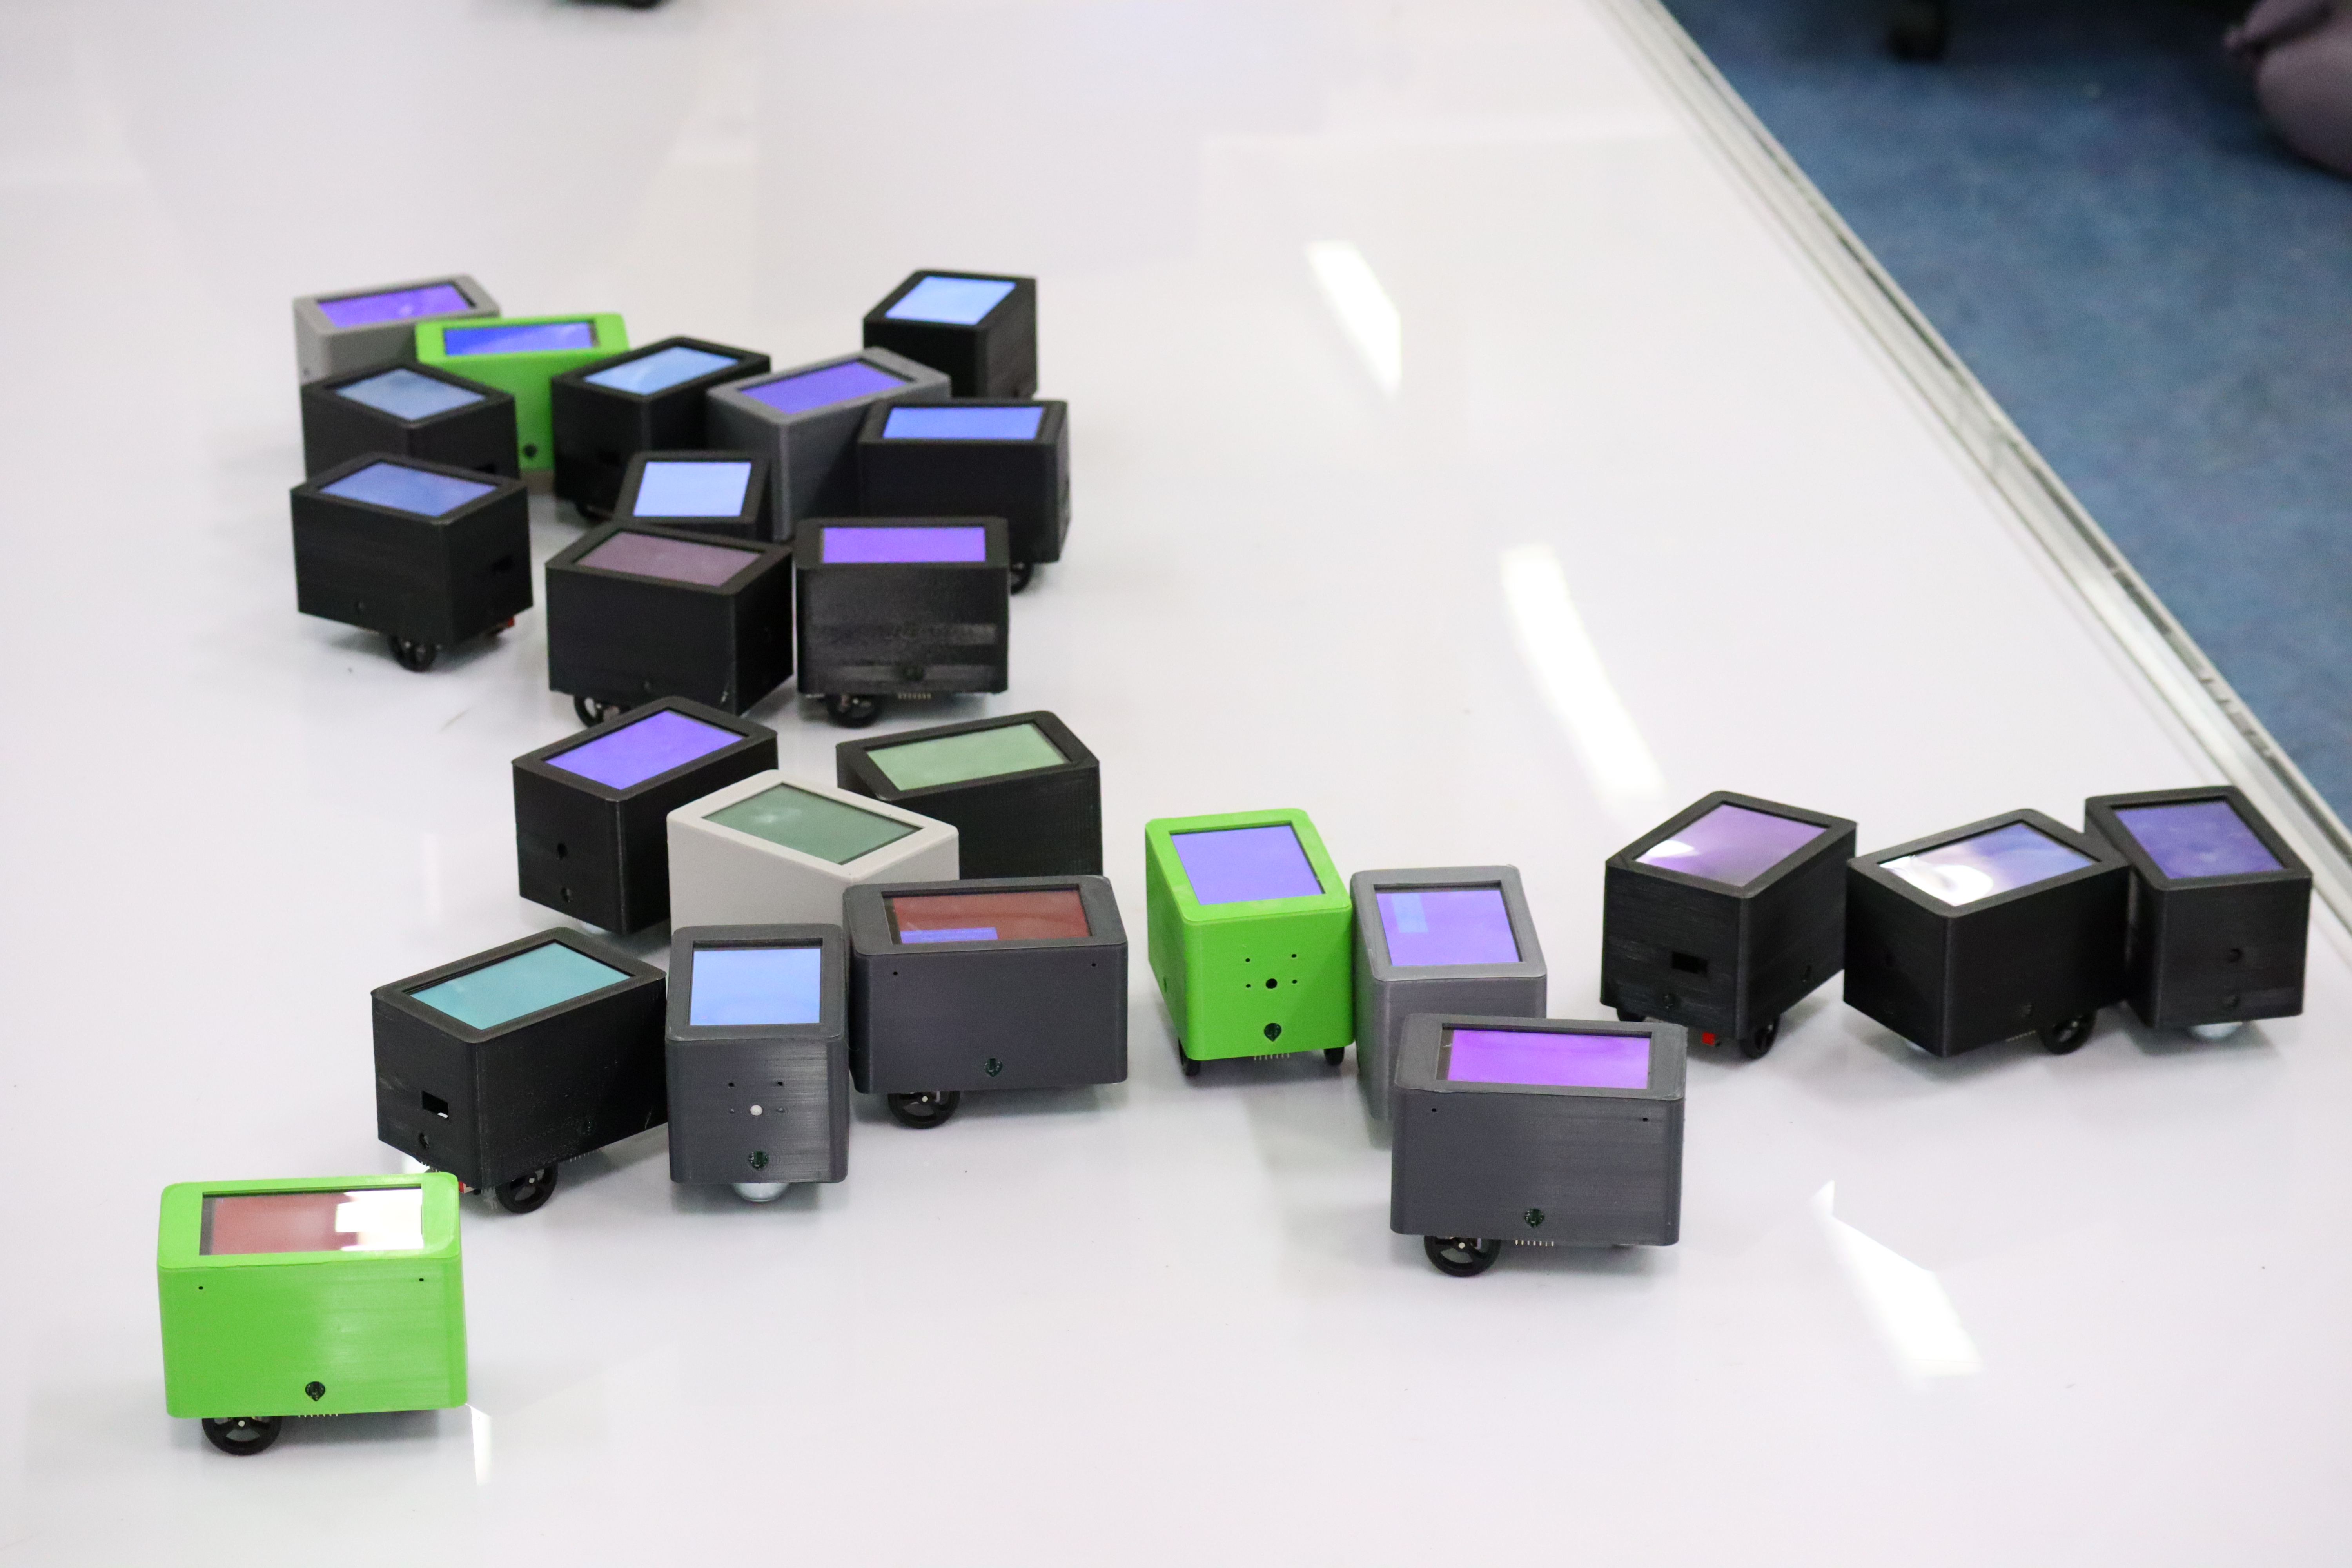
MOSAIX is the first swarm robotic system (completely decentralised) desinged and built to be used by members of the public in large numbers (many robots and many people) to help them in social tasks such as decision-making, brainstorming, art-making and education. MOSAIX is made of individual robots called Tiles. As part of my PhD, I designed and built 100 Tiles.
How do I build a Tile?
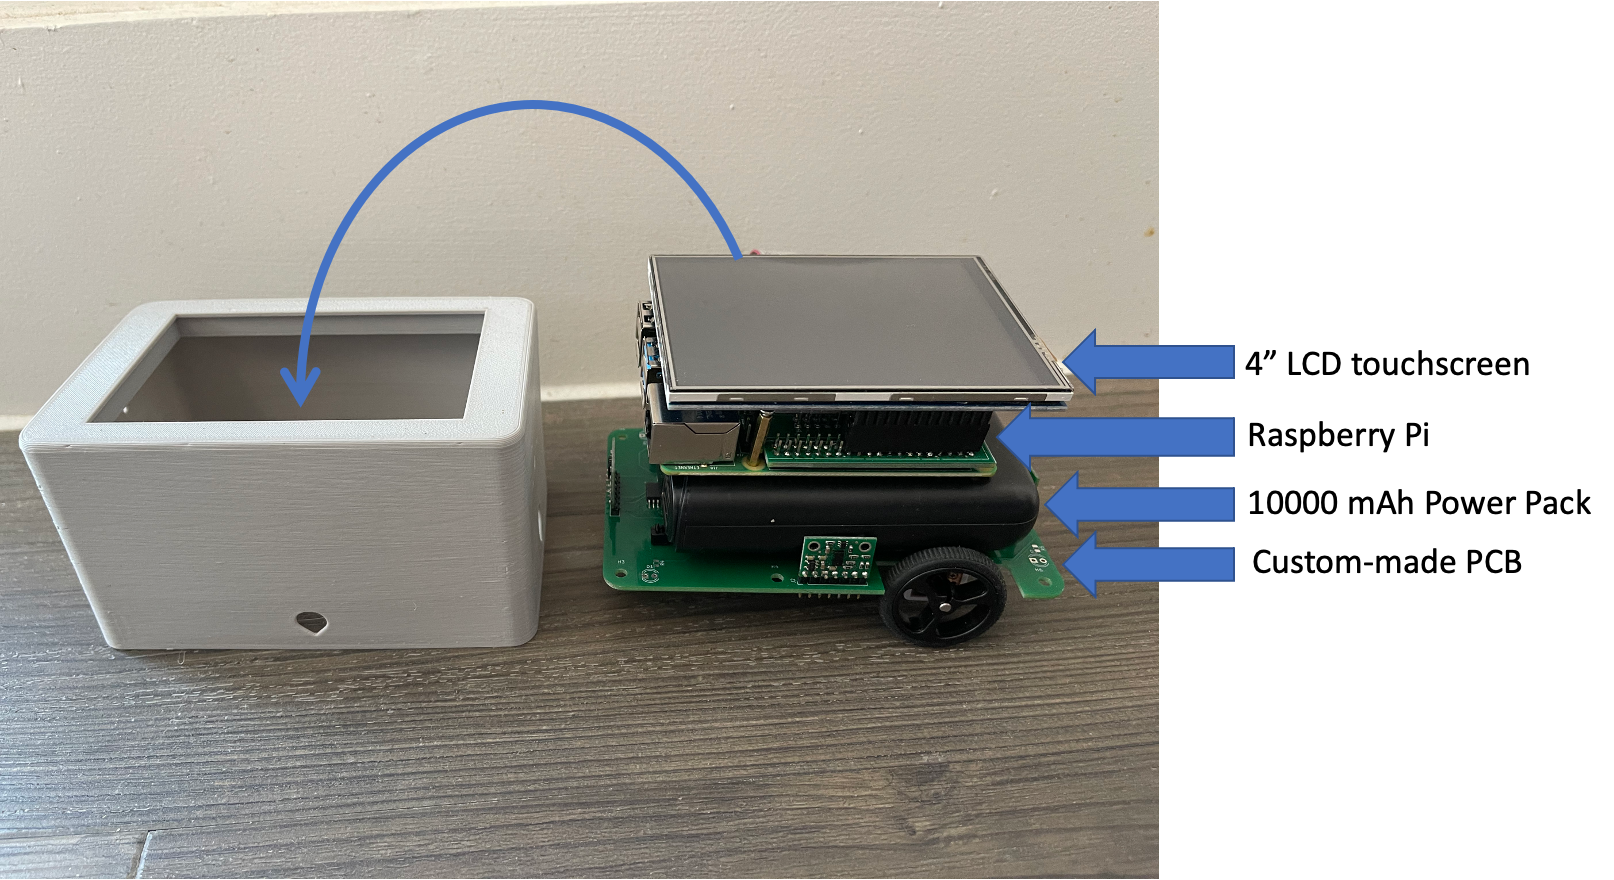
Building a Tile is simple since most components are off the shelf. Tiles run on a Rasberry Pi 4. However, the base of the Tile is a PCB of our design, and there is one more PCB (the adaprter) that is soldered onto the Raspberry Pi's pins. We also designed some 3D printed components to support the robot, found in STL files. The gerber files for both boards can be found in Base_gerberfiles and Adapter_gerberfiles. The Tile is essentially a stack of the following components:
In order to build a Tile, the following steps need to be taken: 1- Send the PCBs to be manufactured 2- Obtain off-the-shelf components and solder them onto the base PCB 3- Solder the Adapter PCB onto the Raspberry Pi pins 4- Secure the stack of components using the 3D prints
Here are all the components needed to build a Tile:
1- Raspberry Pi 4 2GB https://thepihut.com/products/raspberry-pi-4-model-b
2- SD Card 32GB Any microSD Card for the Raspberry Pi
3- 4-inch LCD touchscreen https://thepihut.com/products/spi-4-320x480-ips-touch-screen-gpio
4- 4 VL53L0X Time-of-Flight Distance Sensor Carrier with Voltage Regulator, 200cm Max
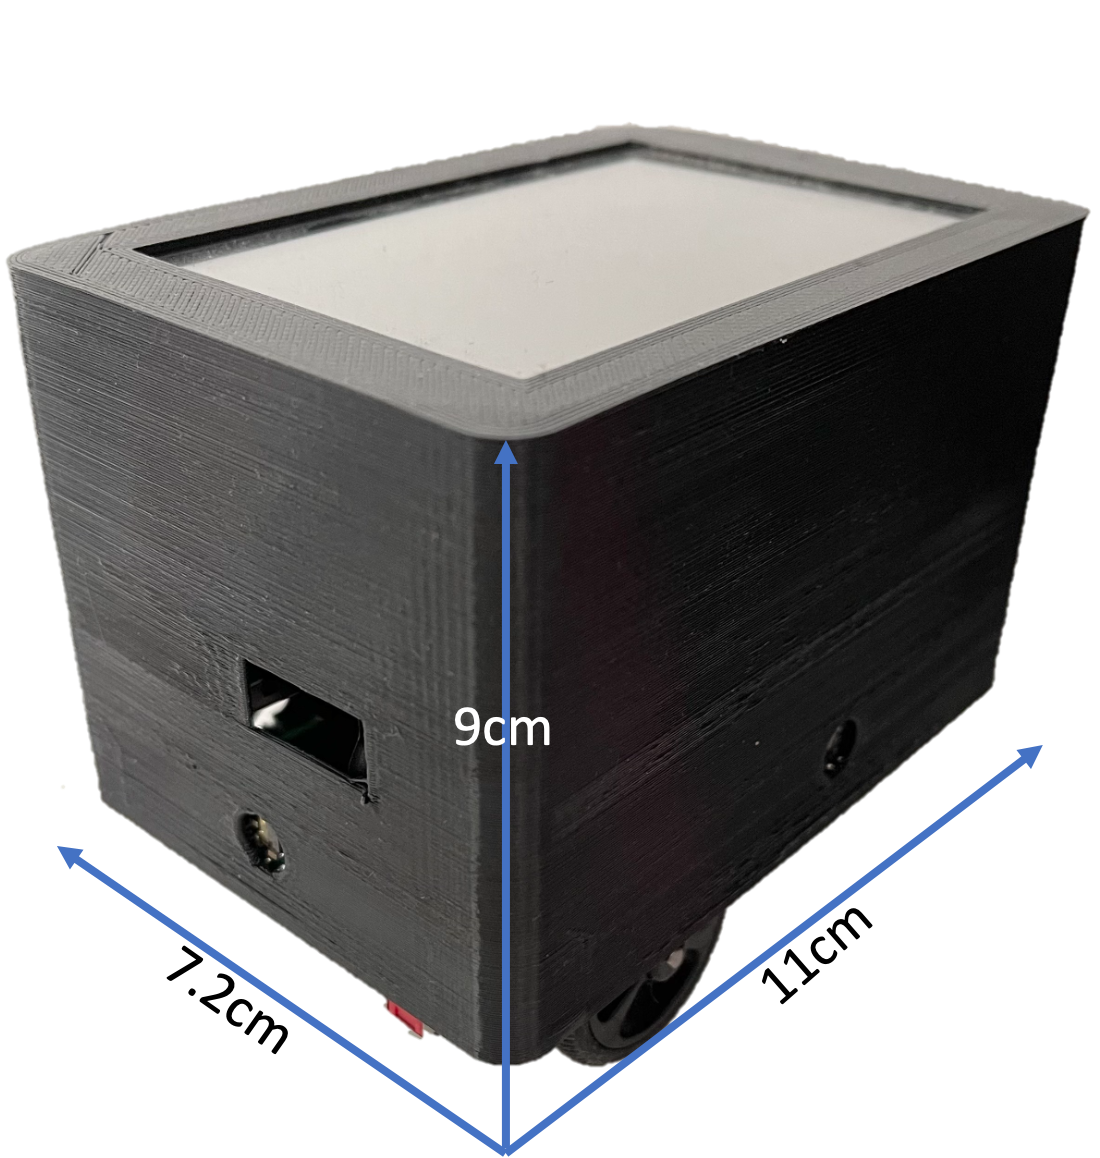
5- 10000 mAh power pack Any model that is 9.5cm x 6cm x 2cm, with USB A input on the top.
6- Raspberry Pi Zero camera module https://shop.pimoroni.com/products/raspberry-pi-zero-camera-module?variant=37751082058
7- Raspberry Pi Zero camera adapter https://shop.pimoroni.com/products/camera-cable-adapter?variant=3031293263882
8- 2 Micro metal gearmotor https://thepihut.com/products/micro-metal-gearmotor?variant=35654648145
9- Motor brackets https://shop.pimoroni.com/products/pololu-micro-metal-gearmotor-bracket-pair-black?variant=471886829
10- TB6612FNG motor driver https://shop.pimoroni.com/products/sparkfun-motor-driver-dual-tb6612fng-1a-1?variant=2509524533258
11- 2 32mmx7mm Pololu Wheels https://shop.pimoroni.com/products/pololu-wheel-32x7mm-pair?variant=390419700
12- Castor ball https://www.amazon.co.uk/dp/B083FSLM8Z?psc=1&ref=ppxpopdtbasin_title
13- 10 Way Flat Ribbon Cable https://uk.rs-online.com/web/p/ribbon-cable/2899846
14- Molex Right Angle, Through Hole, Plug Type A 2.0 USB Connector https://uk.rs-online.com/web/p/usb-connectors/8006797
15- Microchip 16-Channel I/O Expander I2C, Serial 28-Pin SOIC, MCP23017-E/SO https://uk.rs-online.com/web/p/io-expanders/0403816
16- Omron 10-Way Connector Plug for Through Hole Mount, 2-Row https://uk.rs-online.com/web/p/idc-connectors/2026926
17- ASSMANN WSW 10-Way IDC Connector Socket for Cable Mount, 2-Row https://uk.rs-online.com/web/p/idc-connectors/6741097
18- PCB Slide Switch Single Pole Double Throw (SPDT) On-Off-On 5 A @ 28 V dc Top https://uk.rs-online.com/web/p/slide-switches/7347334
19- Molex Straight, SMT, Socket Type B USB Connector https://uk.rs-online.com/web/p/usb-connectors/8967572
20- USB A to USB micro cable Any cable
The following are components soldered onto the Base PCB:
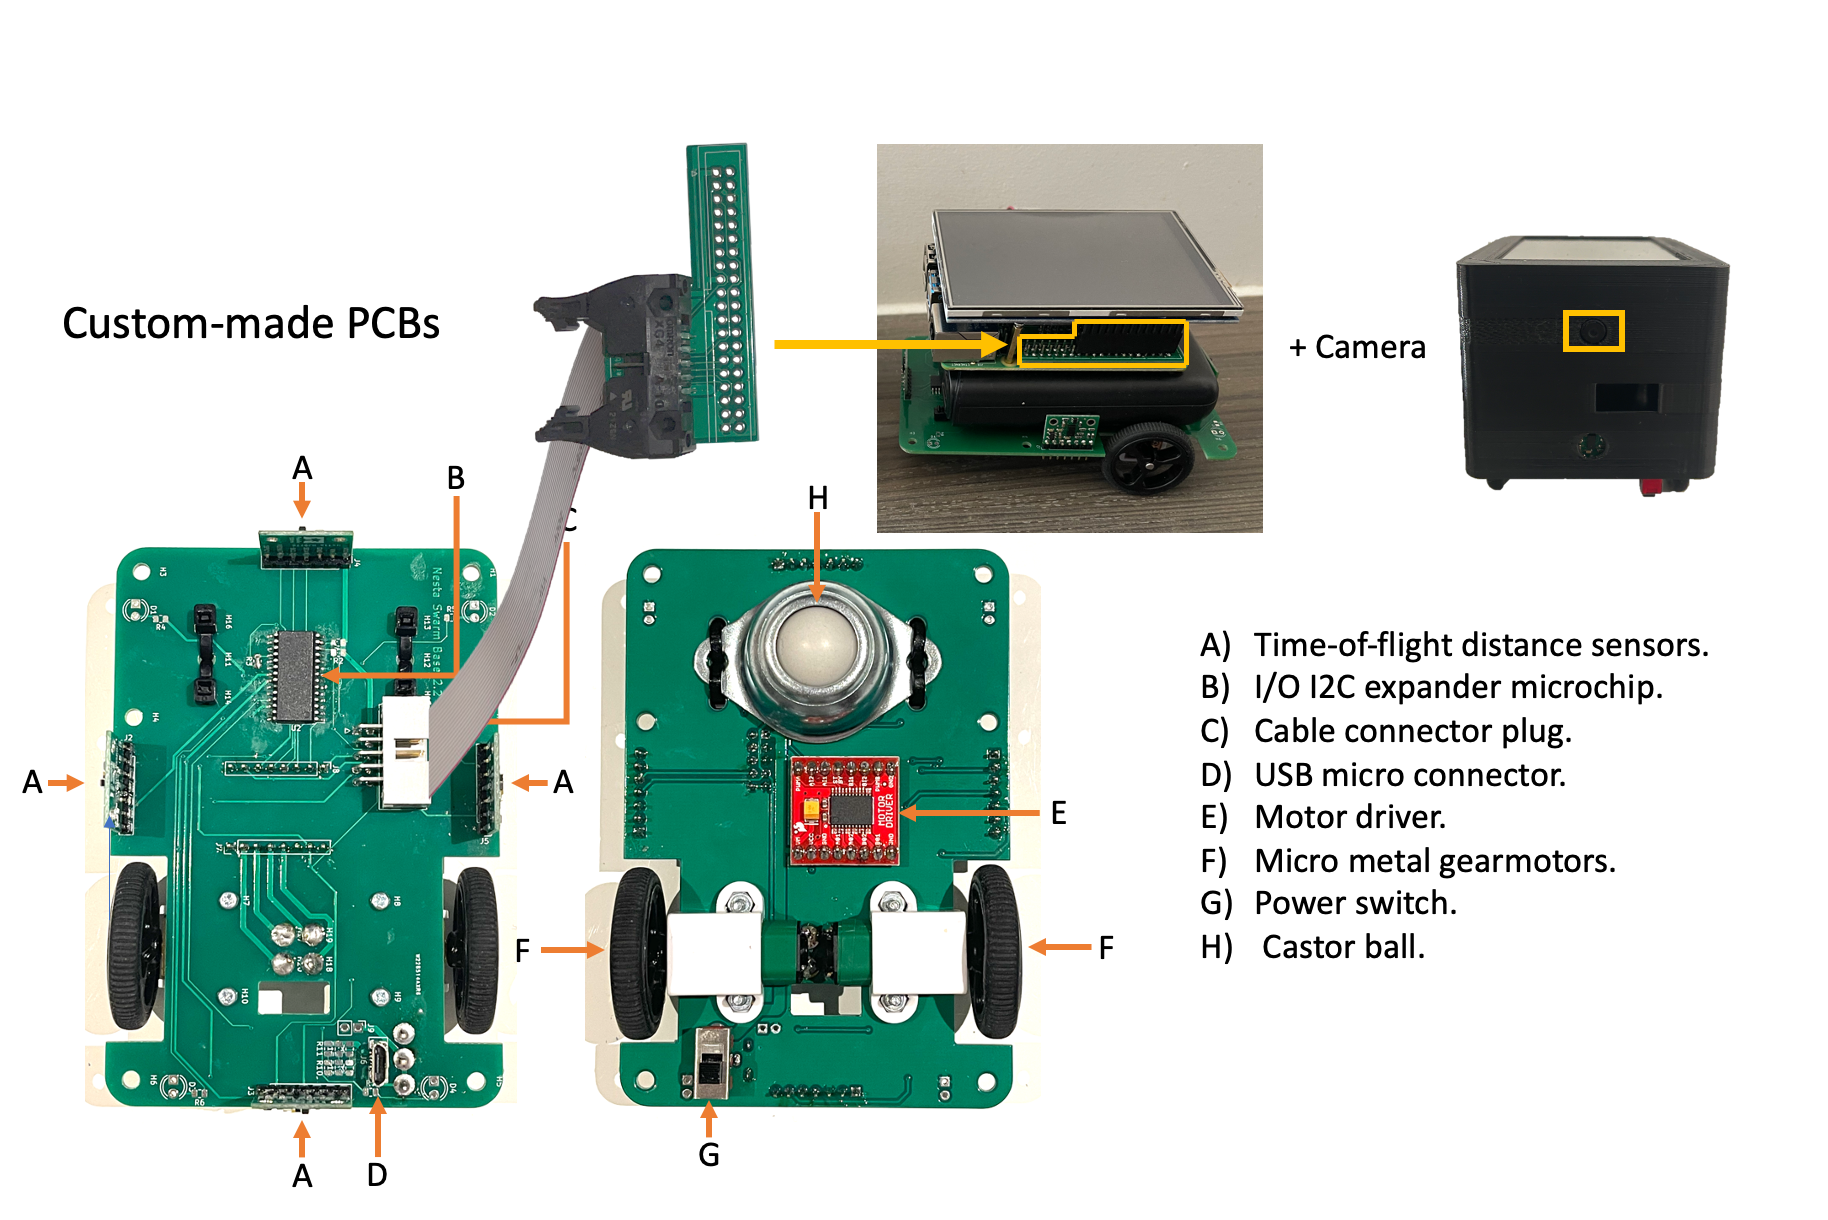
As for the 3D components, here is an image explaining the role of each component:
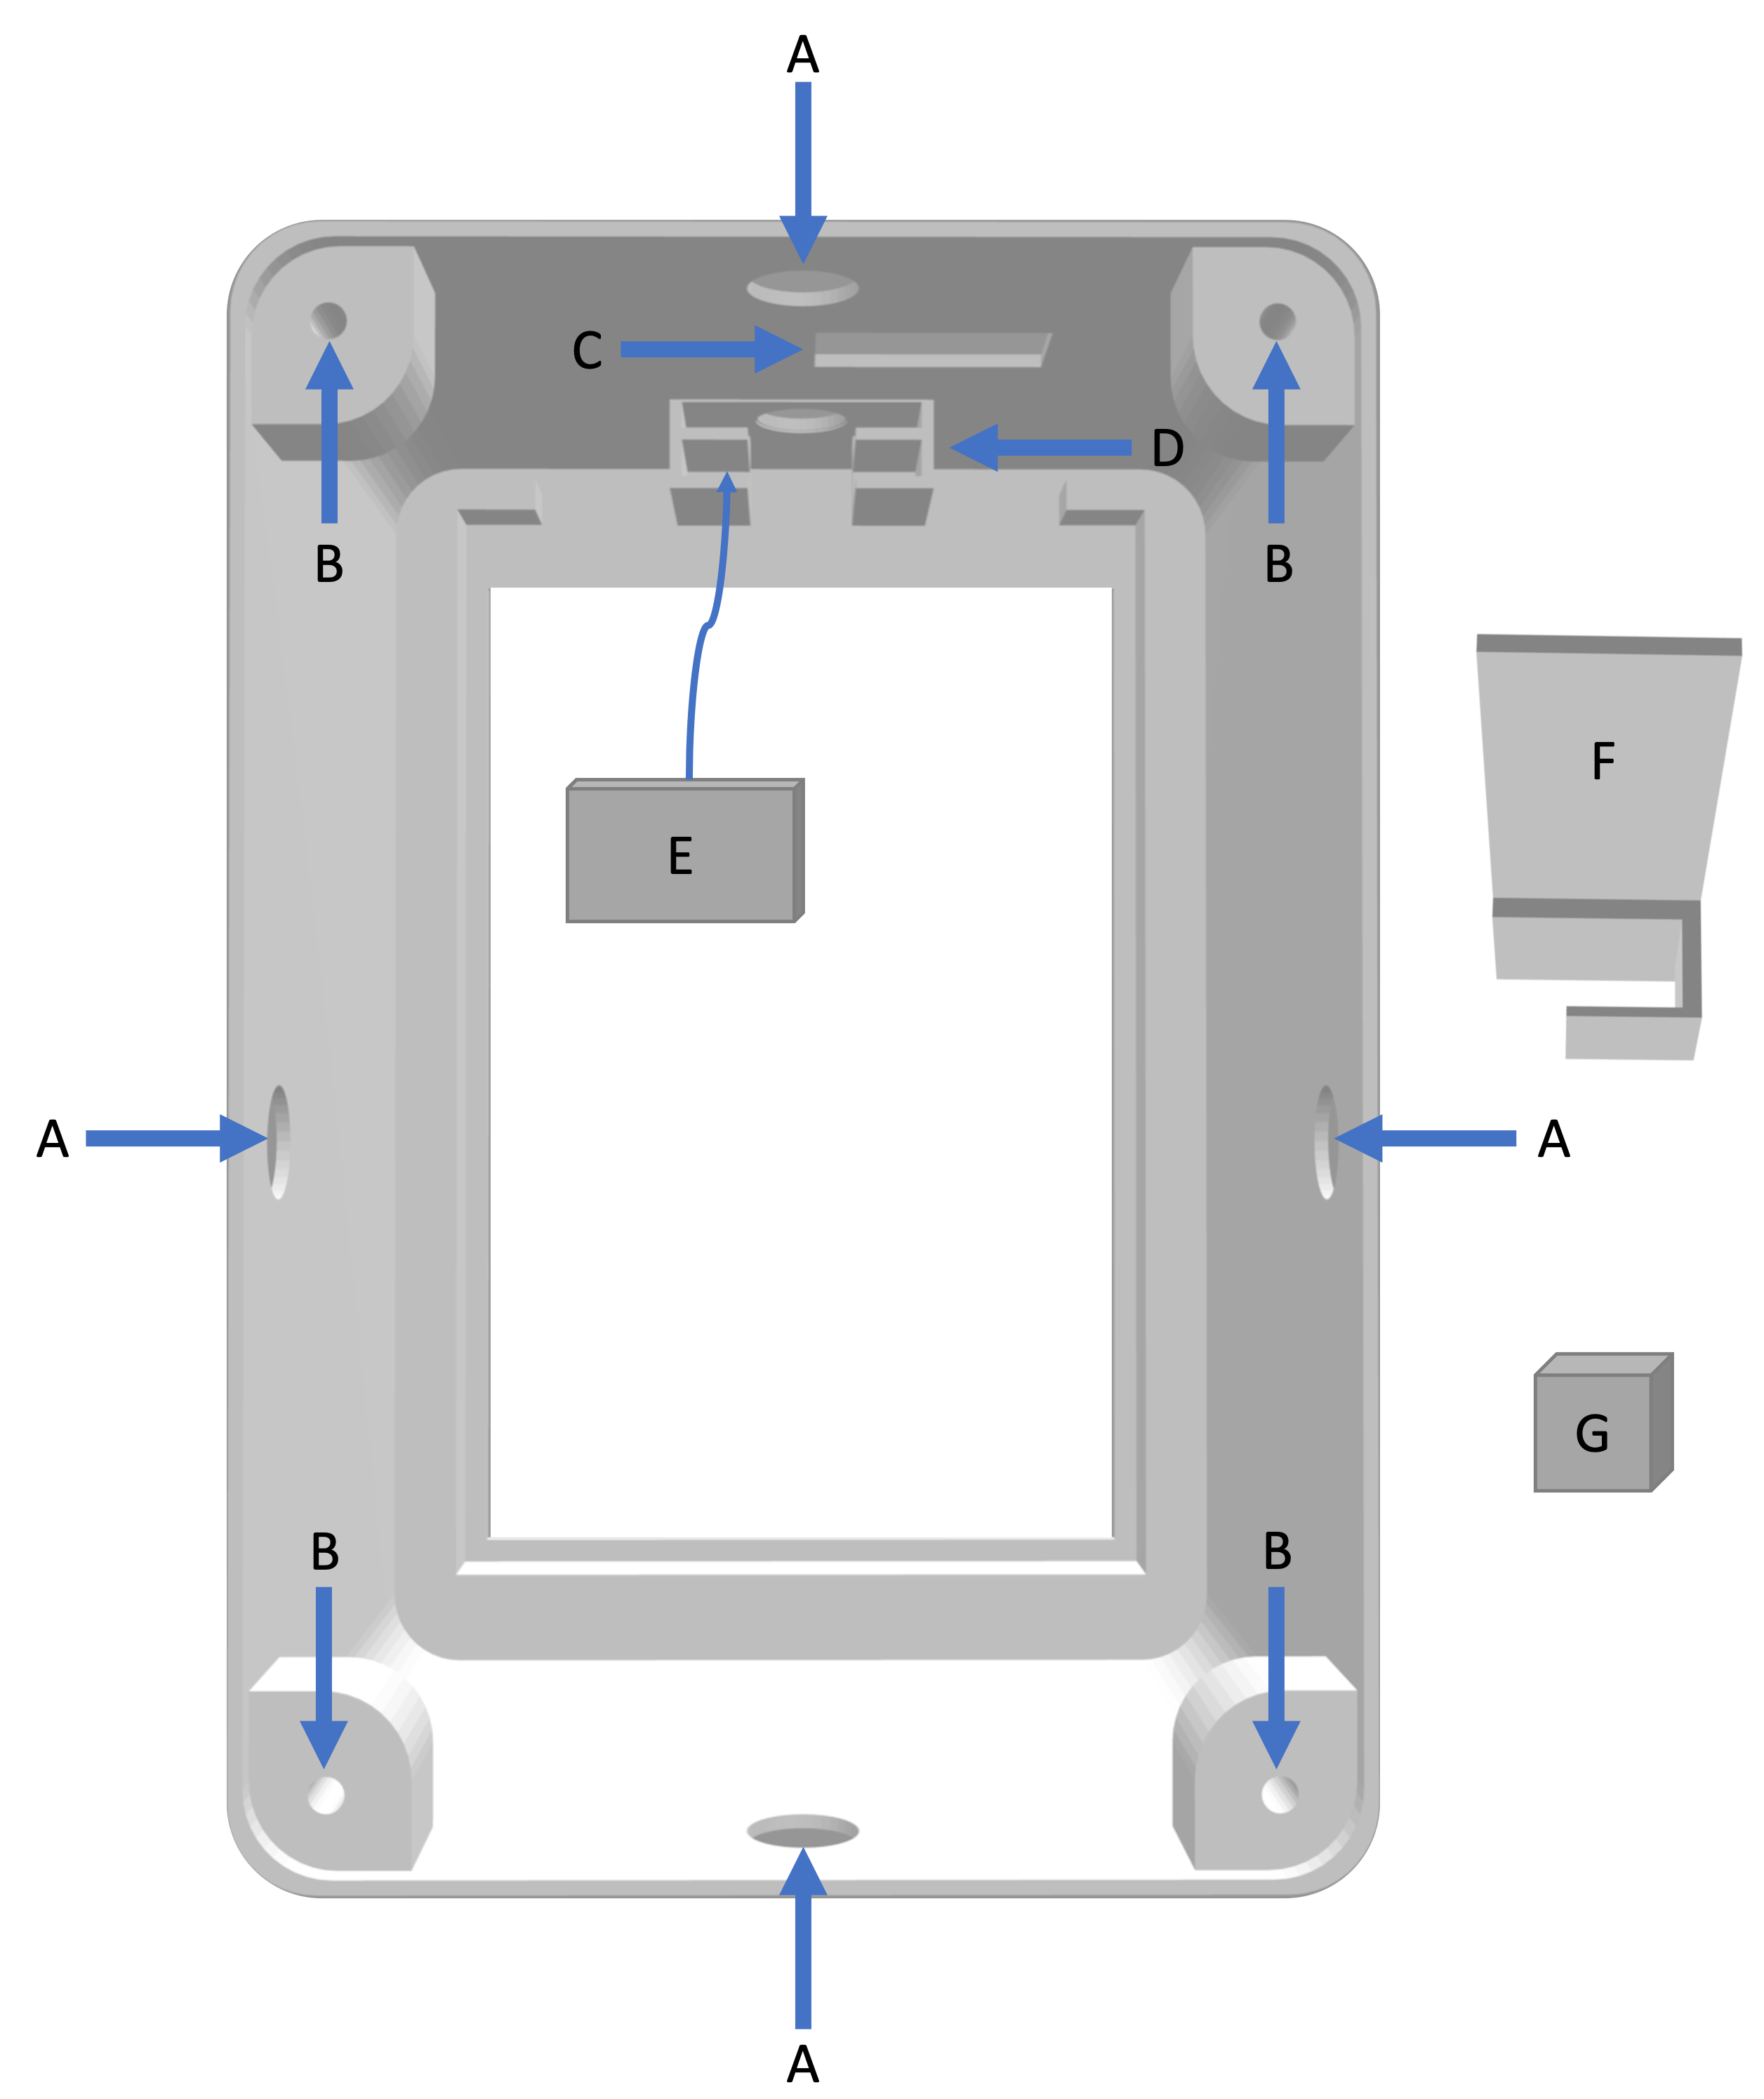
A) 4 Holes on each side of the shell for proximity sensors. B) 4 screw holes at the bottom corners of the shell to screw in the base PCB. C) An opening that exposes the USB-C input socket of the power pack in order to charge the robot without opening the case. D) A "pocket" that has a hole where the camera is placed, and secured in place by the small shelf in shown in E). E) Camera shelf. F) This part is placed between the touchscreen and the Raspberry Pi and hooks onto the Ethernet port to help level the touchscreen. It can been seen in image A) of the next figure . G) This part is glued onto the side of the power pack to help keep it in place since the power pack is narrower than the case. This part can be seen in image C) of the next figure.
We made the cable that connects the power bank to the USB micro connector on the base board by getting a USB A to USB micro cable, cutting it, getting rid of the USB A side, and soldering the VCC and ground wires to the USB connector. The cable can be seen in image C) of the next figure.
After soldering components onto the base PCB, soldering the Adapter PCB onto the pins of the Raspberry Pi, and 3D printing, assembly goes as follows:
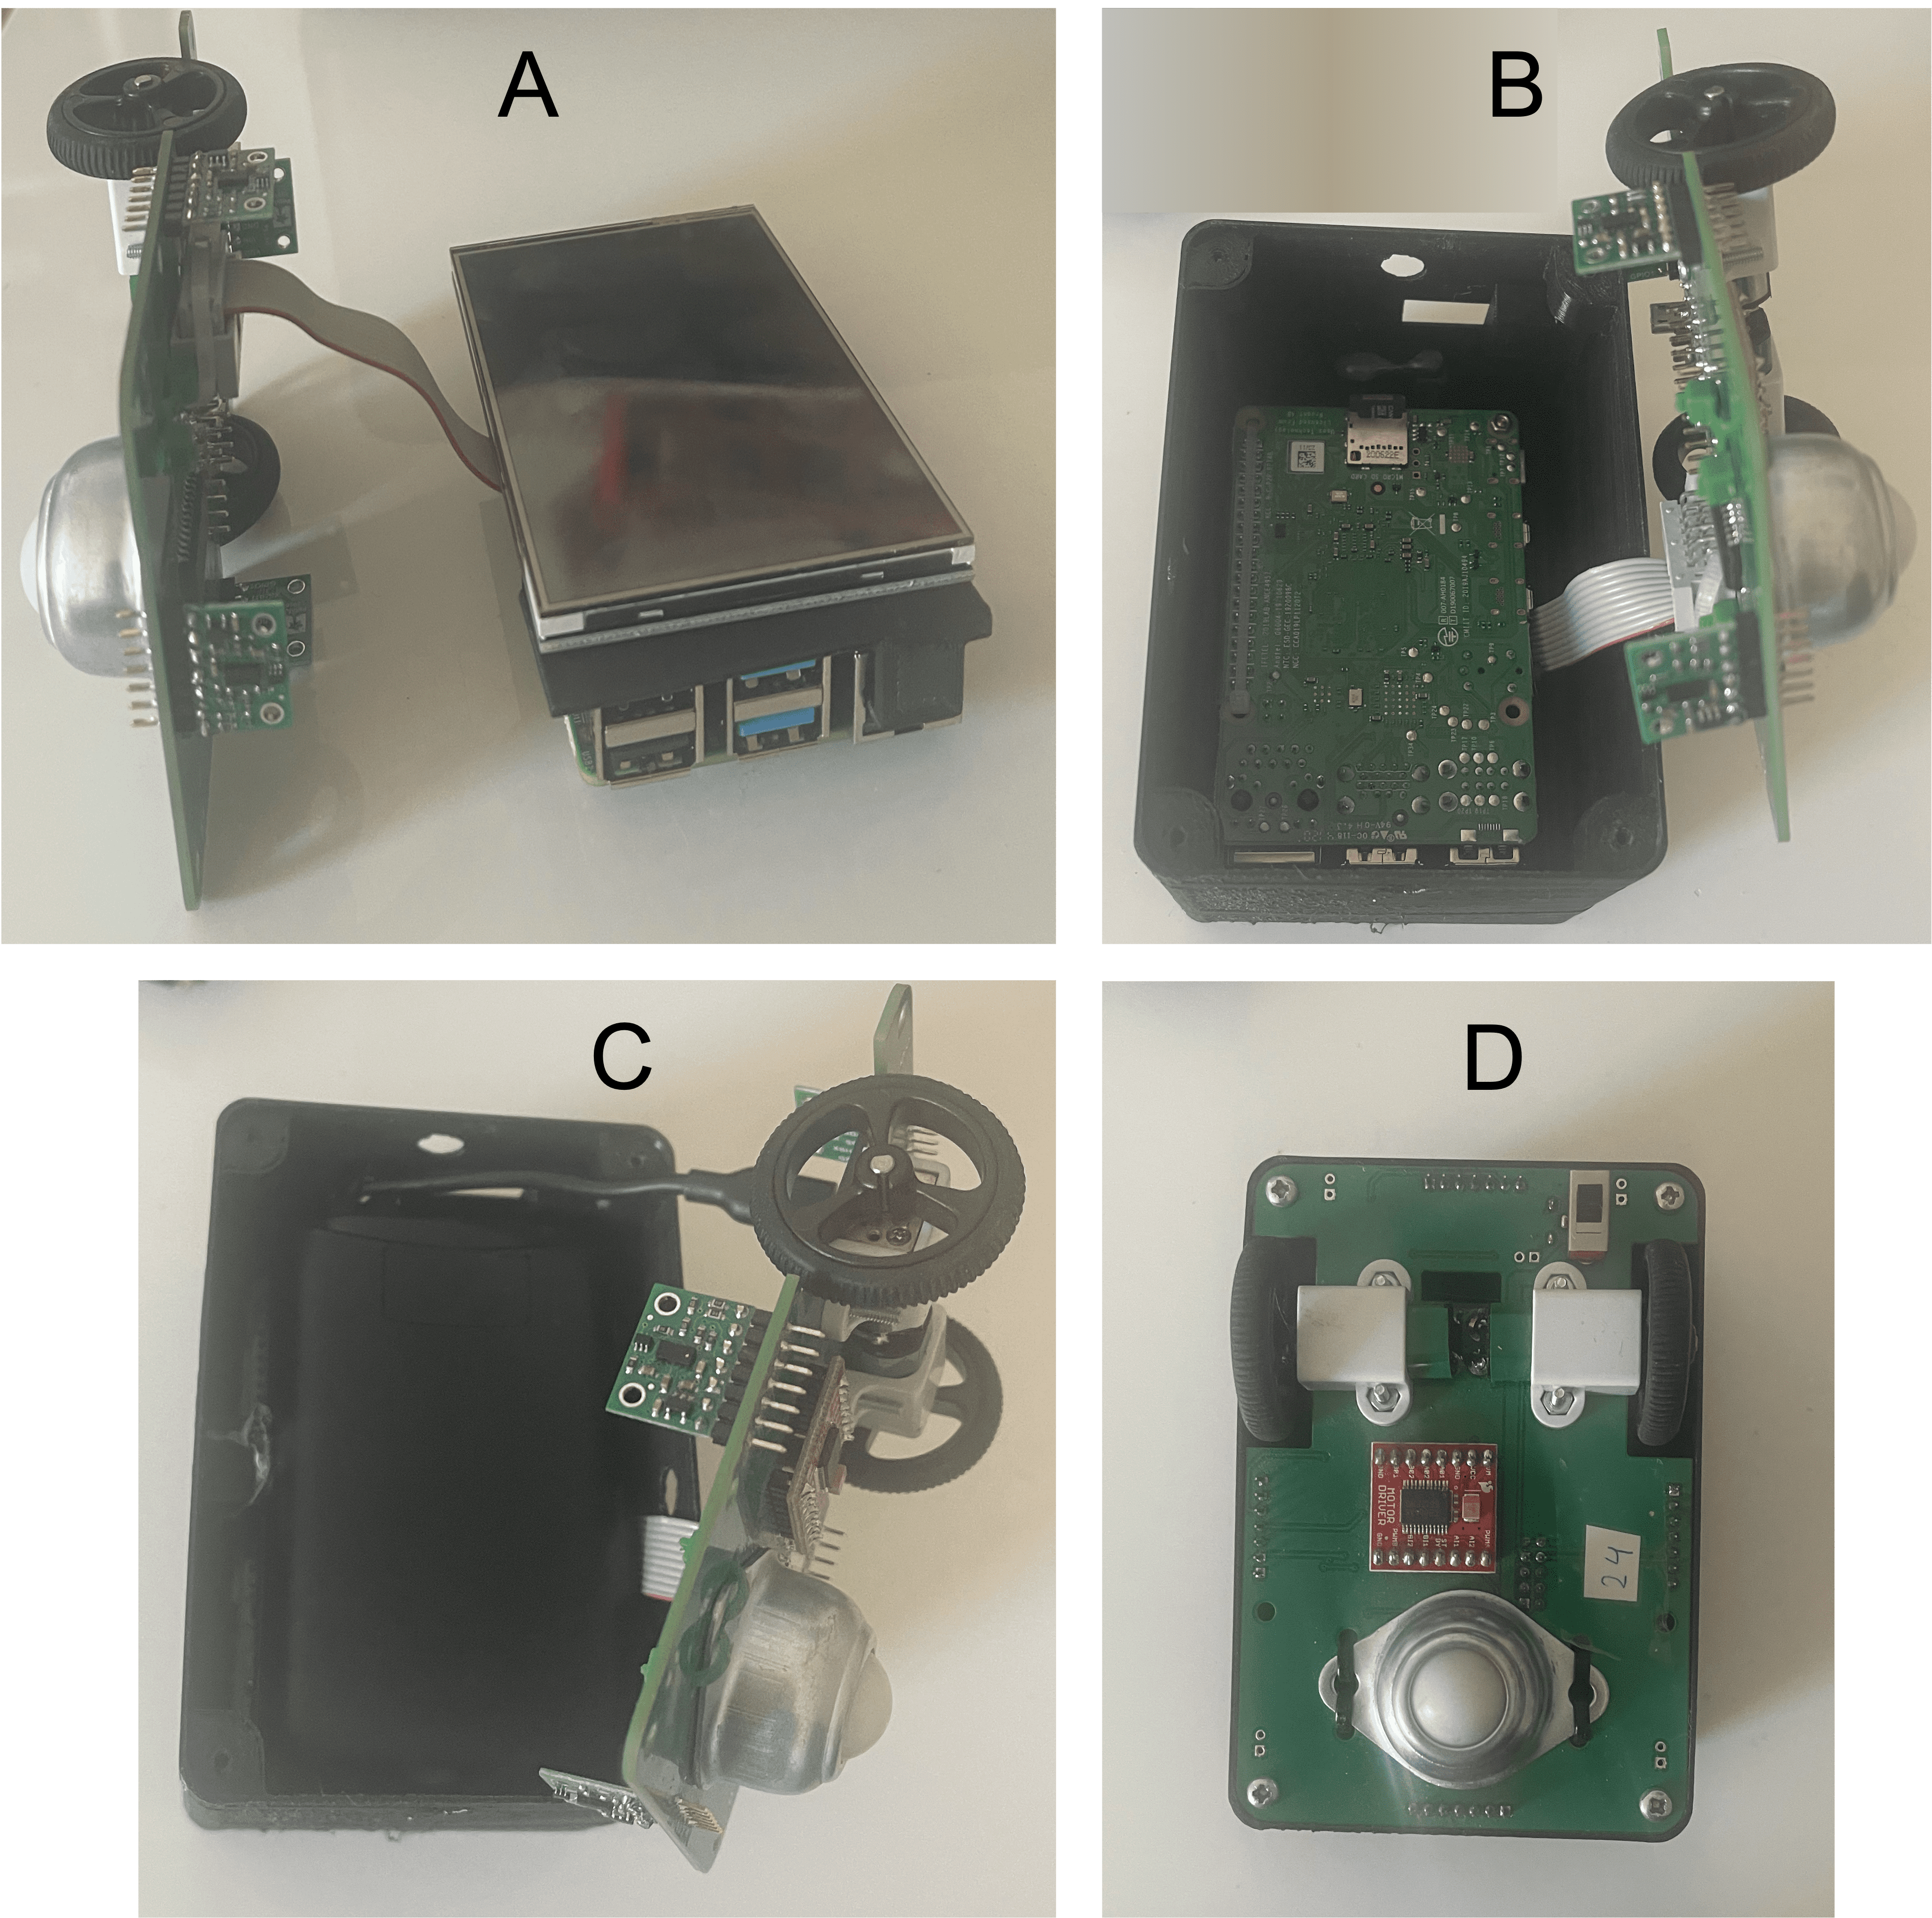
Assembly all done!
How do Tiles communicate?
Since MOSAIX was built to be a decentralised system, I've created a WiFi ad-hoc network to run among the robots so we can avoid any central points of failure (for example, by avoiding using a router). This type of network acts as a plug-and-play feature, where as soon as any of the Raspberry Pis are turned on, the network becomes live (no need to do any extra steps). This means that the swarm can operate and communicate independent of location or internet access. Also, you can connect your laptop/phone to the network to coommunicate with the robots (add a password if you're worried about malicious activity). The network has been quite reliable so far, and I tested it with 65+ robots with no issues. I also have a centralised network for when I want to update the code running on the robots. I can easily switch between those 2 networks (please note I am running the Debian 64-bit Bullseye Operating System).
First, I set up the ad-hoc network by editing the network interfaces which is found in /etc/network/interfaces. The following snippet is an example of the ad-hoc network settings added to get the network up and running on the Raspberry Pi.
iface wlan0 inet static
address 10.2.1.1
netmask 255.255.255.0
wireless-channel 1
wireless-essid mosaix
wireless-mode ad-hoc
In order to switch between ad-hoc and centralised WiFi, I trigger a shell command to replace the "wpa_supplicant.conf" file wither to the ad-hoc or to the central WiFi configurations. Both files can be found in code. More on how this is done is under "How do I program Tiles?".
Bluetooth is another option, however, I found it to be unreliable so I do not use it often.
How do I program Tiles?
They run on Rasberry Pis so sky is the limit!! However, to make my life easier, I have a system I developed in order to update code on the entire swarm of Tiles, turn them off all at once, etc. Here is what I do (DISCLAIMER: I am not claiming this is the best/most efficient way, it's just a system that I created and worked for my applications, feel free to adopt and/or develop your own!):
Coming soon
Owner
- Name: malhafnawi
- Login: MerihanAlhafnawi
- Kind: user
- Repositories: 1
- Profile: https://github.com/MerihanAlhafnawi
Citation (CITATION.cff)
cff-version: 1.2.0
message: "If you use this repo to recreate MOSAIX, please cite it as below."
authors:
  - family-names: Alhafnawi
    given-names: Merihan
title: "MOSAIX: a swarm of robot Tiles"
identifiers:
  - type: doi
    value: 10.1109/ICRA46639.2022.9811723
date-released: 2023-01-25