https://github.com/kimjisoo443/yolact
A simple, fully convolutional model for real-time instance segmentation.
Science Score: 10.0%
This score indicates how likely this project is to be science-related based on various indicators:
-
○CITATION.cff file
-
○codemeta.json file
-
○.zenodo.json file
-
○DOI references
-
✓Academic publication links
Links to: arxiv.org -
○Academic email domains
-
○Institutional organization owner
-
○JOSS paper metadata
-
○Scientific vocabulary similarity
Low similarity (12.7%) to scientific vocabulary
Last synced: 9 months ago
·
JSON representation
Repository
A simple, fully convolutional model for real-time instance segmentation.
Basic Info
Statistics
- Stars: 0
- Watchers: 0
- Forks: 0
- Open Issues: 0
- Releases: 0
Fork of dbolya/yolact
Created over 3 years ago
· Last pushed over 3 years ago
https://github.com/kimjisoo443/yolact/blob/master/
# **Y**ou **O**nly **L**ook **A**t **C**oefficien**T**s
```
```
A simple, fully convolutional model for real-time instance segmentation. This is the code for our papers:
- [YOLACT: Real-time Instance Segmentation](https://arxiv.org/abs/1904.02689)
- [YOLACT++: Better Real-time Instance Segmentation](https://arxiv.org/abs/1912.06218)
#### YOLACT++ (v1.2) released! ([Changelog](CHANGELOG.md))
YOLACT++'s resnet50 model runs at 33.5 fps on a Titan Xp and achieves 34.1 mAP on COCO's `test-dev` (check out our journal paper [here](https://arxiv.org/abs/1912.06218)).
In order to use YOLACT++, make sure you compile the DCNv2 code. (See [Installation](https://github.com/dbolya/yolact#installation))
#### For a real-time demo, check out our ICCV video:
[](https://www.youtube.com/watch?v=0pMfmo8qfpQ)
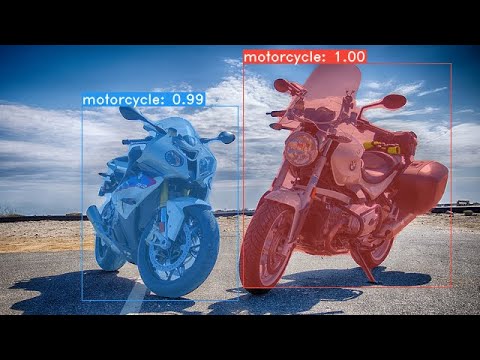
Some examples from our YOLACT base model (33.5 fps on a Titan Xp and 29.8 mAP on COCO's `test-dev`):


# Installation
- Clone this repository and enter it:
```Shell
git clone https://github.com/dbolya/yolact.git
cd yolact
```
- Set up the environment using one of the following methods:
- Using [Anaconda](https://www.anaconda.com/distribution/)
- Run `conda env create -f environment.yml`
- Manually with pip
- Set up a Python3 environment (e.g., using virtenv).
- Install [Pytorch](http://pytorch.org/) 1.0.1 (or higher) and TorchVision.
- Install some other packages:
```Shell
# Cython needs to be installed before pycocotools
pip install cython
pip install opencv-python pillow pycocotools matplotlib
```
- If you'd like to train YOLACT, download the COCO dataset and the 2014/2017 annotations. Note that this script will take a while and dump 21gb of files into `./data/coco`.
```Shell
sh data/scripts/COCO.sh
```
- If you'd like to evaluate YOLACT on `test-dev`, download `test-dev` with this script.
```Shell
sh data/scripts/COCO_test.sh
```
- If you want to use YOLACT++, compile deformable convolutional layers (from [DCNv2](https://github.com/CharlesShang/DCNv2/tree/pytorch_1.0)).
Make sure you have the latest CUDA toolkit installed from [NVidia's Website](https://developer.nvidia.com/cuda-toolkit).
```Shell
cd external/DCNv2
python setup.py build develop
```
# Evaluation
Here are our YOLACT models (released on April 5th, 2019) along with their FPS on a Titan Xp and mAP on `test-dev`:
| Image Size | Backbone | FPS | mAP | Weights | |
|:----------:|:-------------:|:----:|:----:|----------------------------------------------------------------------------------------------------------------------|--------|
| 550 | Resnet50-FPN | 42.5 | 28.2 | [yolact_resnet50_54_800000.pth](https://drive.google.com/file/d/1yp7ZbbDwvMiFJEq4ptVKTYTI2VeRDXl0/view?usp=sharing) | [Mirror](https://ucdavis365-my.sharepoint.com/:u:/g/personal/yongjaelee_ucdavis_edu/EUVpxoSXaqNIlssoLKOEoCcB1m0RpzGq_Khp5n1VX3zcUw) |
| 550 | Darknet53-FPN | 40.0 | 28.7 | [yolact_darknet53_54_800000.pth](https://drive.google.com/file/d/1dukLrTzZQEuhzitGkHaGjphlmRJOjVnP/view?usp=sharing) | [Mirror](https://ucdavis365-my.sharepoint.com/:u:/g/personal/yongjaelee_ucdavis_edu/ERrao26c8llJn25dIyZPhwMBxUp2GdZTKIMUQA3t0djHLw)
| 550 | Resnet101-FPN | 33.5 | 29.8 | [yolact_base_54_800000.pth](https://drive.google.com/file/d/1UYy3dMapbH1BnmtZU4WH1zbYgOzzHHf_/view?usp=sharing) | [Mirror](https://ucdavis365-my.sharepoint.com/:u:/g/personal/yongjaelee_ucdavis_edu/EYRWxBEoKU9DiblrWx2M89MBGFkVVB_drlRd_v5sdT3Hgg)
| 700 | Resnet101-FPN | 23.6 | 31.2 | [yolact_im700_54_800000.pth](https://drive.google.com/file/d/1lE4Lz5p25teiXV-6HdTiOJSnS7u7GBzg/view?usp=sharing) | [Mirror](https://ucdavis365-my.sharepoint.com/:u:/g/personal/yongjaelee_ucdavis_edu/Eagg5RSc5hFEhp7sPtvLNyoBjhlf2feog7t8OQzHKKphjw)
YOLACT++ models (released on December 16th, 2019):
| Image Size | Backbone | FPS | mAP | Weights | |
|:----------:|:-------------:|:----:|:----:|----------------------------------------------------------------------------------------------------------------------|--------|
| 550 | Resnet50-FPN | 33.5 | 34.1 | [yolact_plus_resnet50_54_800000.pth](https://drive.google.com/file/d/1ZPu1YR2UzGHQD0o1rEqy-j5bmEm3lbyP/view?usp=sharing) | [Mirror](https://ucdavis365-my.sharepoint.com/:u:/g/personal/yongjaelee_ucdavis_edu/EcJAtMiEFlhAnVsDf00yWRIBUC4m8iE9NEEiV05XwtEoGw) |
| 550 | Resnet101-FPN | 27.3 | 34.6 | [yolact_plus_base_54_800000.pth](https://drive.google.com/file/d/15id0Qq5eqRbkD-N3ZjDZXdCvRyIaHpFB/view?usp=sharing) | [Mirror](https://ucdavis365-my.sharepoint.com/:u:/g/personal/yongjaelee_ucdavis_edu/EVQ62sF0SrJPrl_68onyHF8BpG7c05A8PavV4a849sZgEA)
To evalute the model, put the corresponding weights file in the `./weights` directory and run one of the following commands. The name of each config is everything before the numbers in the file name (e.g., `yolact_base` for `yolact_base_54_800000.pth`).
## Quantitative Results on COCO
```Shell
# Quantitatively evaluate a trained model on the entire validation set. Make sure you have COCO downloaded as above.
# This should get 29.92 validation mask mAP last time I checked.
python eval.py --trained_model=weights/yolact_base_54_800000.pth
# Output a COCOEval json to submit to the website or to use the run_coco_eval.py script.
# This command will create './results/bbox_detections.json' and './results/mask_detections.json' for detection and instance segmentation respectively.
python eval.py --trained_model=weights/yolact_base_54_800000.pth --output_coco_json
# You can run COCOEval on the files created in the previous command. The performance should match my implementation in eval.py.
python run_coco_eval.py
# To output a coco json file for test-dev, make sure you have test-dev downloaded from above and go
python eval.py --trained_model=weights/yolact_base_54_800000.pth --output_coco_json --dataset=coco2017_testdev_dataset
```
## Qualitative Results on COCO
```Shell
# Display qualitative results on COCO. From here on I'll use a confidence threshold of 0.15.
python eval.py --trained_model=weights/yolact_base_54_800000.pth --score_threshold=0.15 --top_k=15 --display
```
## Benchmarking on COCO
```Shell
# Run just the raw model on the first 1k images of the validation set
python eval.py --trained_model=weights/yolact_base_54_800000.pth --benchmark --max_images=1000
```
## Images
```Shell
# Display qualitative results on the specified image.
python eval.py --trained_model=weights/yolact_base_54_800000.pth --score_threshold=0.15 --top_k=15 --image=my_image.png
# Process an image and save it to another file.
python eval.py --trained_model=weights/yolact_base_54_800000.pth --score_threshold=0.15 --top_k=15 --image=input_image.png:output_image.png
# Process a whole folder of images.
python eval.py --trained_model=weights/yolact_base_54_800000.pth --score_threshold=0.15 --top_k=15 --images=path/to/input/folder:path/to/output/folder
```
## Video
```Shell
# Display a video in real-time. "--video_multiframe" will process that many frames at once for improved performance.
# If you want, use "--display_fps" to draw the FPS directly on the frame.
python eval.py --trained_model=weights/yolact_base_54_800000.pth --score_threshold=0.15 --top_k=15 --video_multiframe=4 --video=my_video.mp4
# Display a webcam feed in real-time. If you have multiple webcams pass the index of the webcam you want instead of 0.
python eval.py --trained_model=weights/yolact_base_54_800000.pth --score_threshold=0.15 --top_k=15 --video_multiframe=4 --video=0
# Process a video and save it to another file. This uses the same pipeline as the ones above now, so it's fast!
python eval.py --trained_model=weights/yolact_base_54_800000.pth --score_threshold=0.15 --top_k=15 --video_multiframe=4 --video=input_video.mp4:output_video.mp4
```
As you can tell, `eval.py` can do a ton of stuff. Run the `--help` command to see everything it can do.
```Shell
python eval.py --help
```
# Training
By default, we train on COCO. Make sure to download the entire dataset using the commands above.
- To train, grab an imagenet-pretrained model and put it in `./weights`.
- For Resnet101, download `resnet101_reducedfc.pth` from [here](https://drive.google.com/file/d/1tvqFPd4bJtakOlmn-uIA492g2qurRChj/view?usp=sharing).
- For Resnet50, download `resnet50-19c8e357.pth` from [here](https://drive.google.com/file/d/1Jy3yCdbatgXa5YYIdTCRrSV0S9V5g1rn/view?usp=sharing).
- For Darknet53, download `darknet53.pth` from [here](https://drive.google.com/file/d/17Y431j4sagFpSReuPNoFcj9h7azDTZFf/view?usp=sharing).
- Run one of the training commands below.
- Note that you can press ctrl+c while training and it will save an `*_interrupt.pth` file at the current iteration.
- All weights are saved in the `./weights` directory by default with the file name `__.pth`.
```Shell
# Trains using the base config with a batch size of 8 (the default).
python train.py --config=yolact_base_config
# Trains yolact_base_config with a batch_size of 5. For the 550px models, 1 batch takes up around 1.5 gigs of VRAM, so specify accordingly.
python train.py --config=yolact_base_config --batch_size=5
# Resume training yolact_base with a specific weight file and start from the iteration specified in the weight file's name.
python train.py --config=yolact_base_config --resume=weights/yolact_base_10_32100.pth --start_iter=-1
# Use the help option to see a description of all available command line arguments
python train.py --help
```
## Multi-GPU Support
YOLACT now supports multiple GPUs seamlessly during training:
- Before running any of the scripts, run: `export CUDA_VISIBLE_DEVICES=[gpus]`
- Where you should replace [gpus] with a comma separated list of the index of each GPU you want to use (e.g., 0,1,2,3).
- You should still do this if only using 1 GPU.
- You can check the indices of your GPUs with `nvidia-smi`.
- Then, simply set the batch size to `8*num_gpus` with the training commands above. The training script will automatically scale the hyperparameters to the right values.
- If you have memory to spare you can increase the batch size further, but keep it a multiple of the number of GPUs you're using.
- If you want to allocate the images per GPU specific for different GPUs, you can use `--batch_alloc=[alloc]` where [alloc] is a comma seprated list containing the number of images on each GPU. This must sum to `batch_size`.
## Logging
YOLACT now logs training and validation information by default. You can disable this with `--no_log`. A guide on how to visualize these logs is coming soon, but now you can look at `LogVizualizer` in `utils/logger.py` for help.
## Pascal SBD
We also include a config for training on Pascal SBD annotations (for rapid experimentation or comparing with other methods). To train on Pascal SBD, proceed with the following steps:
1. Download the dataset from [here](http://home.bharathh.info/pubs/codes/SBD/download.html). It's the first link in the top "Overview" section (and the file is called `benchmark.tgz`).
2. Extract the dataset somewhere. In the dataset there should be a folder called `dataset/img`. Create the directory `./data/sbd` (where `.` is YOLACT's root) and copy `dataset/img` to `./data/sbd/img`.
4. Download the COCO-style annotations from [here](https://drive.google.com/open?id=1ExrRSPVctHW8Nxrn0SofU1lVhK5Wn0_S).
5. Extract the annotations into `./data/sbd/`.
6. Now you can train using `--config=yolact_resnet50_pascal_config`. Check that config to see how to extend it to other models.
I will automate this all with a script soon, don't worry. Also, if you want the script I used to convert the annotations, I put it in `./scripts/convert_sbd.py`, but you'll have to check how it works to be able to use it because I don't actually remember at this point.
If you want to verify our results, you can download our `yolact_resnet50_pascal_config` weights from [here](https://drive.google.com/open?id=1yLVwtkRtNxyl0kxeMCtPXJsXFFyc_FHe). This model should get 72.3 mask AP_50 and 56.2 mask AP_70. Note that the "all" AP isn't the same as the "vol" AP reported in others papers for pascal (they use an averages of the thresholds from `0.1 - 0.9` in increments of `0.1` instead of what COCO uses).
## Custom Datasets
You can also train on your own dataset by following these steps:
- Create a COCO-style Object Detection JSON annotation file for your dataset. The specification for this can be found [here](http://cocodataset.org/#format-data). Note that we don't use some fields, so the following may be omitted:
- `info`
- `liscense`
- Under `image`: `license, flickr_url, coco_url, date_captured`
- `categories` (we use our own format for categories, see below)
- Create a definition for your dataset under `dataset_base` in `data/config.py` (see the comments in `dataset_base` for an explanation of each field):
```Python
my_custom_dataset = dataset_base.copy({
'name': 'My Dataset',
'train_images': 'path_to_training_images',
'train_info': 'path_to_training_annotation',
'valid_images': 'path_to_validation_images',
'valid_info': 'path_to_validation_annotation',
'has_gt': True,
'class_names': ('my_class_id_1', 'my_class_id_2', 'my_class_id_3', ...)
})
```
- A couple things to note:
- Class IDs in the annotation file should start at 1 and increase sequentially on the order of `class_names`. If this isn't the case for your annotation file (like in COCO), see the field `label_map` in `dataset_base`.
- If you do not want to create a validation split, use the same image path and annotations file for validation. By default (see `python train.py --help`), `train.py` will output validation mAP for the first 5000 images in the dataset every 2 epochs.
- Finally, in `yolact_base_config` in the same file, change the value for `'dataset'` to `'my_custom_dataset'` or whatever you named the config object above. Then you can use any of the training commands in the previous section.
#### Creating a Custom Dataset from Scratch
See [this nice post by @Amit12690](https://github.com/dbolya/yolact/issues/70#issuecomment-504283008) for tips on how to annotate a custom dataset and prepare it for use with YOLACT.
# Citation
If you use YOLACT or this code base in your work, please cite
```
@inproceedings{yolact-iccv2019,
author = {Daniel Bolya and Chong Zhou and Fanyi Xiao and Yong Jae Lee},
title = {YOLACT: {Real-time} Instance Segmentation},
booktitle = {ICCV},
year = {2019},
}
```
For YOLACT++, please cite
```
@article{yolact-plus-tpami2020,
author = {Daniel Bolya and Chong Zhou and Fanyi Xiao and Yong Jae Lee},
journal = {IEEE Transactions on Pattern Analysis and Machine Intelligence},
title = {YOLACT++: Better Real-time Instance Segmentation},
year = {2020},
}
```
# Contact
For questions about our paper or code, please contact [Daniel Bolya](mailto:dbolya@ucdavis.edu).
Owner
- Name: jisoo64
- Login: kimjisoo443
- Kind: user
- Repositories: 1
- Profile: https://github.com/kimjisoo443
milkkjs@naver.com