Science Score: 44.0%
This score indicates how likely this project is to be science-related based on various indicators:
-
✓CITATION.cff file
Found CITATION.cff file -
✓codemeta.json file
Found codemeta.json file -
✓.zenodo.json file
Found .zenodo.json file -
○DOI references
-
○Academic publication links
-
○Academic email domains
-
○Institutional organization owner
-
○JOSS paper metadata
-
○Scientific vocabulary similarity
Low similarity (10.5%) to scientific vocabulary
Repository
Basic Info
- Host: GitHub
- Owner: sheepmax
- License: cc-by-4.0
- Language: Jupyter Notebook
- Default Branch: main
- Size: 422 KB
Statistics
- Stars: 0
- Watchers: 0
- Forks: 0
- Open Issues: 0
- Releases: 0
Metadata Files
README.md
Teachbook Editor test in the TeachBooks template
The template allows you to test the TeachBook Editor:
You can test this in your own book linked to a GitHub repository or use this template repository.
Option 1: Test with your own book linked to a GitHub repository
- Add the following lines to your requirements.txt:
--extra-index-url https://test.pypi.org/simple/
teachbooks_software_project_extension_name==0.1.3
- Change the baseurl and repositoryurl properties in `book/config.yml
underhtmlandhtmlthemeoptionstohttps://.github.io/ / andhttps://github.com// ` respectively. The end result should look like this:
yaml
html:
      favicon : "figures/TB_favicon.ico"                 # Replace this with your own favicon
      baseurl : "https://<your_username>.github.io/<your_repository_name>/"
...
html_theme_options:
      ...
      repository_url: "https://github.com/_<your_username>_/_<your_repository_name>_"
- Add the extension
teachbooks_software_project_extension_nametobook/_config.ymlundersphinx - extra extensions. The end result should look like this:
yaml
sphinx:                                              # Options passed on to the underlying sphinx-parser
  extra_extensions:                                  # Gives you a starter package of extensions to use in your book
    ...
    - teachbooks_software_project_extension_name
Now checkout the progress of the publishing workflow under
Actions-All workflows-call-deploy-book-<the most recent workflow run>. Remember, the first commit which is there has failed because GitHub Pages wasn't activated at the time ofInitial commit.When the workflow has finished, visit your built TeachBook at
https://<username or organiszation_name>.github.io/<repository_name>(case sensitive). For our example it is https://dummydocent.github.io/testbookfrom_template/ for the shown repository. These links are visible in the action's summary as well, as shown in the figure of step 4.For creating the PAT, the user has to click the "Don't have an access token?" hypertext, which will redirect them to the GitHub page for creating a token. After that the user will have to write down the name of the token in the input box for Token name, change repository access to all repositories and go under permissions/repository permissions and change contents to read and write. When clicking Generate token, the user will be redirected to a page which displays the token. They have to copy and store that if they don't want to redo the token creation process again. After that is done, the user can input the token into the input box under "Enter GitHub Access Token", which would allow them access to the rest of the GitHub functionality.
To test the TeachBooks editor, click the 'edit page' button on the top of a page in your built book
Option 2: Test with this template book repository
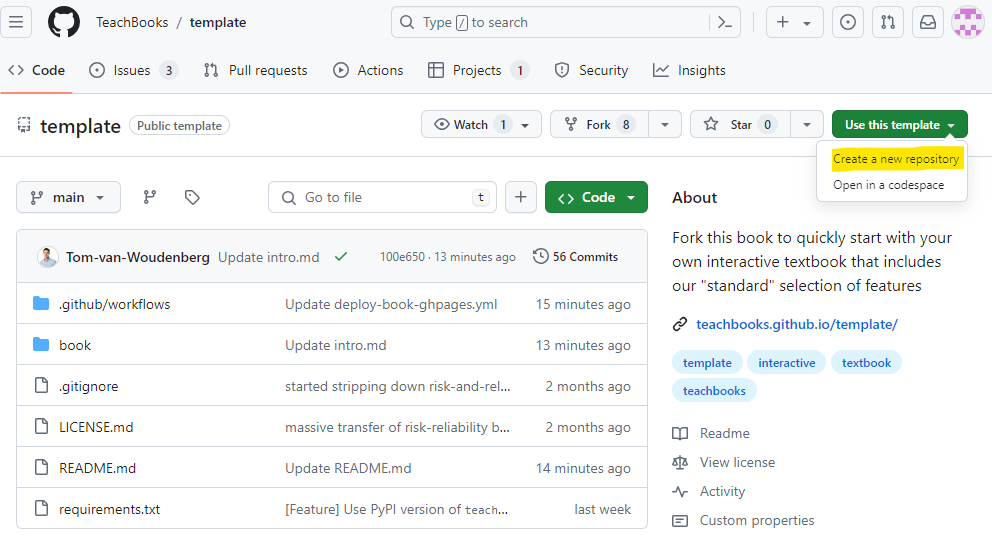
How to use the template is demonstrated in the figure below, all steps are elaborated on in the following step-by-step tutorial.
- To get started, use the template TeachBook as template:
- Fill in a repository name, this name will be used in the future url of your book:

- You need to activate GitHub pages so that your website is published to the internet. As long as you don't do this your TeachBook is not published online. Actually, now that you've taken this template our workflow tries to publish it to GitHub pages, which you didn't have the chance to activate yet. That's why you probably received an email with 'call-deploy-book: Some jobs were not successful' and you see the failed job under
Initial commit. You can activate GitHub pages by setting the source for GitHub pages to GitHub Actions underSettings-Pages-Build and deployment-Source-GitHub Actions:

- Change the baseurl and repositoryurl properties in `book/config.yml
underhtmlandhtmlthemeoptionstohttps://.github.io/ / andhttps://github.com// ` respectively. The end result should look like this:
yaml
html:
      favicon : "figures/TB_favicon.ico"                 # Replace this with your own favicon
      baseurl : "https://<your_username>.github.io/<your_repository_name>/"
...
html_theme_options:
      ...
      repository_url: "https://github.com/_<your_username>_/_<your_repository_name>_"
Now checkout the progress of the publishing workflow under
Actions-All workflows-call-deploy-book-<the most recent workflow run>. Remember, the first commit which is there has failed because GitHub Pages wasn't activated at the time ofInitial commit.When the workflow has finished, visit your built TeachBook at
https://<username or organiszation_name>.github.io/<repository_name>(case sensitive). For our example it is https://dummydocent.github.io/testbookfrom_template/ for the shown repository. These links are visible in the action's summary as well, as shown in the figure of step 3.For creating the PAT, the user has to click the "Don't have an access token?" hypertext, which will redirect them to the GitHub page for creating a token. After that the user will have to write down the name of the token in the input box for Token name, change repository access to all repositories and go under permissions/repository permissions and change contents to read and write. When clicking Generate token, the user will be redirected to a page which displays the token. They have to copy and store that if they don't want to redo the token creation process again. After that is done, the user can input the token into the input box under "Enter GitHub Access Token", which would allow them access to the rest of the GitHub functionality.
To test the TeachBooks editor, click the 'edit page' button on the top of a page in your built book
Owner
- Login: sheepmax
- Kind: user
- Repositories: 1
- Profile: https://github.com/sheepmax
Citation (CITATION.cff)
# This CITATION.cff file was generated with cffinit.
# Visit https://bit.ly/cffinit to generate yours today!

cff-version: 1.2.0
title: 'TeachBooks Template' # replace with your own book title when you use this template
authors: #replace with your own name(s) if you use this template
- email: info@teachbooks.io
  name: 'TeachBooks Development Team'
  website: 'https://teachbooks.io/'
message: 'If you use this teachbook, please cite it using these metadata.'
preferred-citation:
  type: book
  authors: #replace with your own name(s) if you use this template
  - email: info@teachbooks.io
    name: 'TeachBooks Development Team'
    website: 'https://teachbooks.io/'
#  - given-names: Tom
#    name-particle: van
#    family-names: Woudenberg
#    email: t.r.van.woudenberg@tudelft.nl
#    affiliation: TeachBooks
#    orcid: 'https://orcid.org/0000-0002-9536-061X'
  url: 'https://teachbooks.github.io/template/' # replace with your own URL (book website / publisher link) when you use this template
  identifiers:
    - type: url
      value: 'https://teachbooks.github.io/template/' # replace with your own URL when you use this template
      description: 'Published book on GitHub Pages'
    - type: url
      value: 'https://github.com/TeachBooks/template' # replace with your own URL when you use this template
      description: 'GitHub repository'
  abstract: >- # replace with your own abstract when you use this template
    The template allows you to start your own TeachBook and
    hosting that TeachBook online without knowledge on Git,
    the Jupyter book package, python or anaconda. It doesn't
    elaborate on the collaborative functionalities of Git or
    how to edit the book
  keywords: # replace with your own keywords when you use this template
    - TeachBooks
    - Template
    - 'Jupyter Book'
  title: 'TeachBooks Template' # replace with your own book title when you use this template
  institution:
    name: 'TeachBooks' # replace with your own institution when you use this template
  license: CC-BY-4.0
  license-url: 'https://creativecommons.org/licenses/by/4.0/'
  copyright: '© 2025 TeachBooks' # replace with your own affiliation / name when you use this template
  languages:
    - en # replace with your book language when you use this template
  contact: # replace with your own contact information when you use this template
  - email: info@teachbooks.io
    name: 'TeachBooks Development Team'
GitHub Events
Total
- Push event: 1
Last Year
- Push event: 1
Dependencies
- download_link_replacer *
- jupyterbook-patches *
- sphinx-exercise *
- sphinx-iframes *
- sphinx-image-inverter *
- sphinx-named-colors *
- teachbooks *
- teachbooks-sphinx-tippy *
- teachbooks_software_project_extension_name ==0.1.3